Offerings
To create a new Offering in the Marketplace, you need to:
- Assure that categories are configured in the Marketplace.
- Create at least one service provider.
- Create and activate a public offering.
Waldur supports a number of different types of service providers when creating a shared offering. A common way of creating an offering is through a HomePort.
OpenStack offering creation
-
Select organization, which will provide the offering.
-
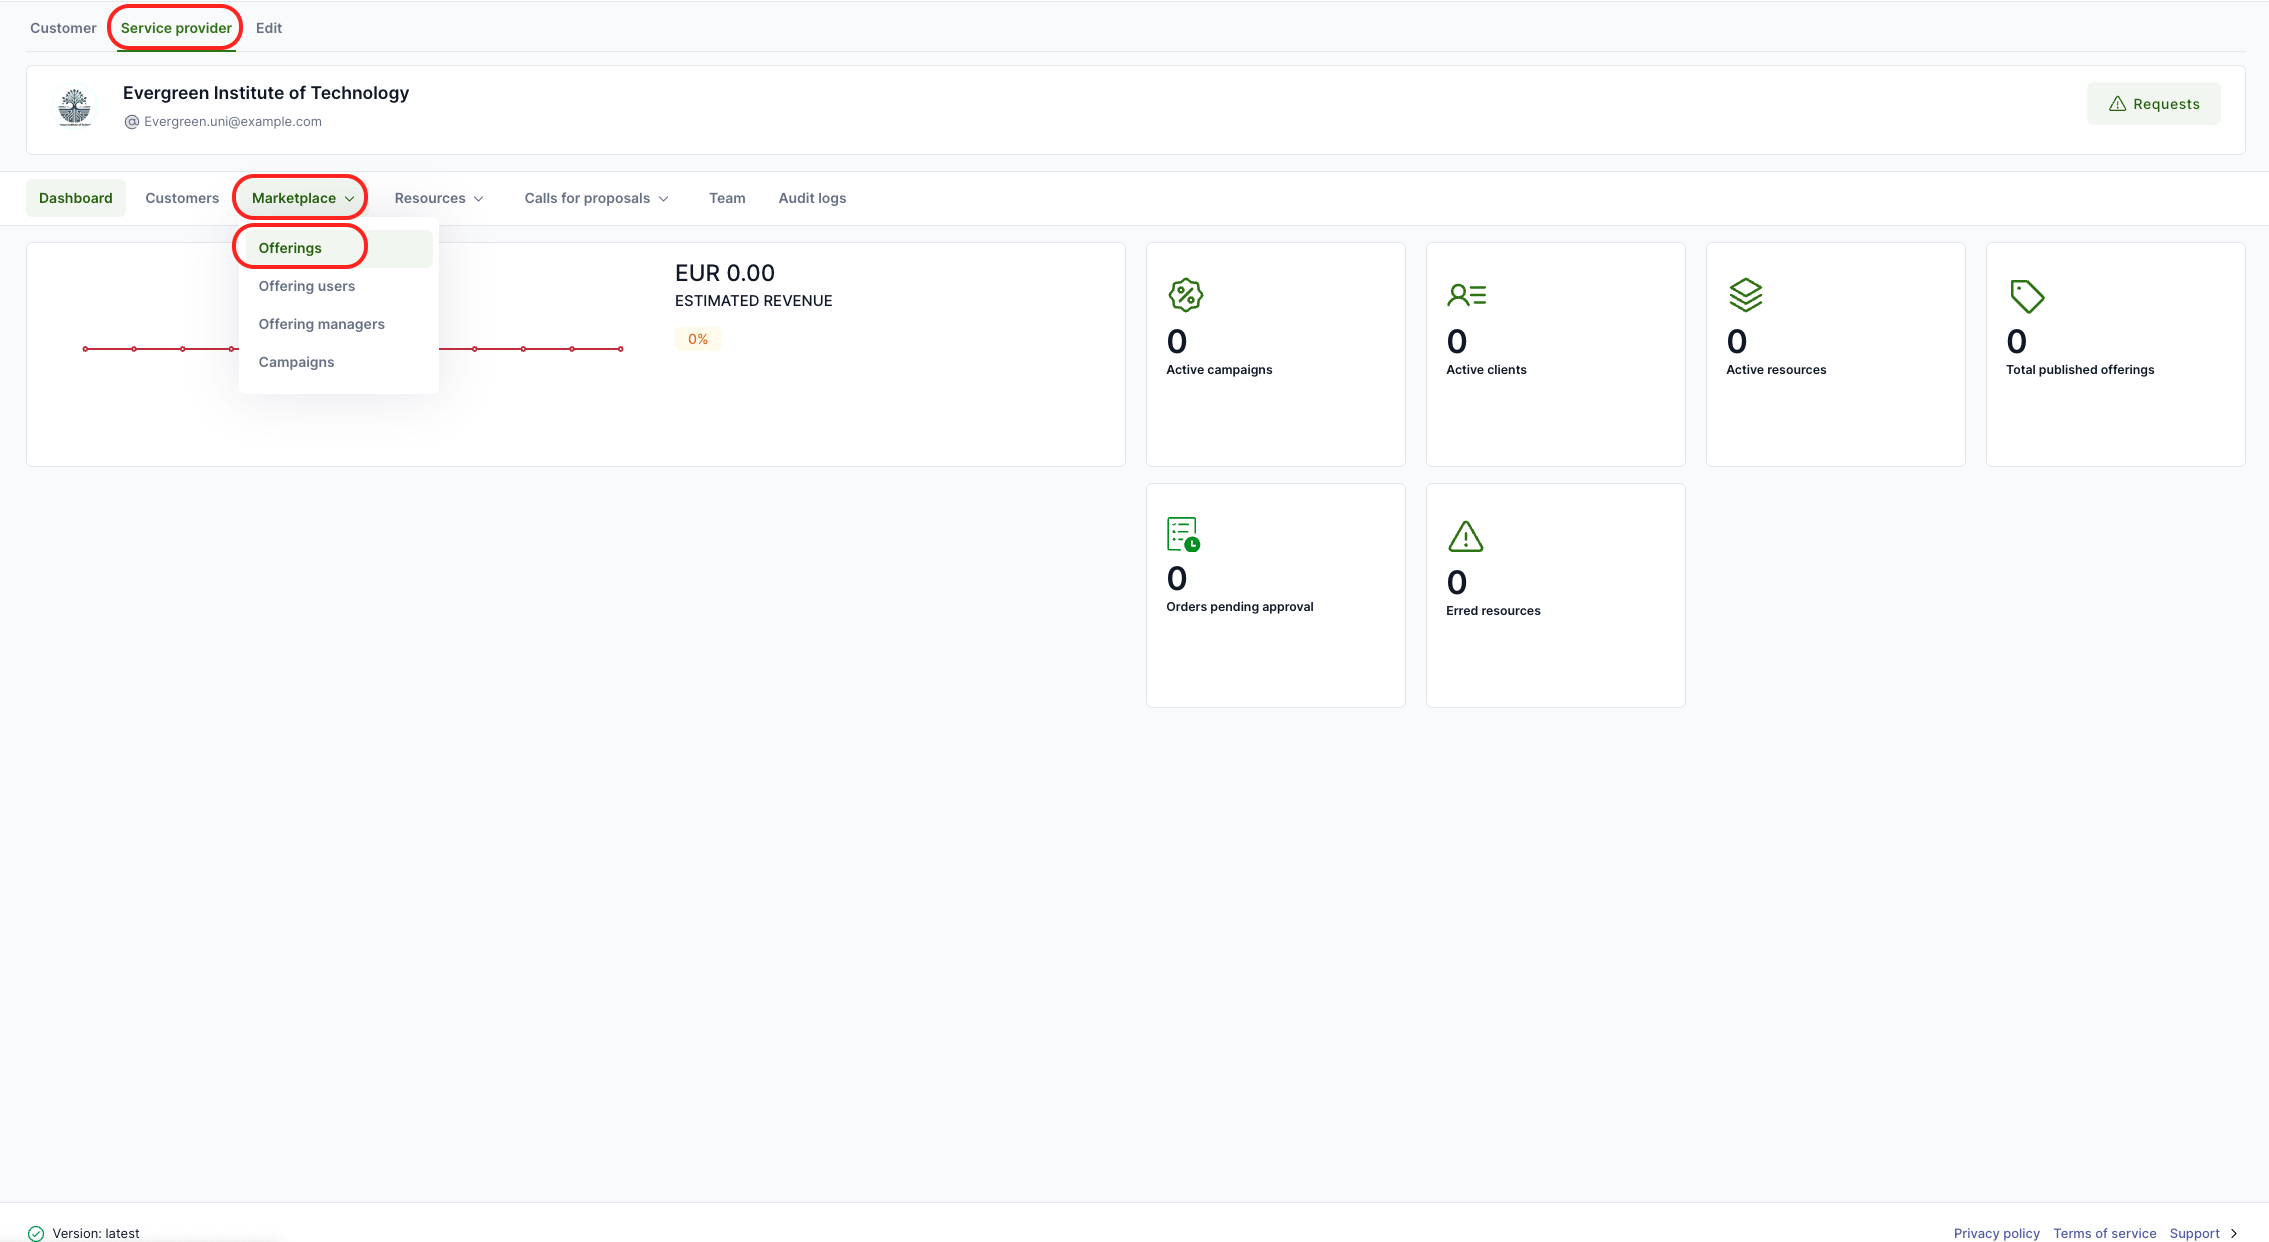
Go to Provider dashboard, click Marketplace -> Offerings from the top menu and then Add from the left.
-
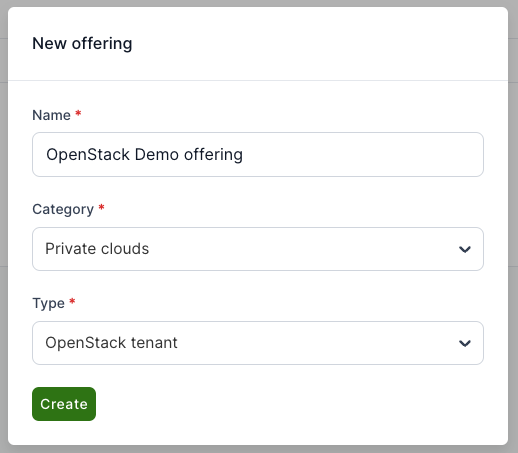
A popup opens, fill in the name for the offering, category (e.g. Private clouds) and type (OpenStack tenant) and click Create.
-
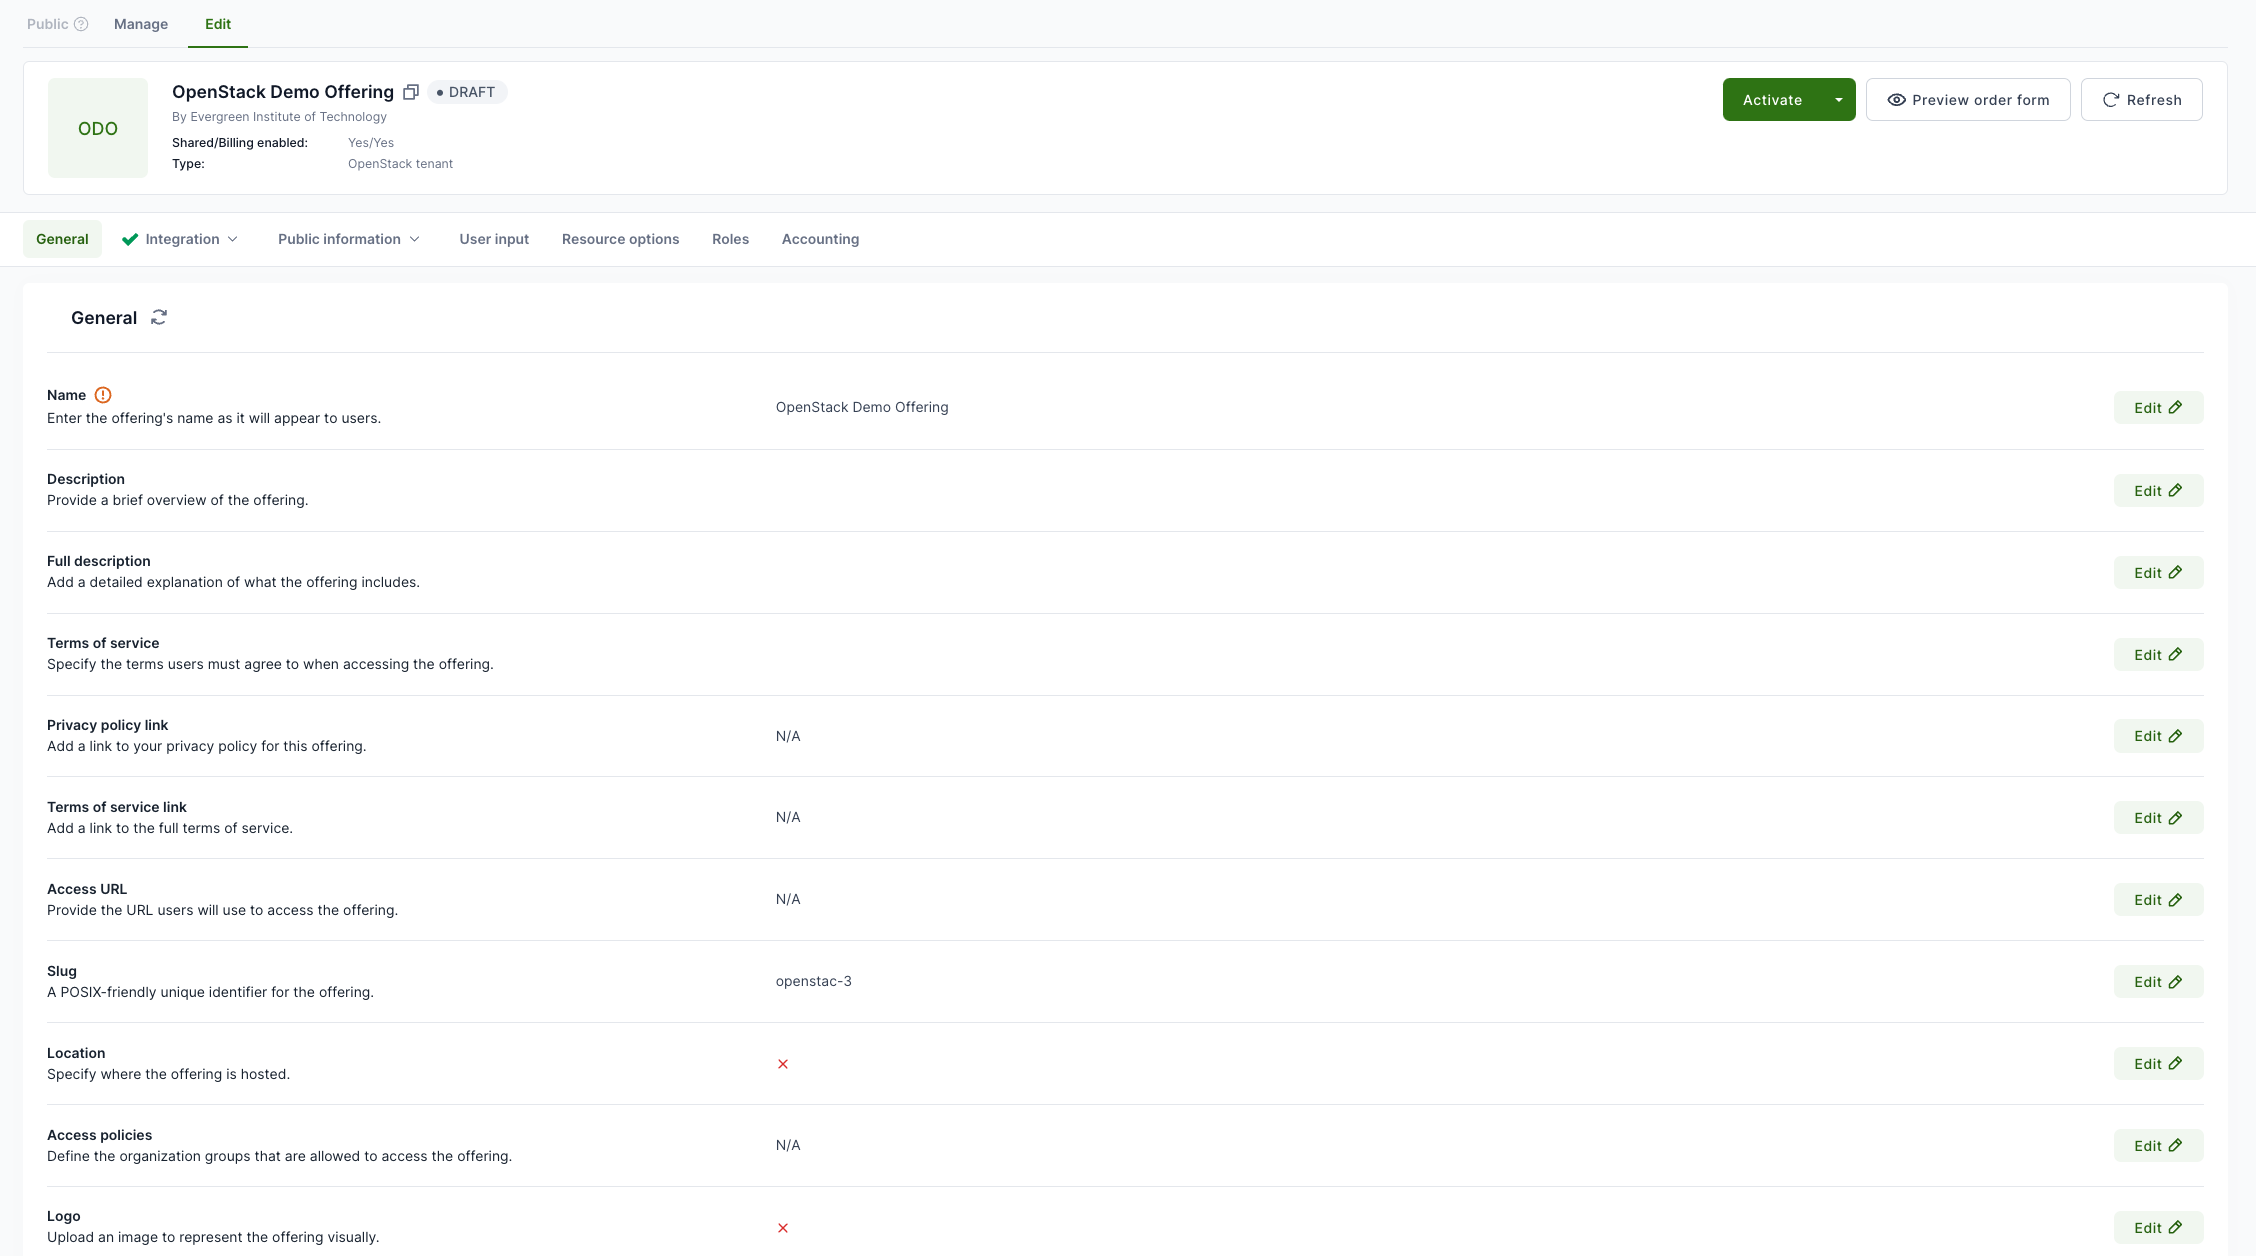
An offering configuration page opens with an option to edit different attributes.
-
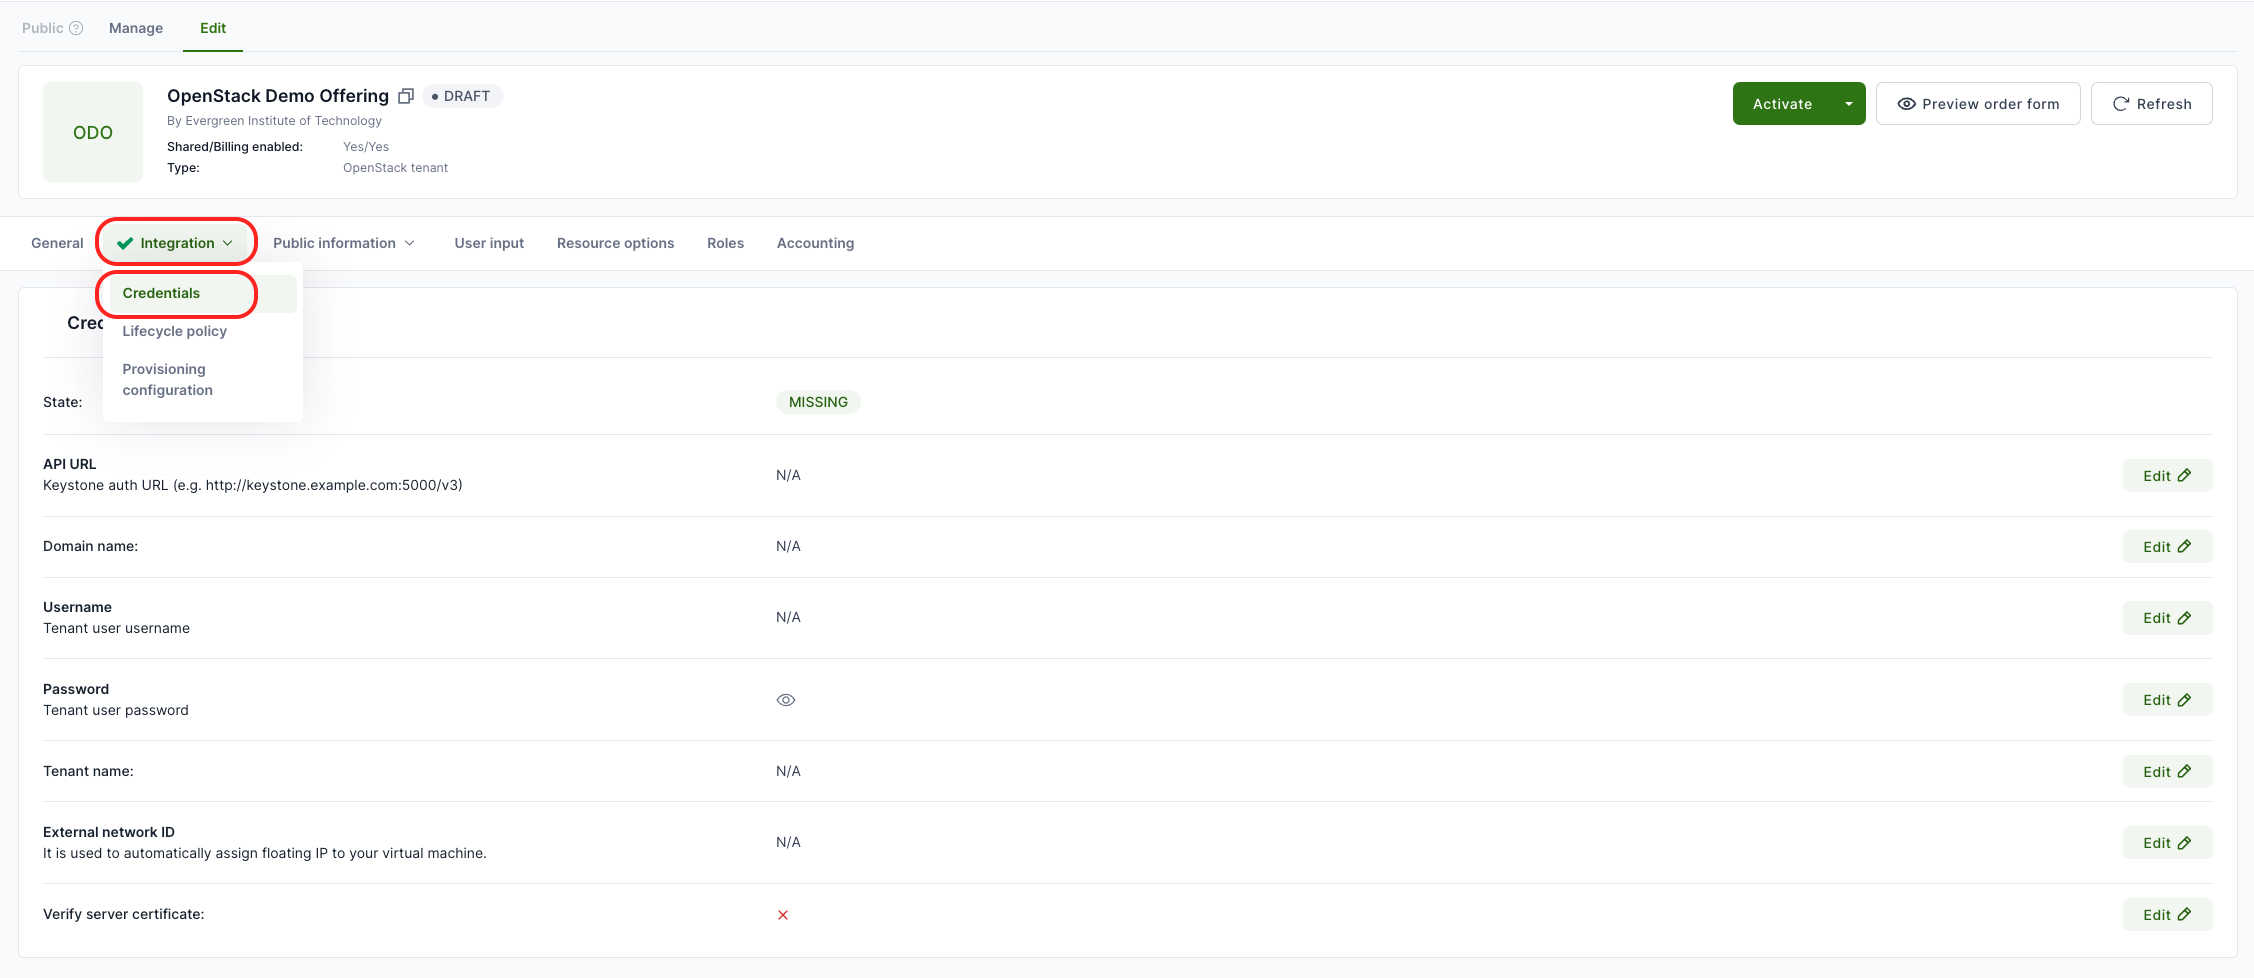
For the OpenStack integration, select Integration -> Credentials from the top menu. Fill in requested parameters.
- API URL - OpenStack deployment keystone URL
- Domain name - OpenStack domain name
- Username - Tenant user username
- Password - Tenant user password
- Tenant name - OpenStack tenant name
- External network ID - OpenStack extnet UUID
-
If everything is filled in, click on Synchronize in the top left corner. After few seconds, the State field will show OK if the integration is completed between Waldur and OpenStack.
-
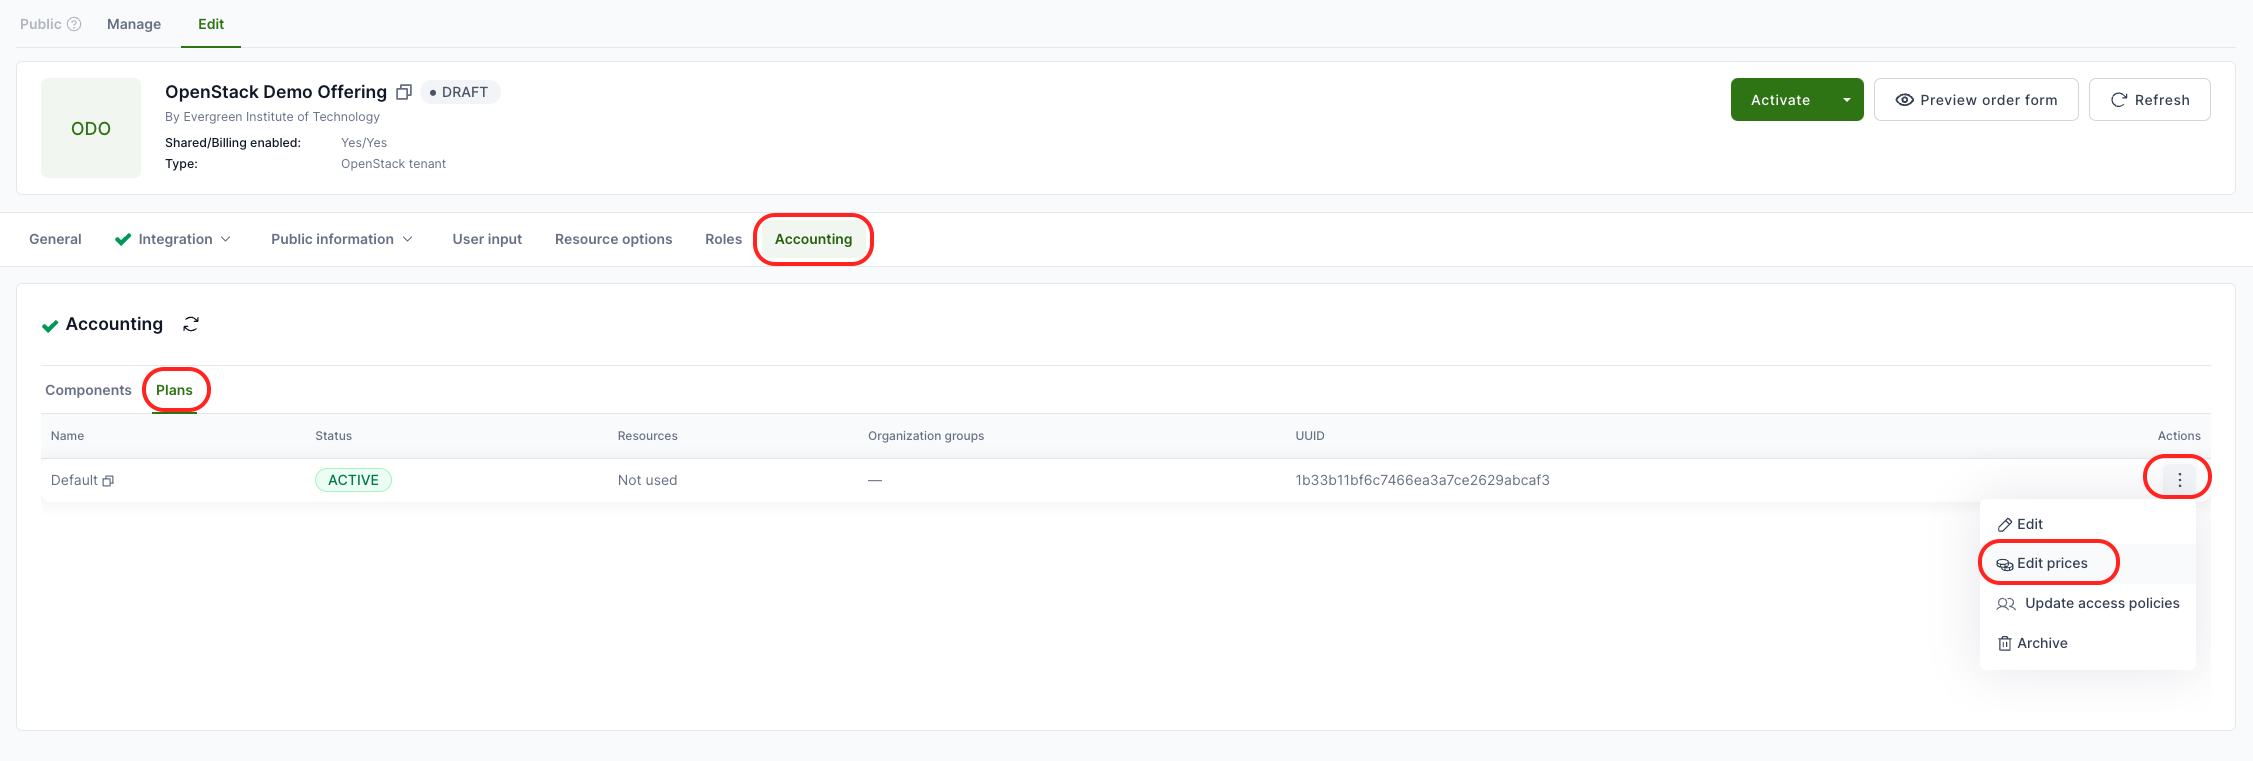
To adjust the accounting, select Accounting from the top menu. It opens on the Components tab, where the default accounting components (Cores, RAM and Storage) are already defined. To set their prices, switch to the Plans tab and choose Edit prices.
-
If everything is completed and ready, click on Activate in the upper right corner to publish the offering.
Provisioning configuration
The Integration → Provisioning configuration card groups options that change how instances and volumes are provisioned on the OpenStack backend. Most operators only need to touch a few of these; defaults are sensible.
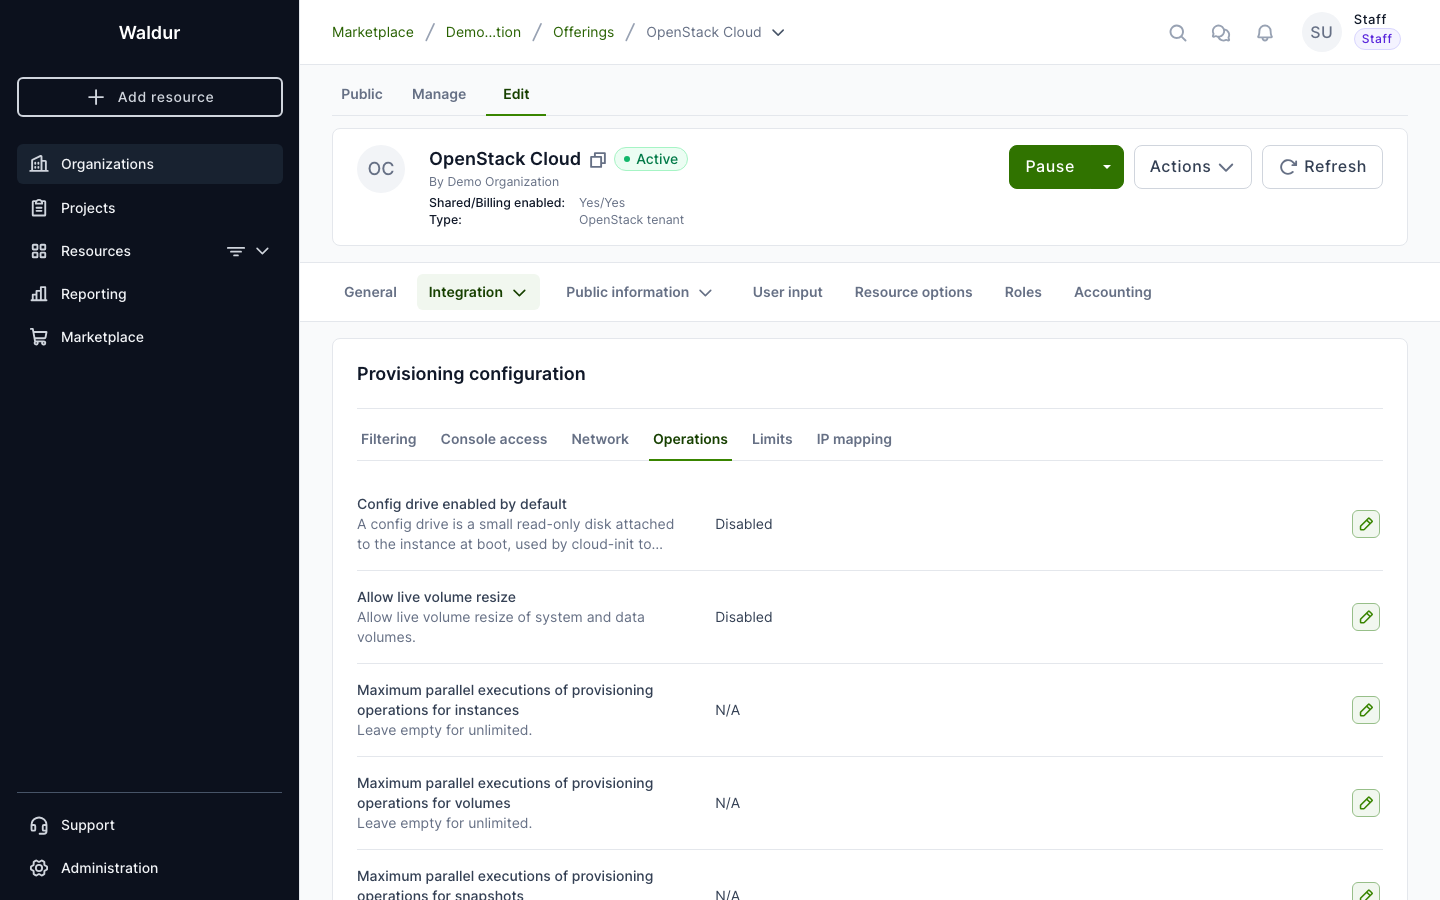
The card is split into tabs — Filtering, Console access, Network, Operations, Limits, IP mapping.
Config drive
The Operations tab includes a Config drive enabled by default toggle. A config drive is a small read-only disk attached to the instance at boot. Cloud-init reads metadata, the SSH key and any user-supplied start script from it, without going through the OpenStack metadata service on the network (http://169.254.169.254).
- Enable this when guests typically cannot reach the metadata service — for example, when tenant networks have no DHCP, or sit on an isolated segment.
- Leave it off when the metadata service is reachable, which is the usual case.
The toggle sets the provider-wide default. Users can override it per instance at order time (see Config drive in the customer guide).
SLURM offering creation
-
Select organization, which will provide the offering.
-
Go to Provider dashboard and click on Marketplace -> Offerings from the top menu and then click Add from the right.
-
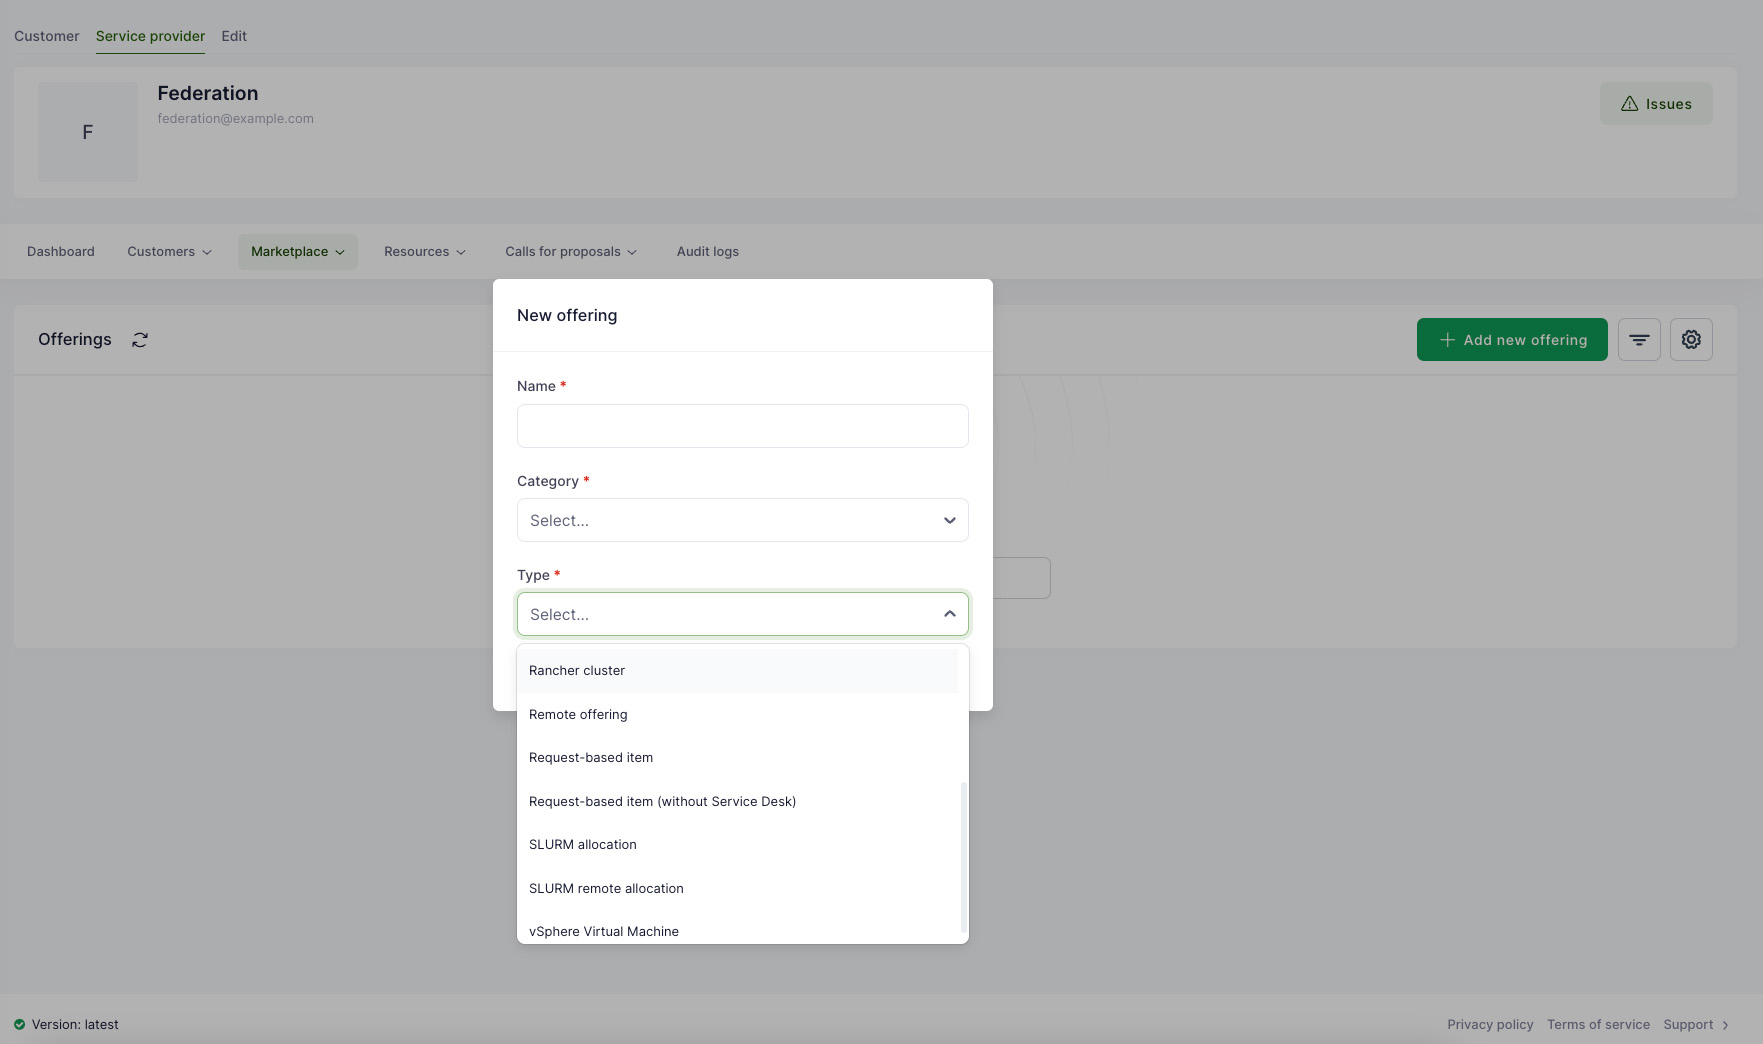
A popup opens, fill in the name for the offering, category and type.
-
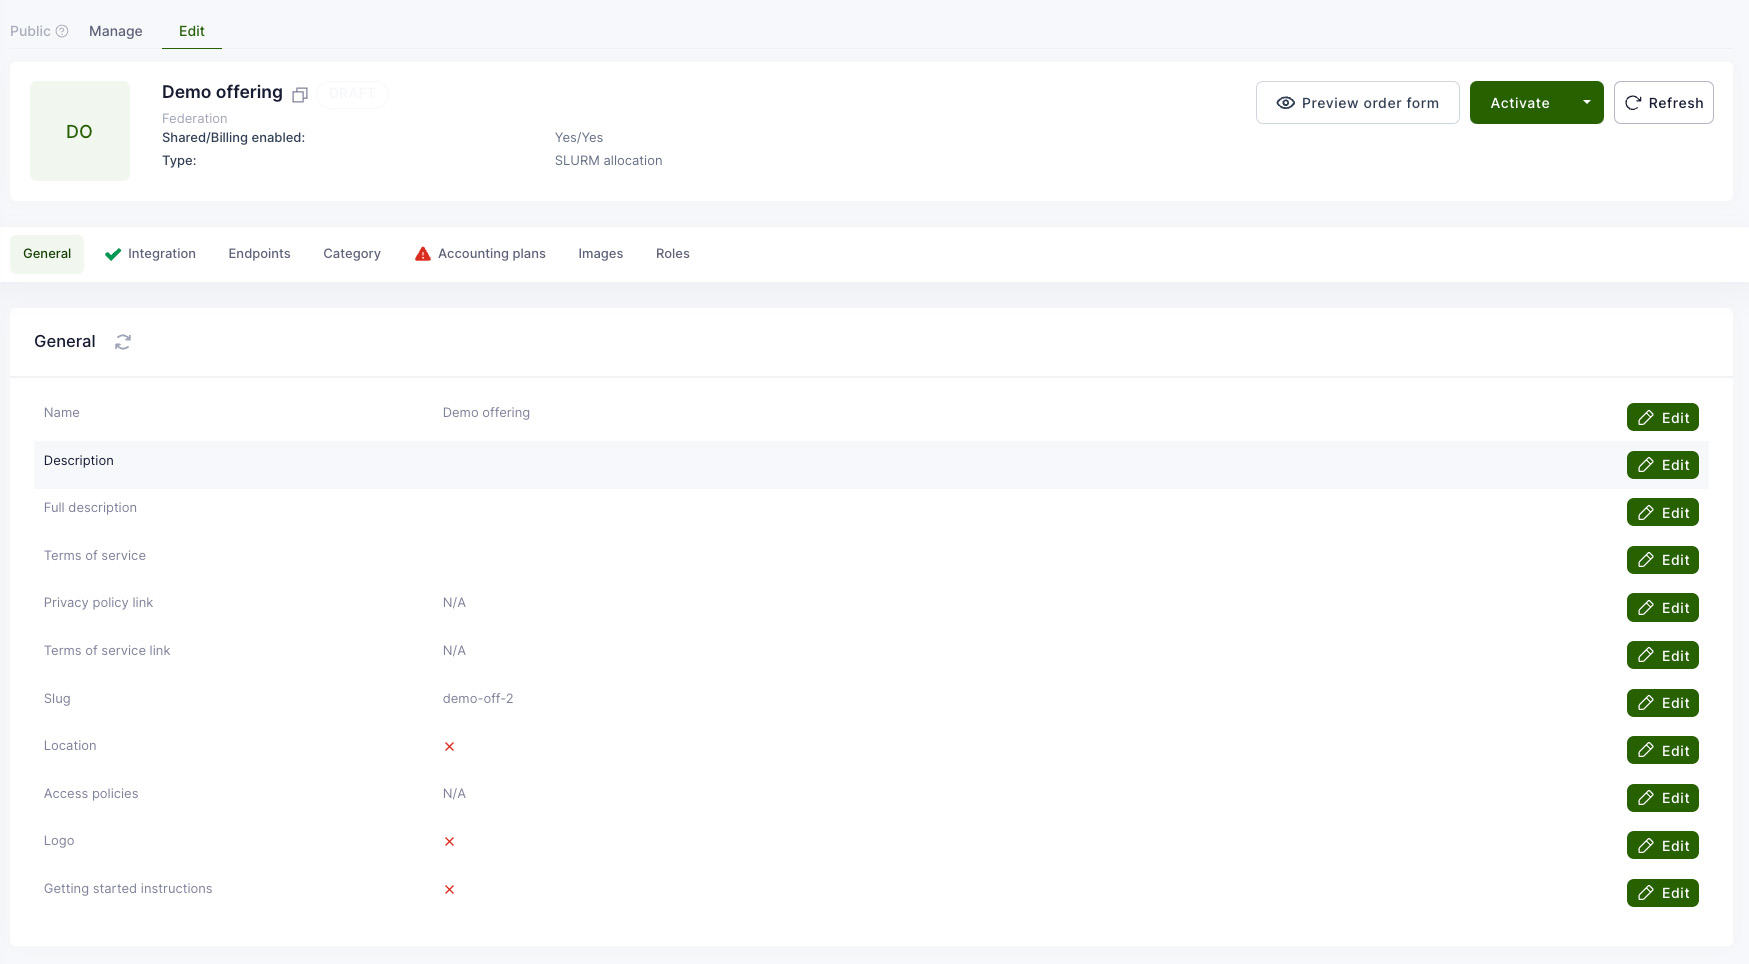
An offering configuration page opens with an option to edit different attributes.
-
Under Endpoints section, you can add access endpoints for the offering, for example, management consoles, SSH login nodes or similar.
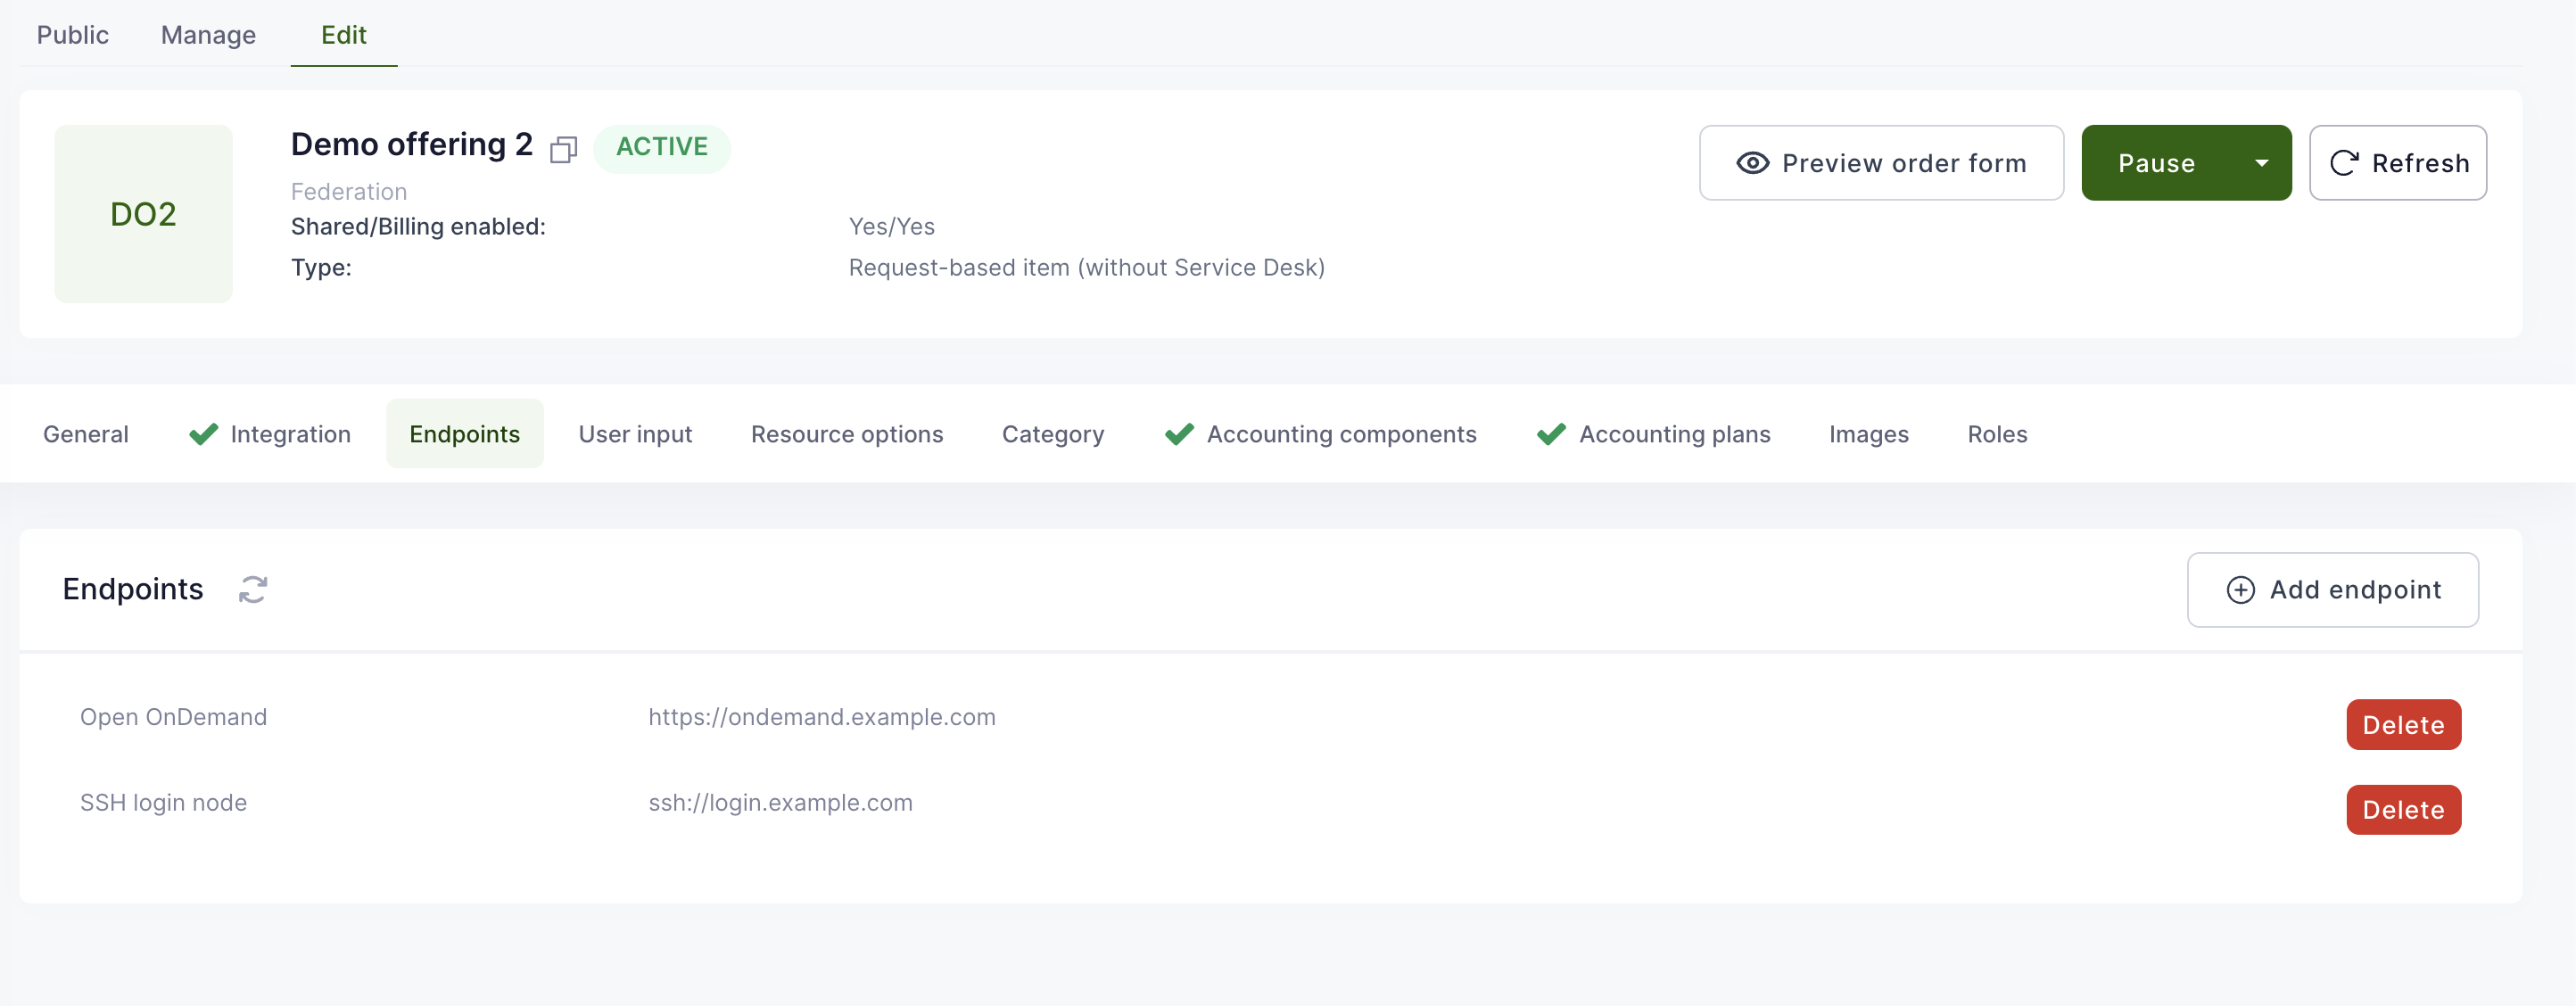
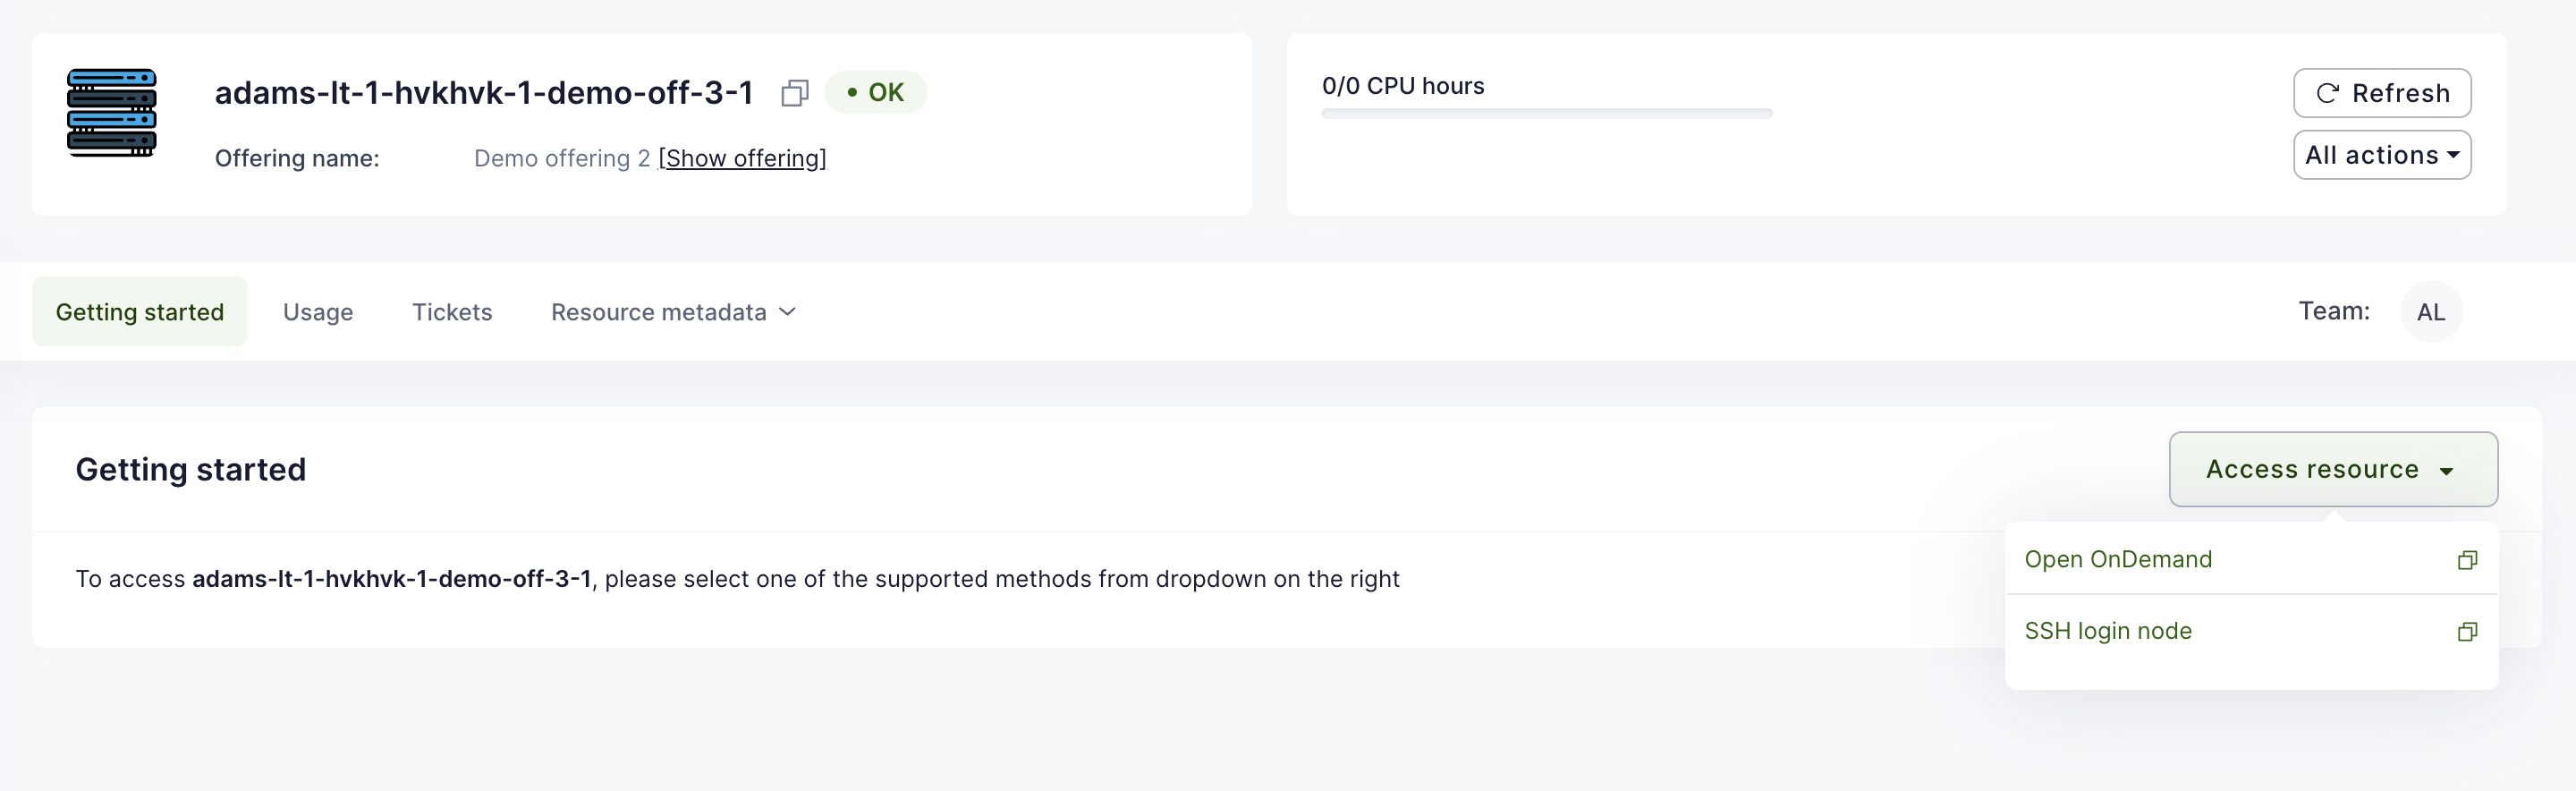
This configuration will display then to resource of the offering a menu for easier navigation to the corresponding services. For SSH protocol this would trigger opening of an SSH client if configured for the browser. Out of the box works on OS X and Linux, requires configuration of the default application on Windows.
-
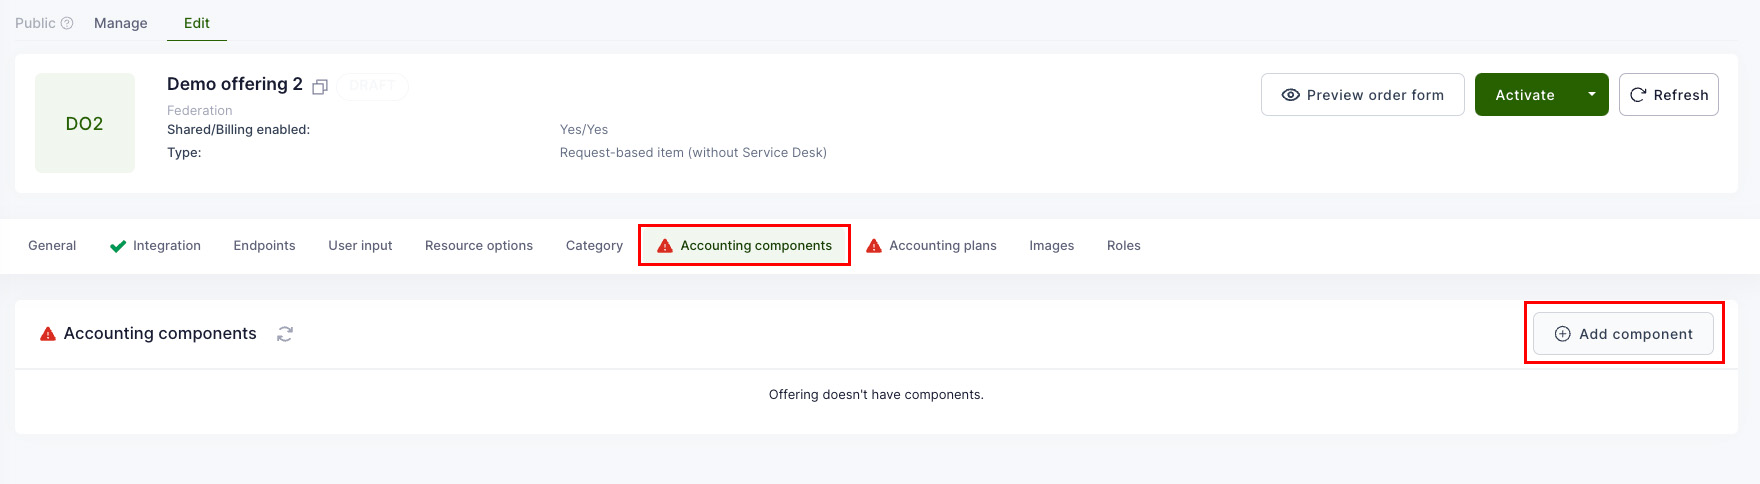
To add accounting components, select "Accounting components" from the top menu and then "Add component" from the right side. Accounting component is a measurable unit of a resource. For example, it can be CPU hours, GPU hours, storage hours, RAM etc.
-
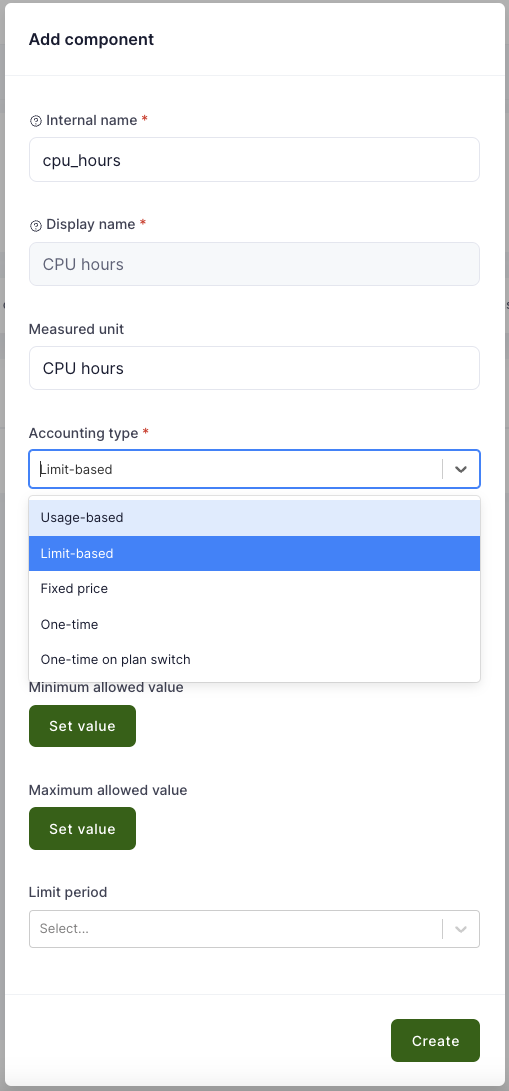
A popup opens with possibility to configure fields and select the accounting type (whether the component is billed by the usage, max limit or it has a fixed price).
- Usage-based - billing is applied according to the actual usage of the resource during the billing period defined in the accounting plan after the submission of a usage report;
- Limit-based - billing is applied according to the requested/updated limits of a resource, actual usage can be below the limits and it is not the basis of the billing;
- Fixed price - billing is applied according to the exact values defined by the service provider in the accounting plan, limits and usage are not the basis for the accounting;
- One-time - billing is applied once on resource activation;
- One-time on plan switch - billing is applied once on resource activation and everytime a plan has changed, using pricing of a new plan.
-
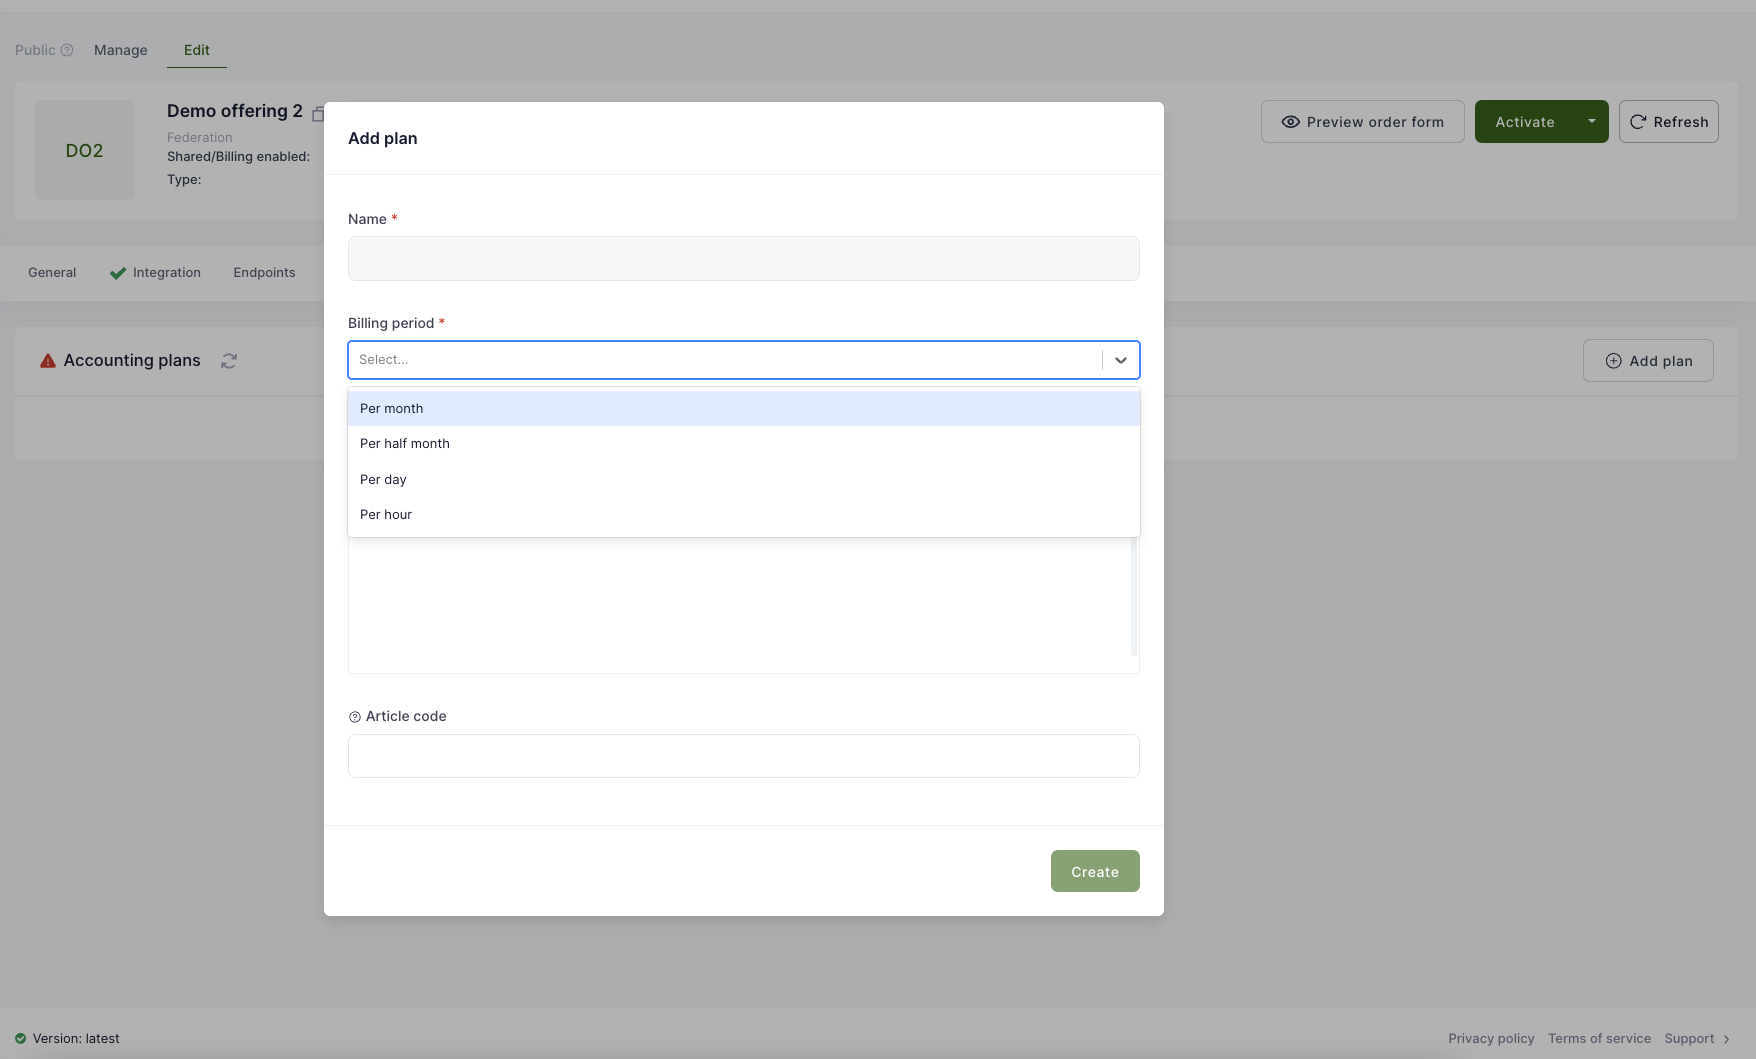
To configure accounting frequency and prices, select "Accounting plans" from the top menu and then "Add plan" from the right. Select a name for the plan and accounting frequency.
-
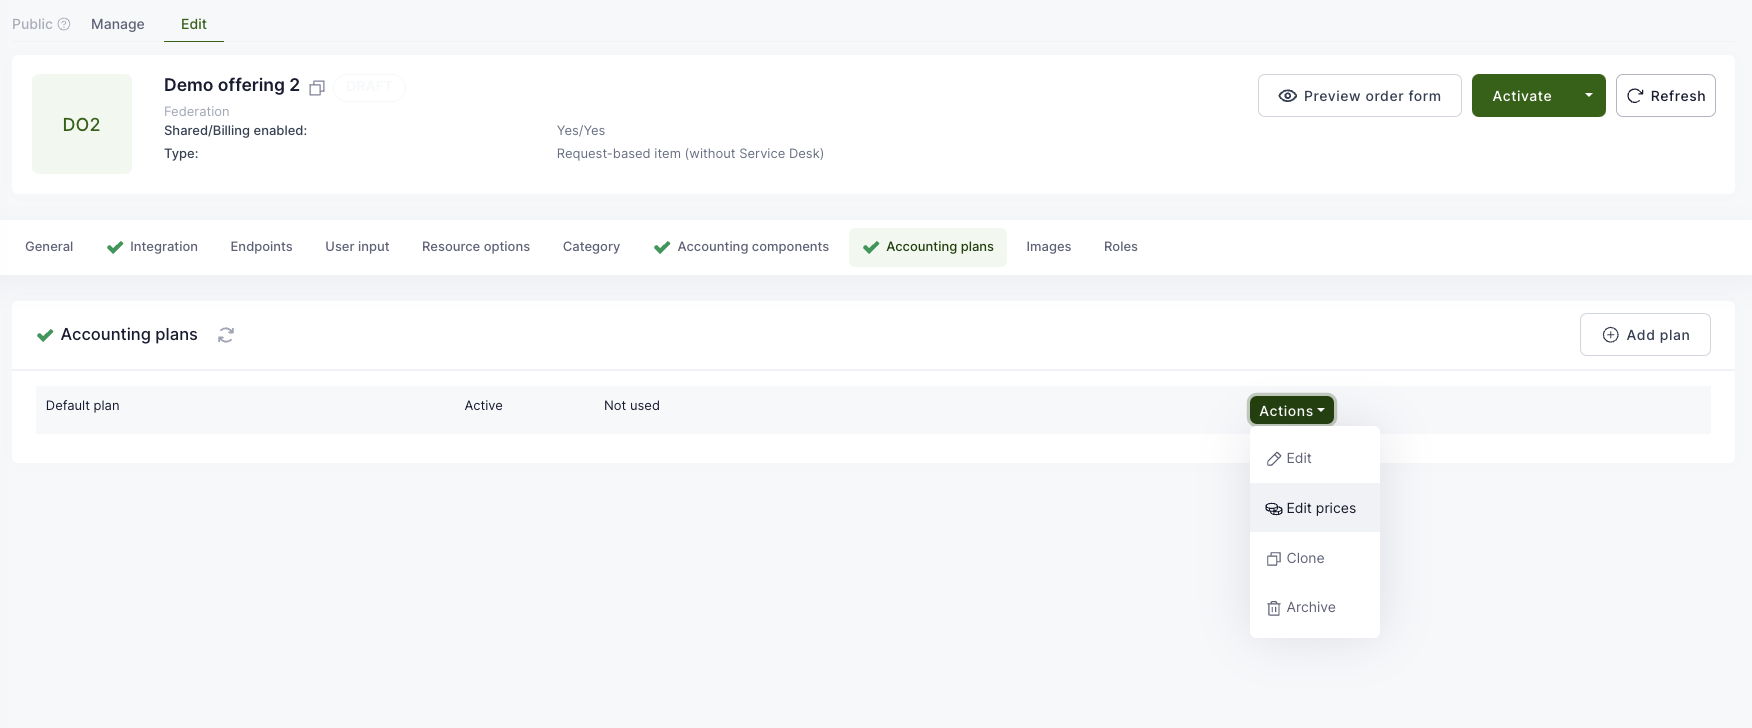
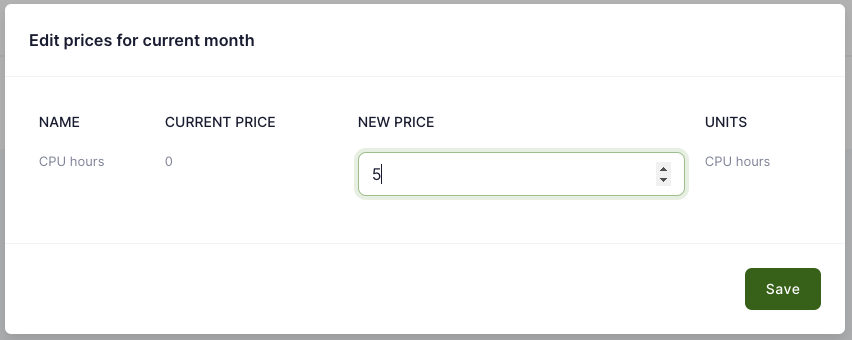
To define prices for the components, select "Actions" and then "Edit prices". Set new price and save. If there is a need to provide higher priority access to resources with different prices, then it is advised to create another offering for this kind of cases.
-
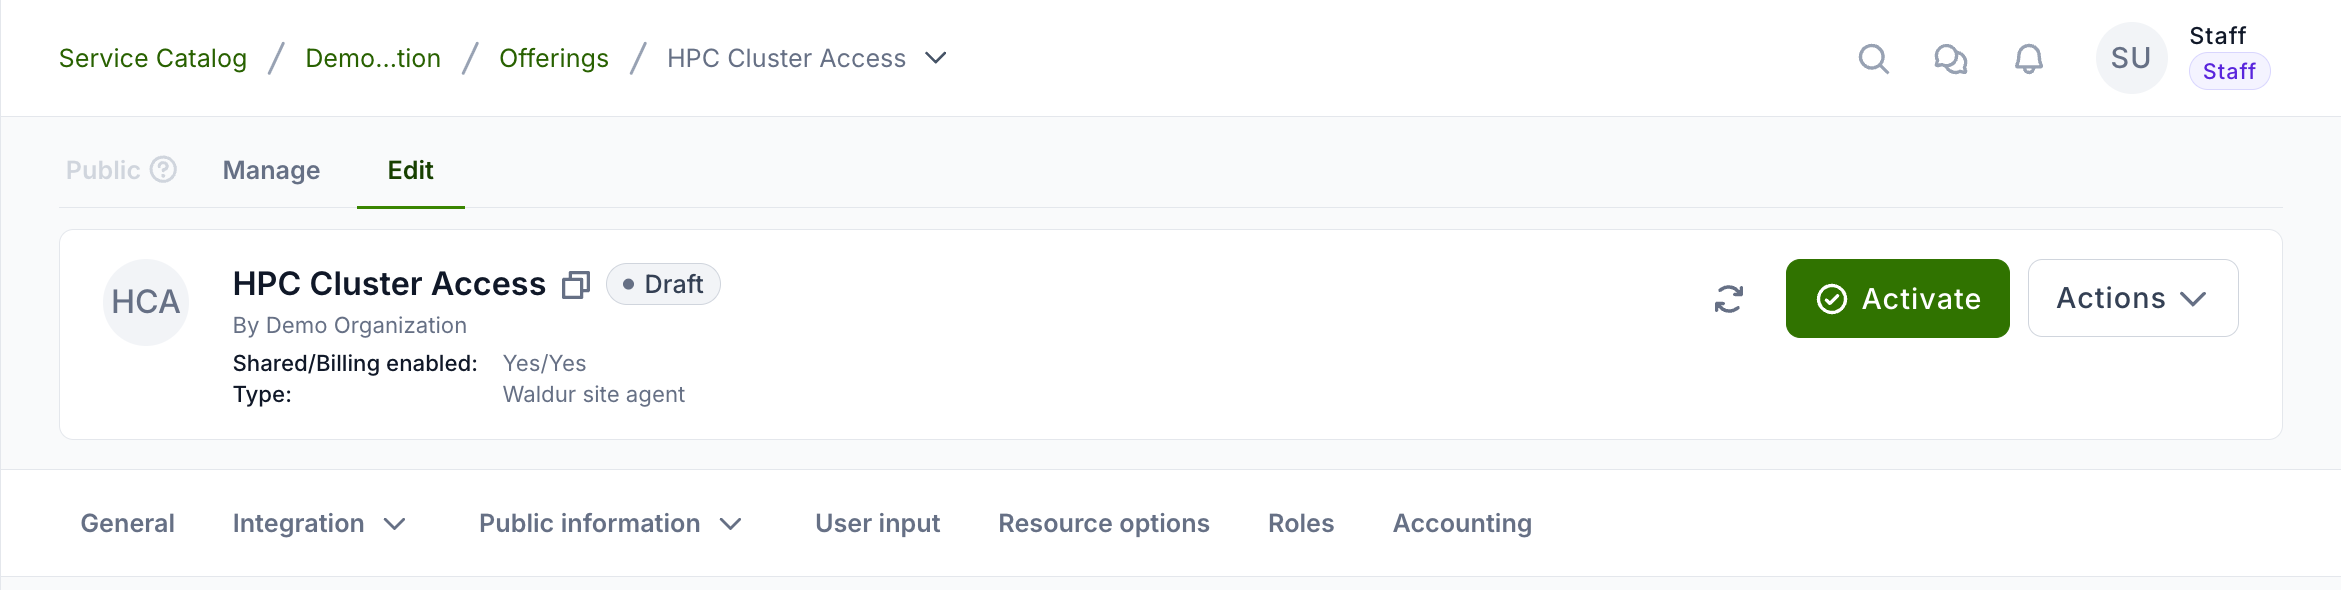
If all set, click "Activate" on the top-right side to make it visible to everybody.
Tip
For more advanced cases of management of offerings, take a look at how a SLURM offering can be managed using Ansible module.
Configuring billing model per component
Waldur supports configuring the billing model for each component individually. The same OpenStack Tenant offering type can have different billing configurations depending on the use case:
- Monthly billing (default): Components use Limit-based accounting type. Customers are billed monthly based on their reserved limits (e.g., 4 cores × €1/core/month).
- Prepaid billing: Components use One-time accounting type with the Pre-paid option enabled. Customers pay upfront for the full duration (e.g., 4 cores × €1/core/month × 3 months = €12 total).
Default: Limit-based (monthly billing)
By default, OpenStack Tenant offerings come with three built-in components — Cores, RAM, and Storage — all configured as Limit-based with monthly billing.
Switching all components with "Switch modes"
The fastest way to switch between monthly and prepaid billing is the Switch modes dropdown on the Accounting → Components tab. It combines both billing mode and storage mode options in one menu:
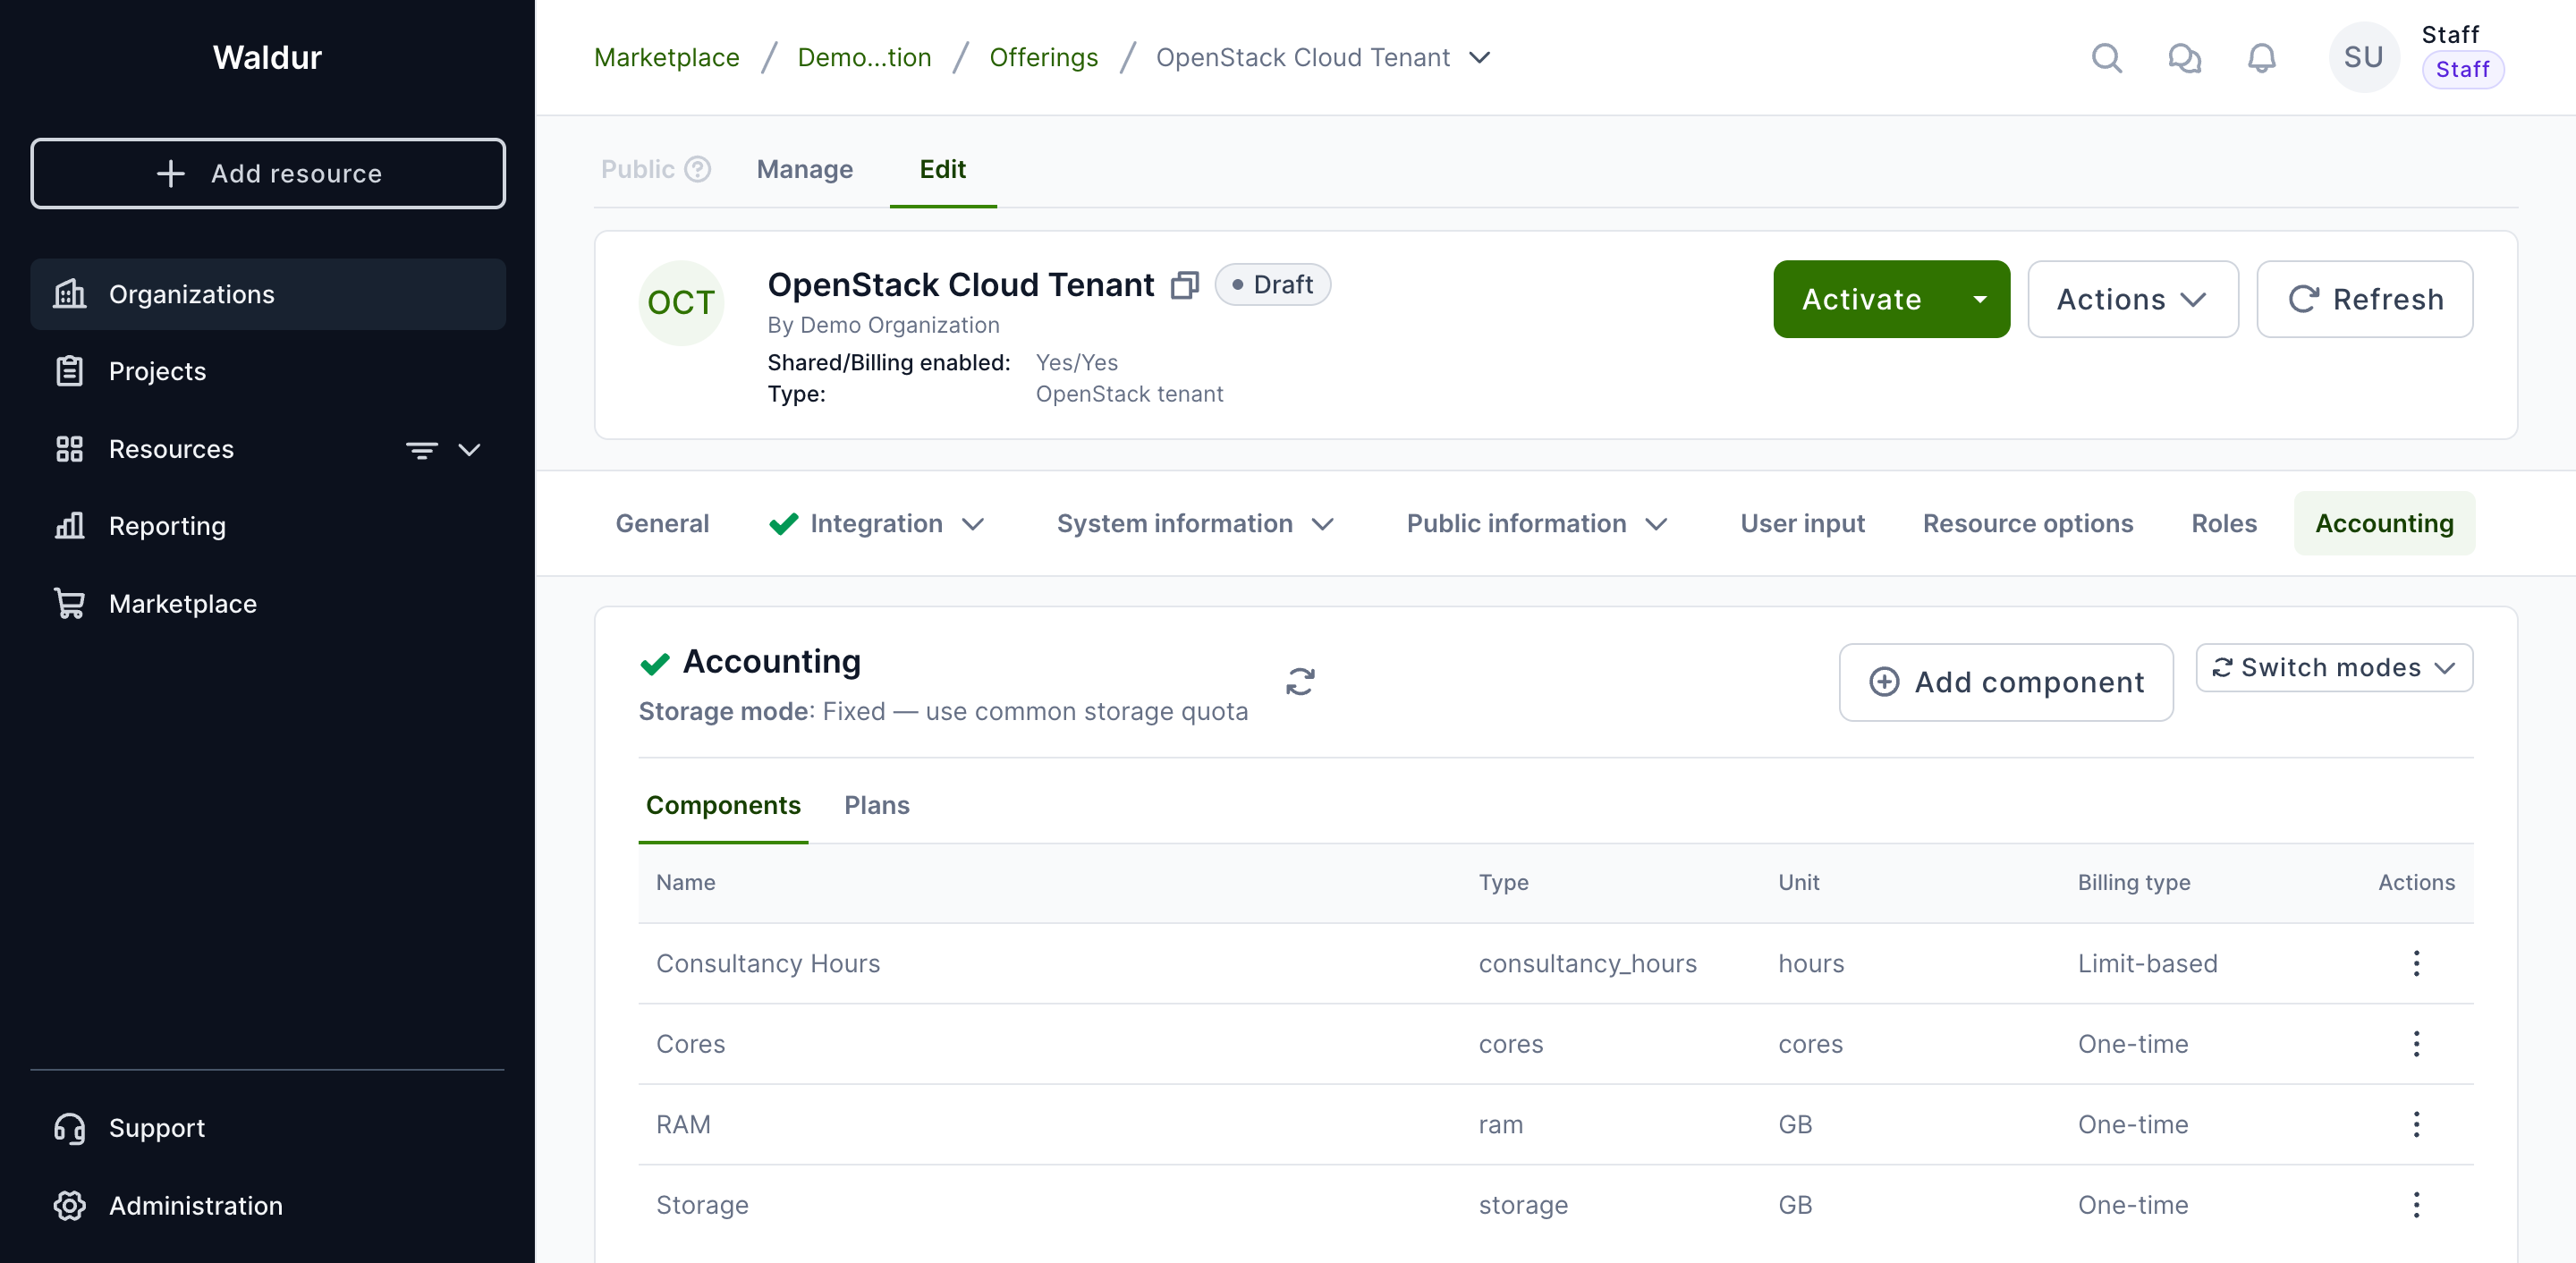
Click Switch modes → Billing mode to open a dialog where you can select the billing model for all infrastructure components at once:
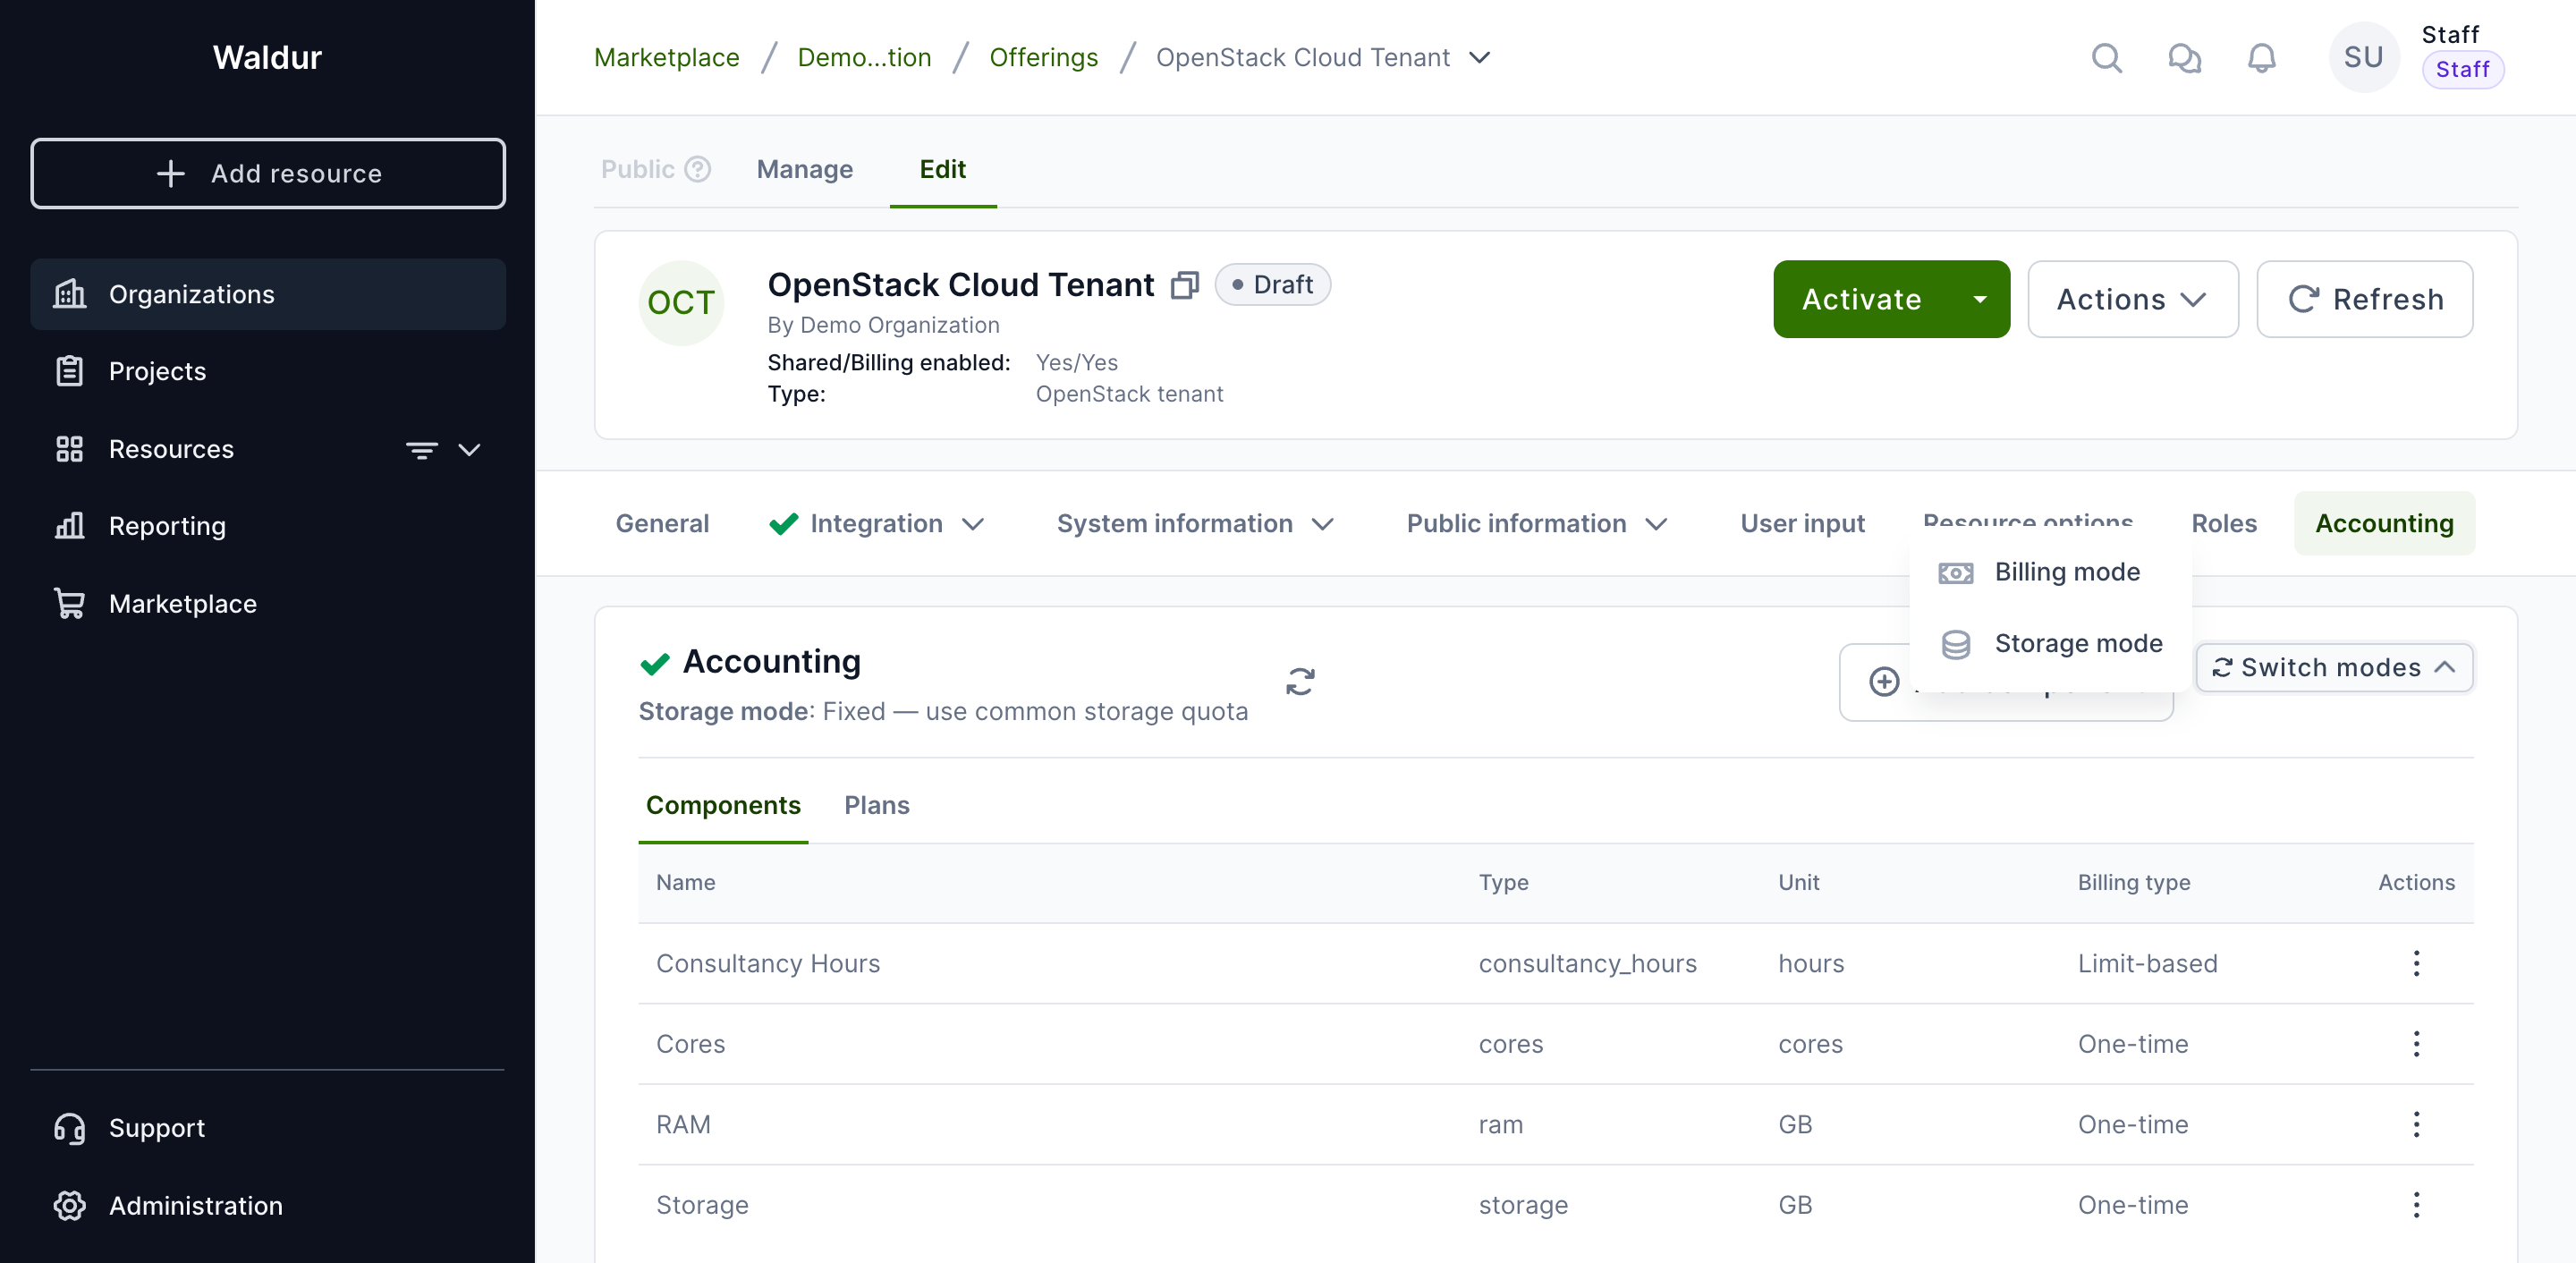
After selecting "Prepaid (One-time)" and saving, all built-in components (Cores, RAM, Storage) switch to "One-time" (prepaid). Custom components like "Consultancy Hours" are not affected.
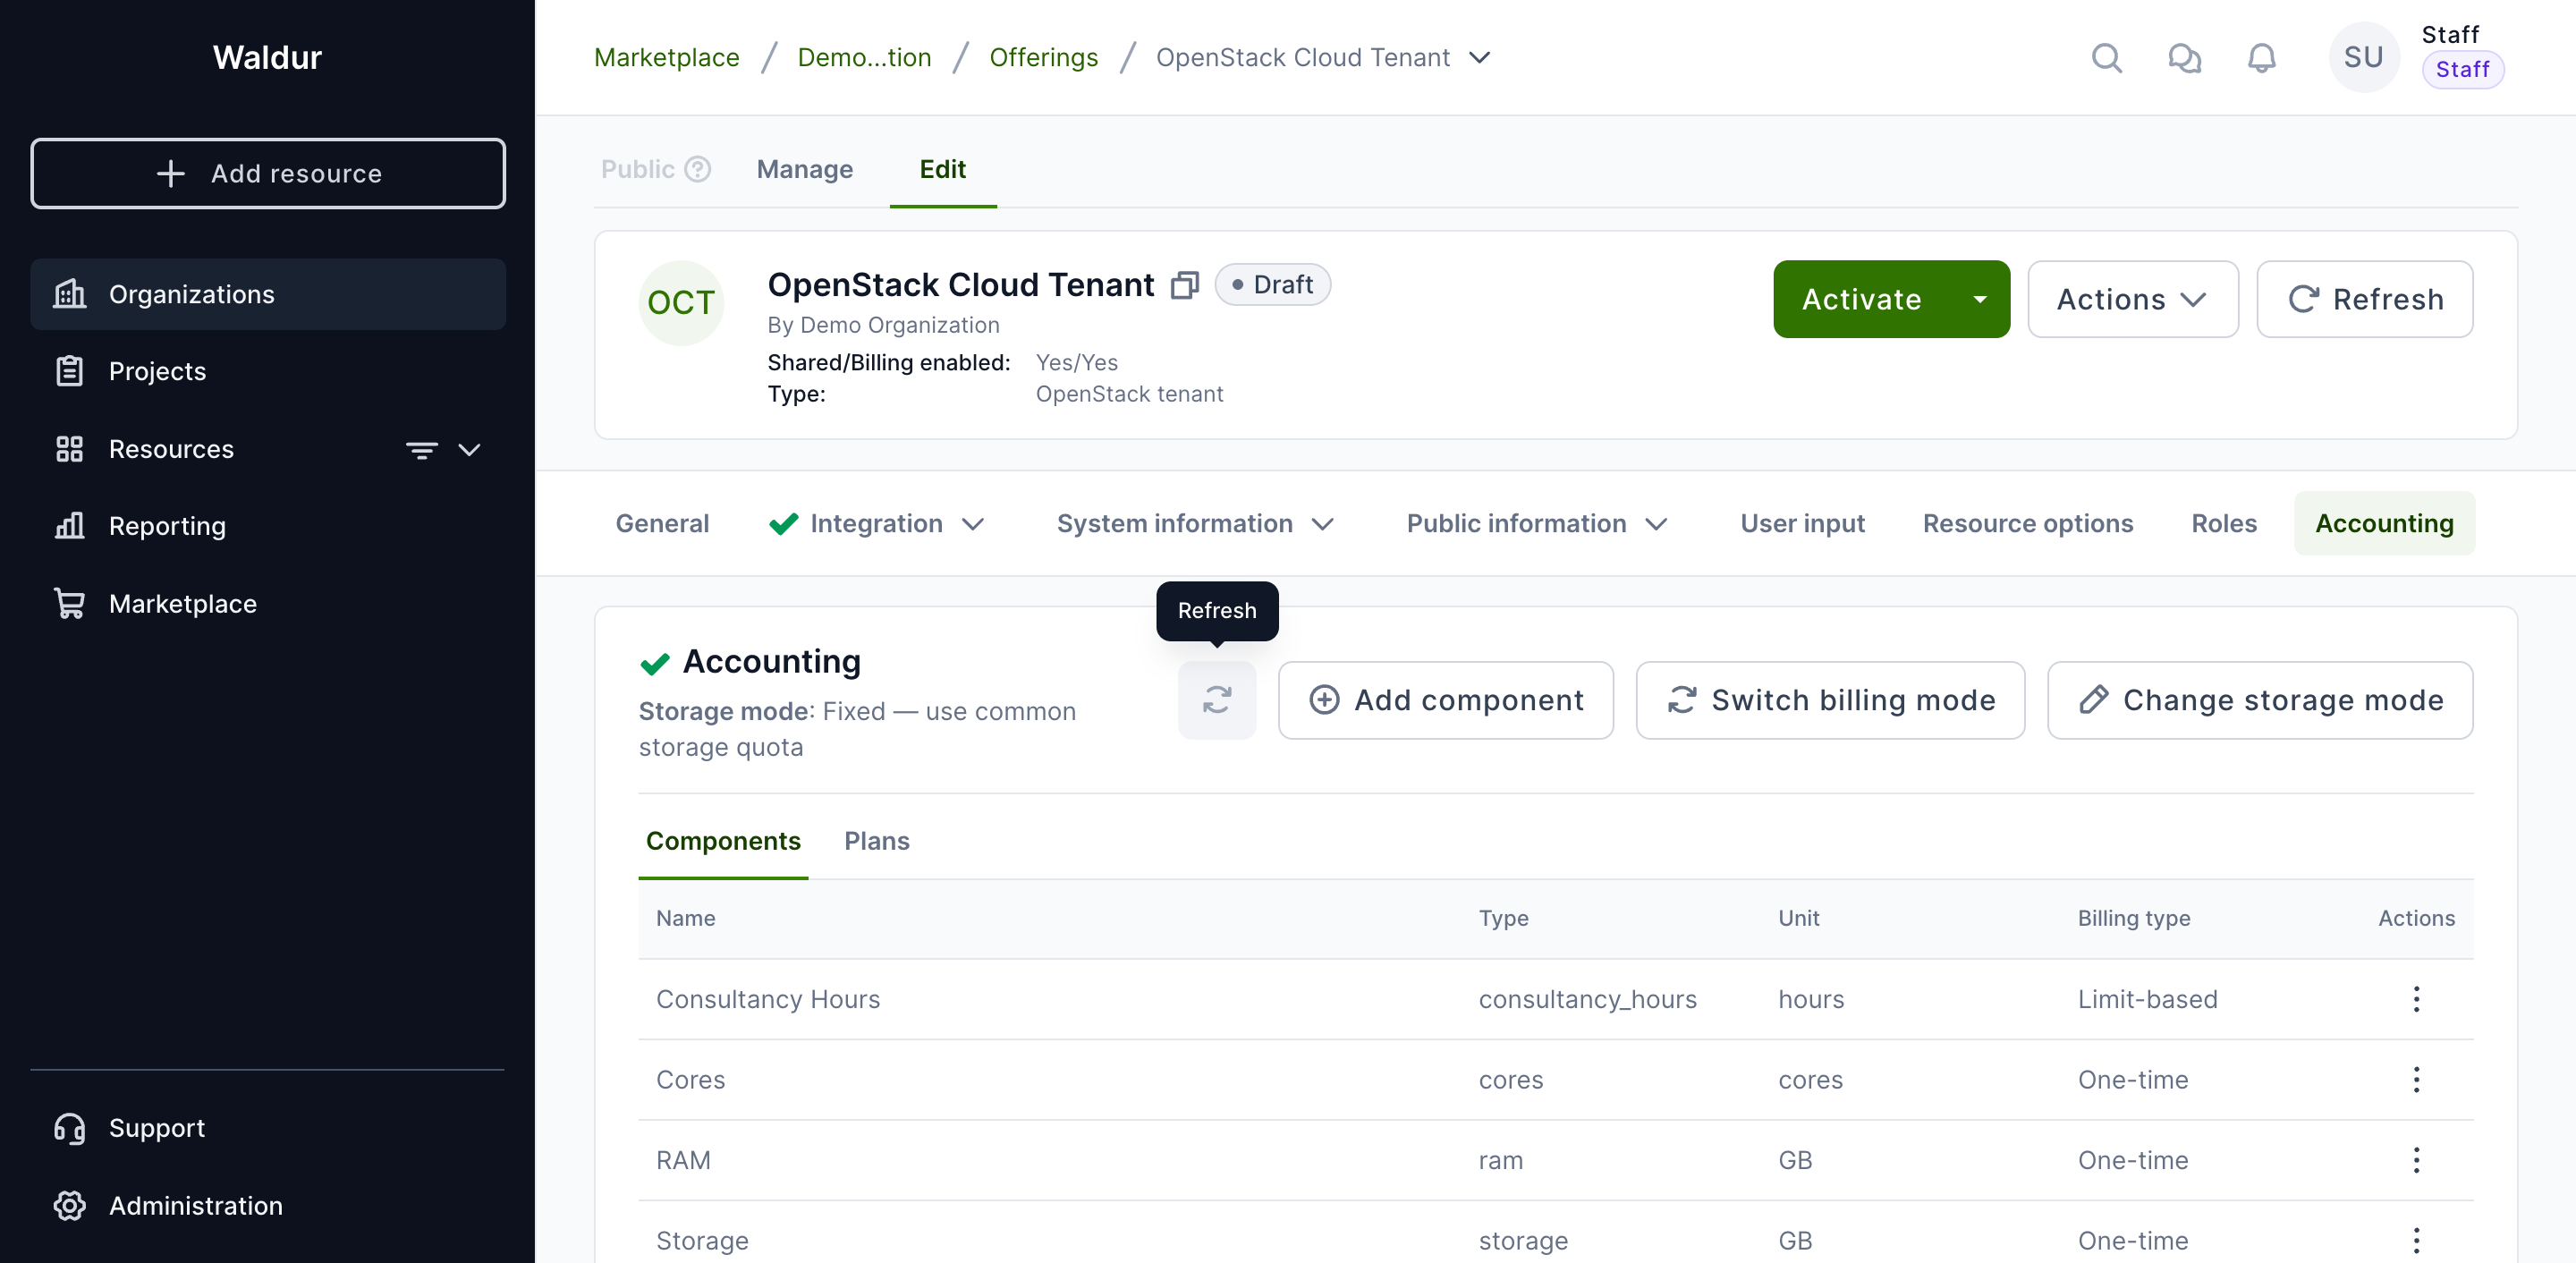
Switching individual components
You can also configure each component individually:
- Navigate to the offering's Edit → Accounting → Components tab.
- Click the action menu (⋮) on the component you want to change and select Edit.
- Change the Accounting type from "Limit-based" to "One-time".
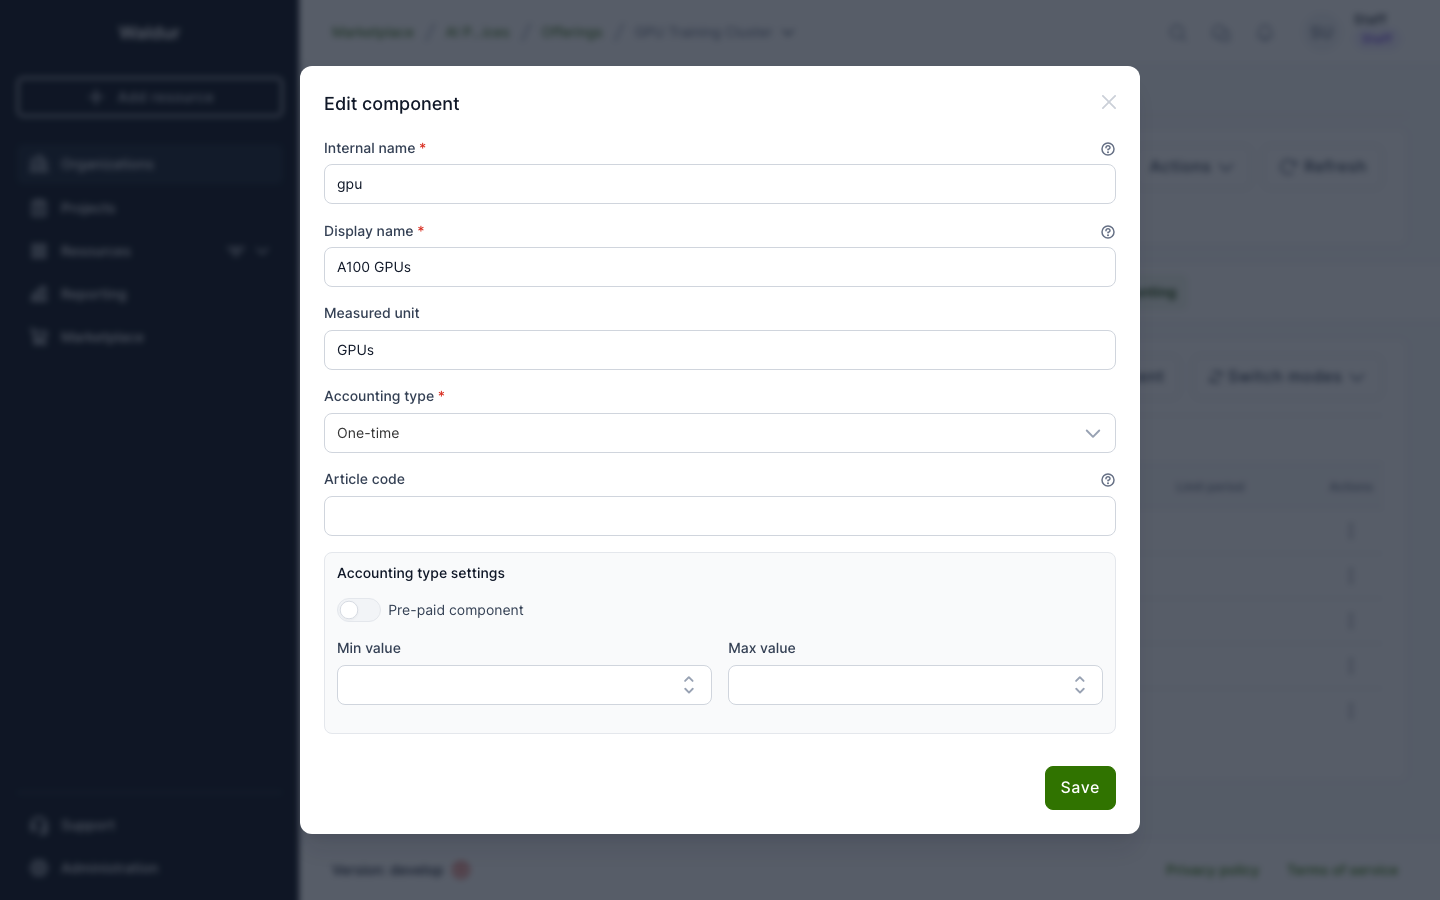
- Enable the Pre-paid component toggle.
- Optionally configure duration constraints (min/max duration, renewal settings).
- Click Save.
This allows mixed configurations — for example, CPU and RAM as prepaid while Storage remains monthly.
One-time components also support Min value and Max value constraints, which limit the quantity a customer can order. These fields appear alongside the Pre-paid toggle in the component edit dialog.
Note
For prepaid offerings, the Termination date (end date) is required when ordering. The total upfront charge is calculated as price × limit × months.
How billing works for each model
| Billing model | Invoice frequency | Formula | Limit changes |
|---|---|---|---|
| Limit-based (monthly) | Every month | price × limit per month |
Adjusted on current month's invoice |
| Usage-based | Every month, as usage is polled | price × accumulated usage (for example core-hours) |
Not applicable: quotas cap usage and are not billed |
| One-time + prepaid (upfront) | Once at creation | price × limit × months |
Supplementary charge for (new - old) × remaining months |
| Limit-based / Total (one-time) | Once at creation | price × limit |
Incremental charge for difference |
Allowing fractional limits
By default a component limit is a whole number: a customer ordering storage can ask for 10 GB but not 10.5 GB. Some resources are naturally fractional — storage measured in TB, GPU shares, a budget in currency — and rounding them up charges the customer for capacity they did not ask for.
Decimal places on the component edit dialog controls this. Set it to 1 or 2 to let customers request that many decimals; 0, the default, keeps the component whole-number only.
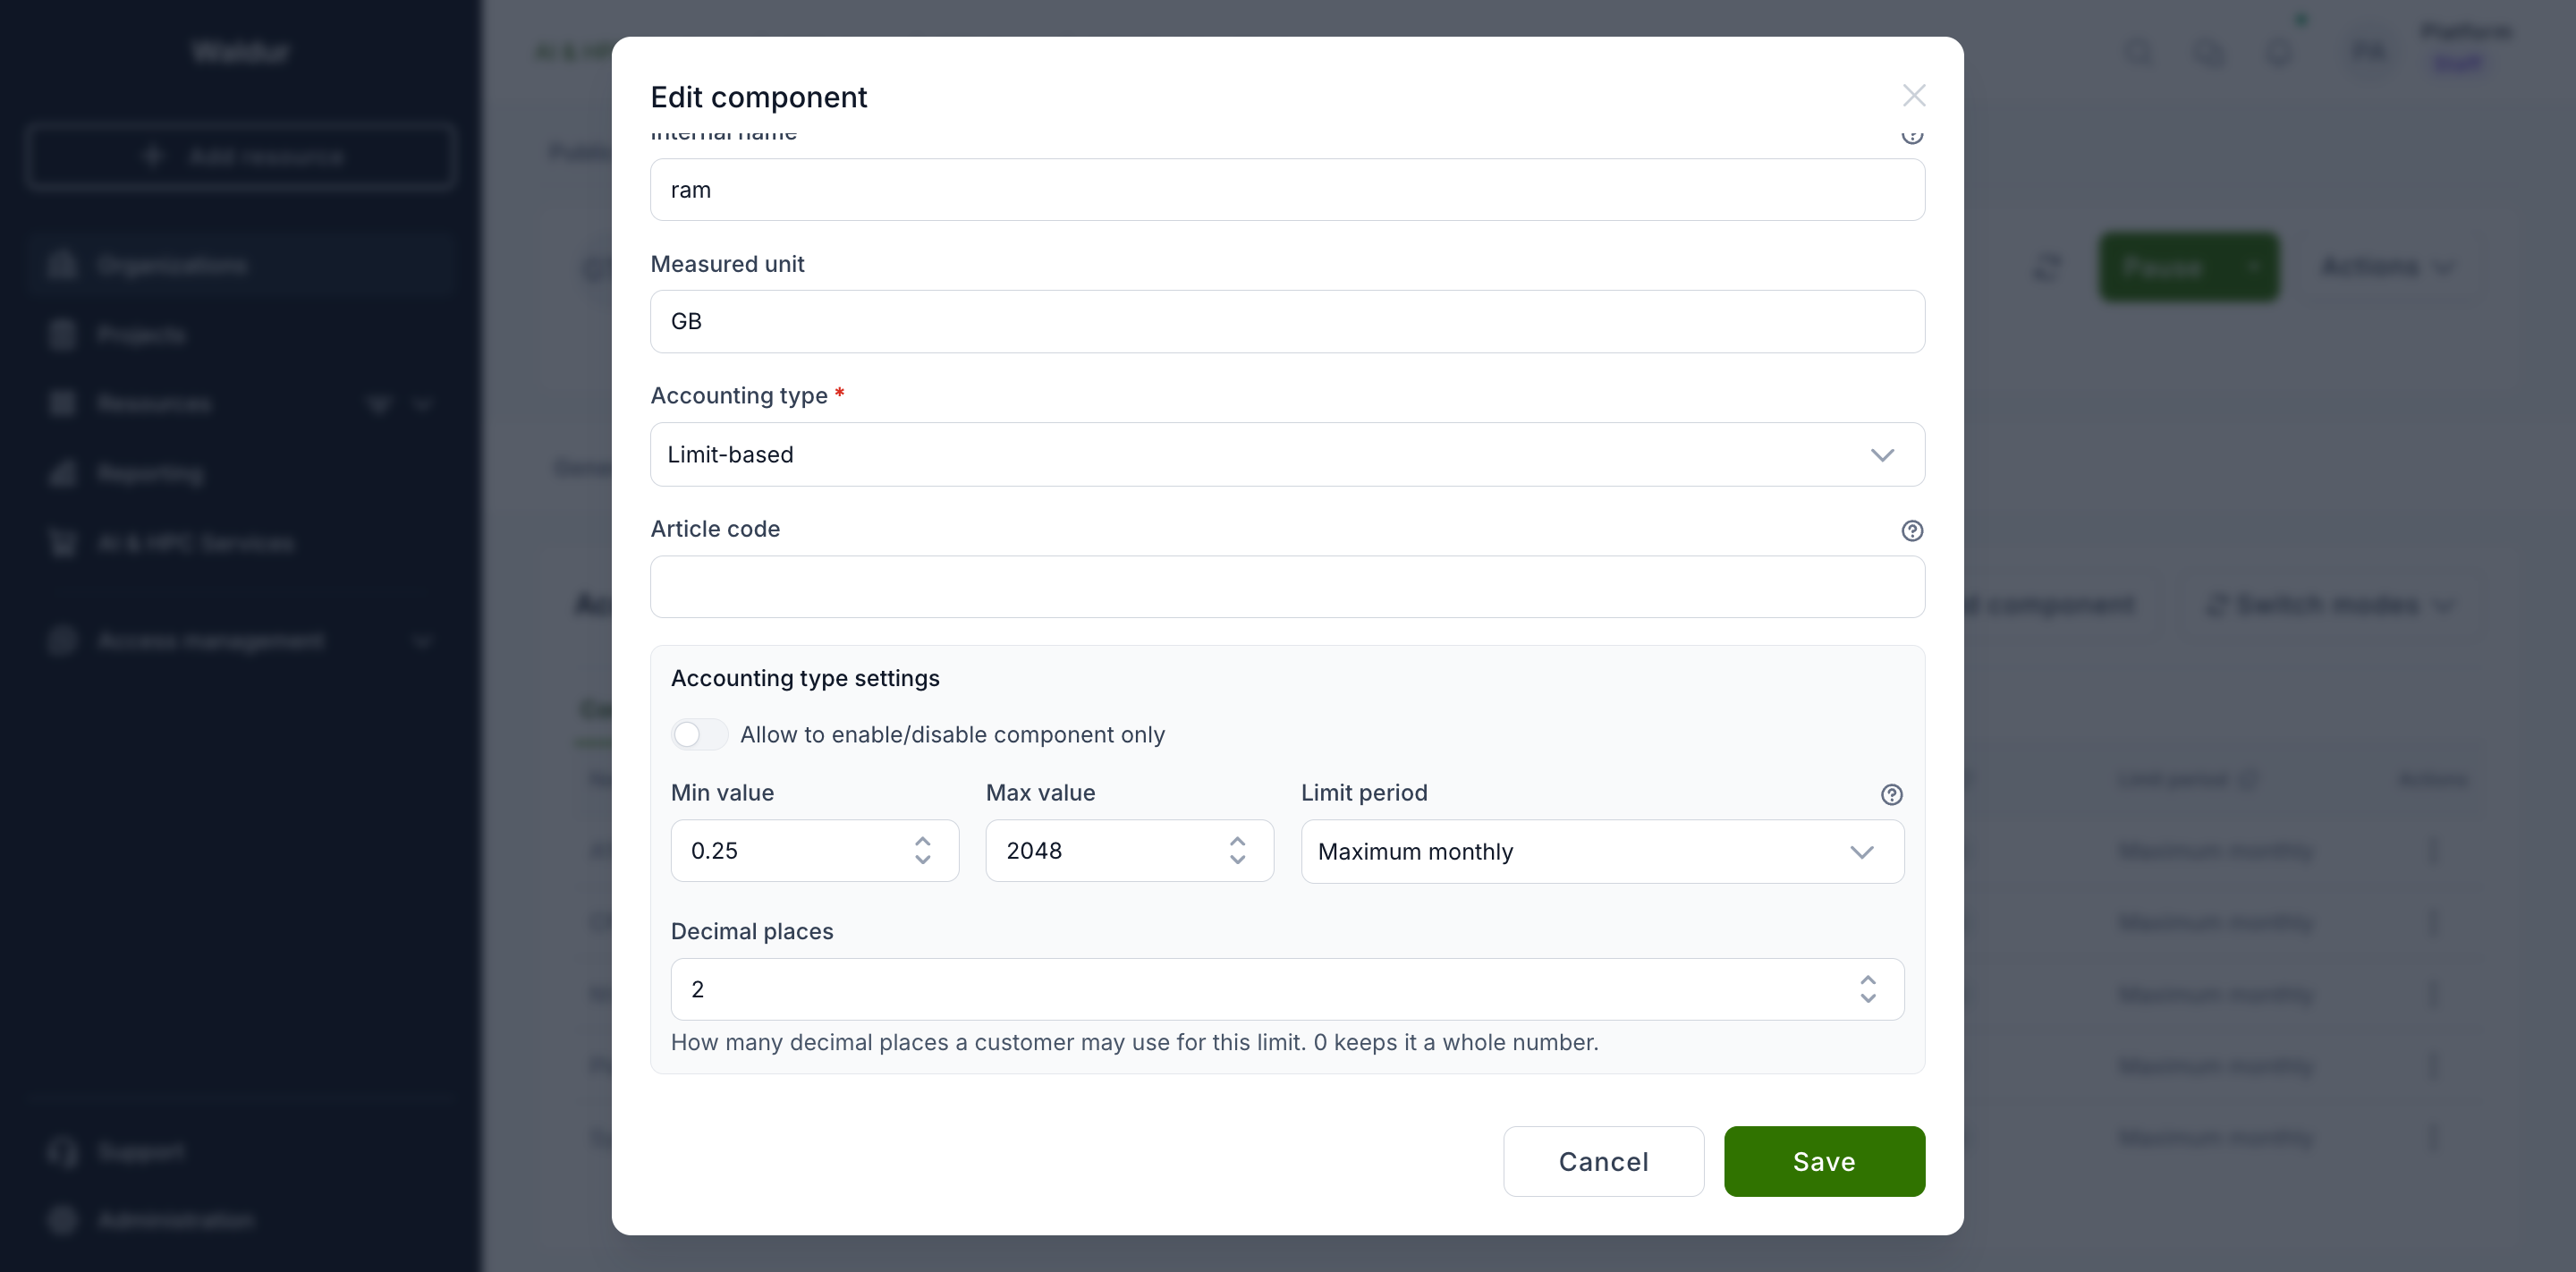
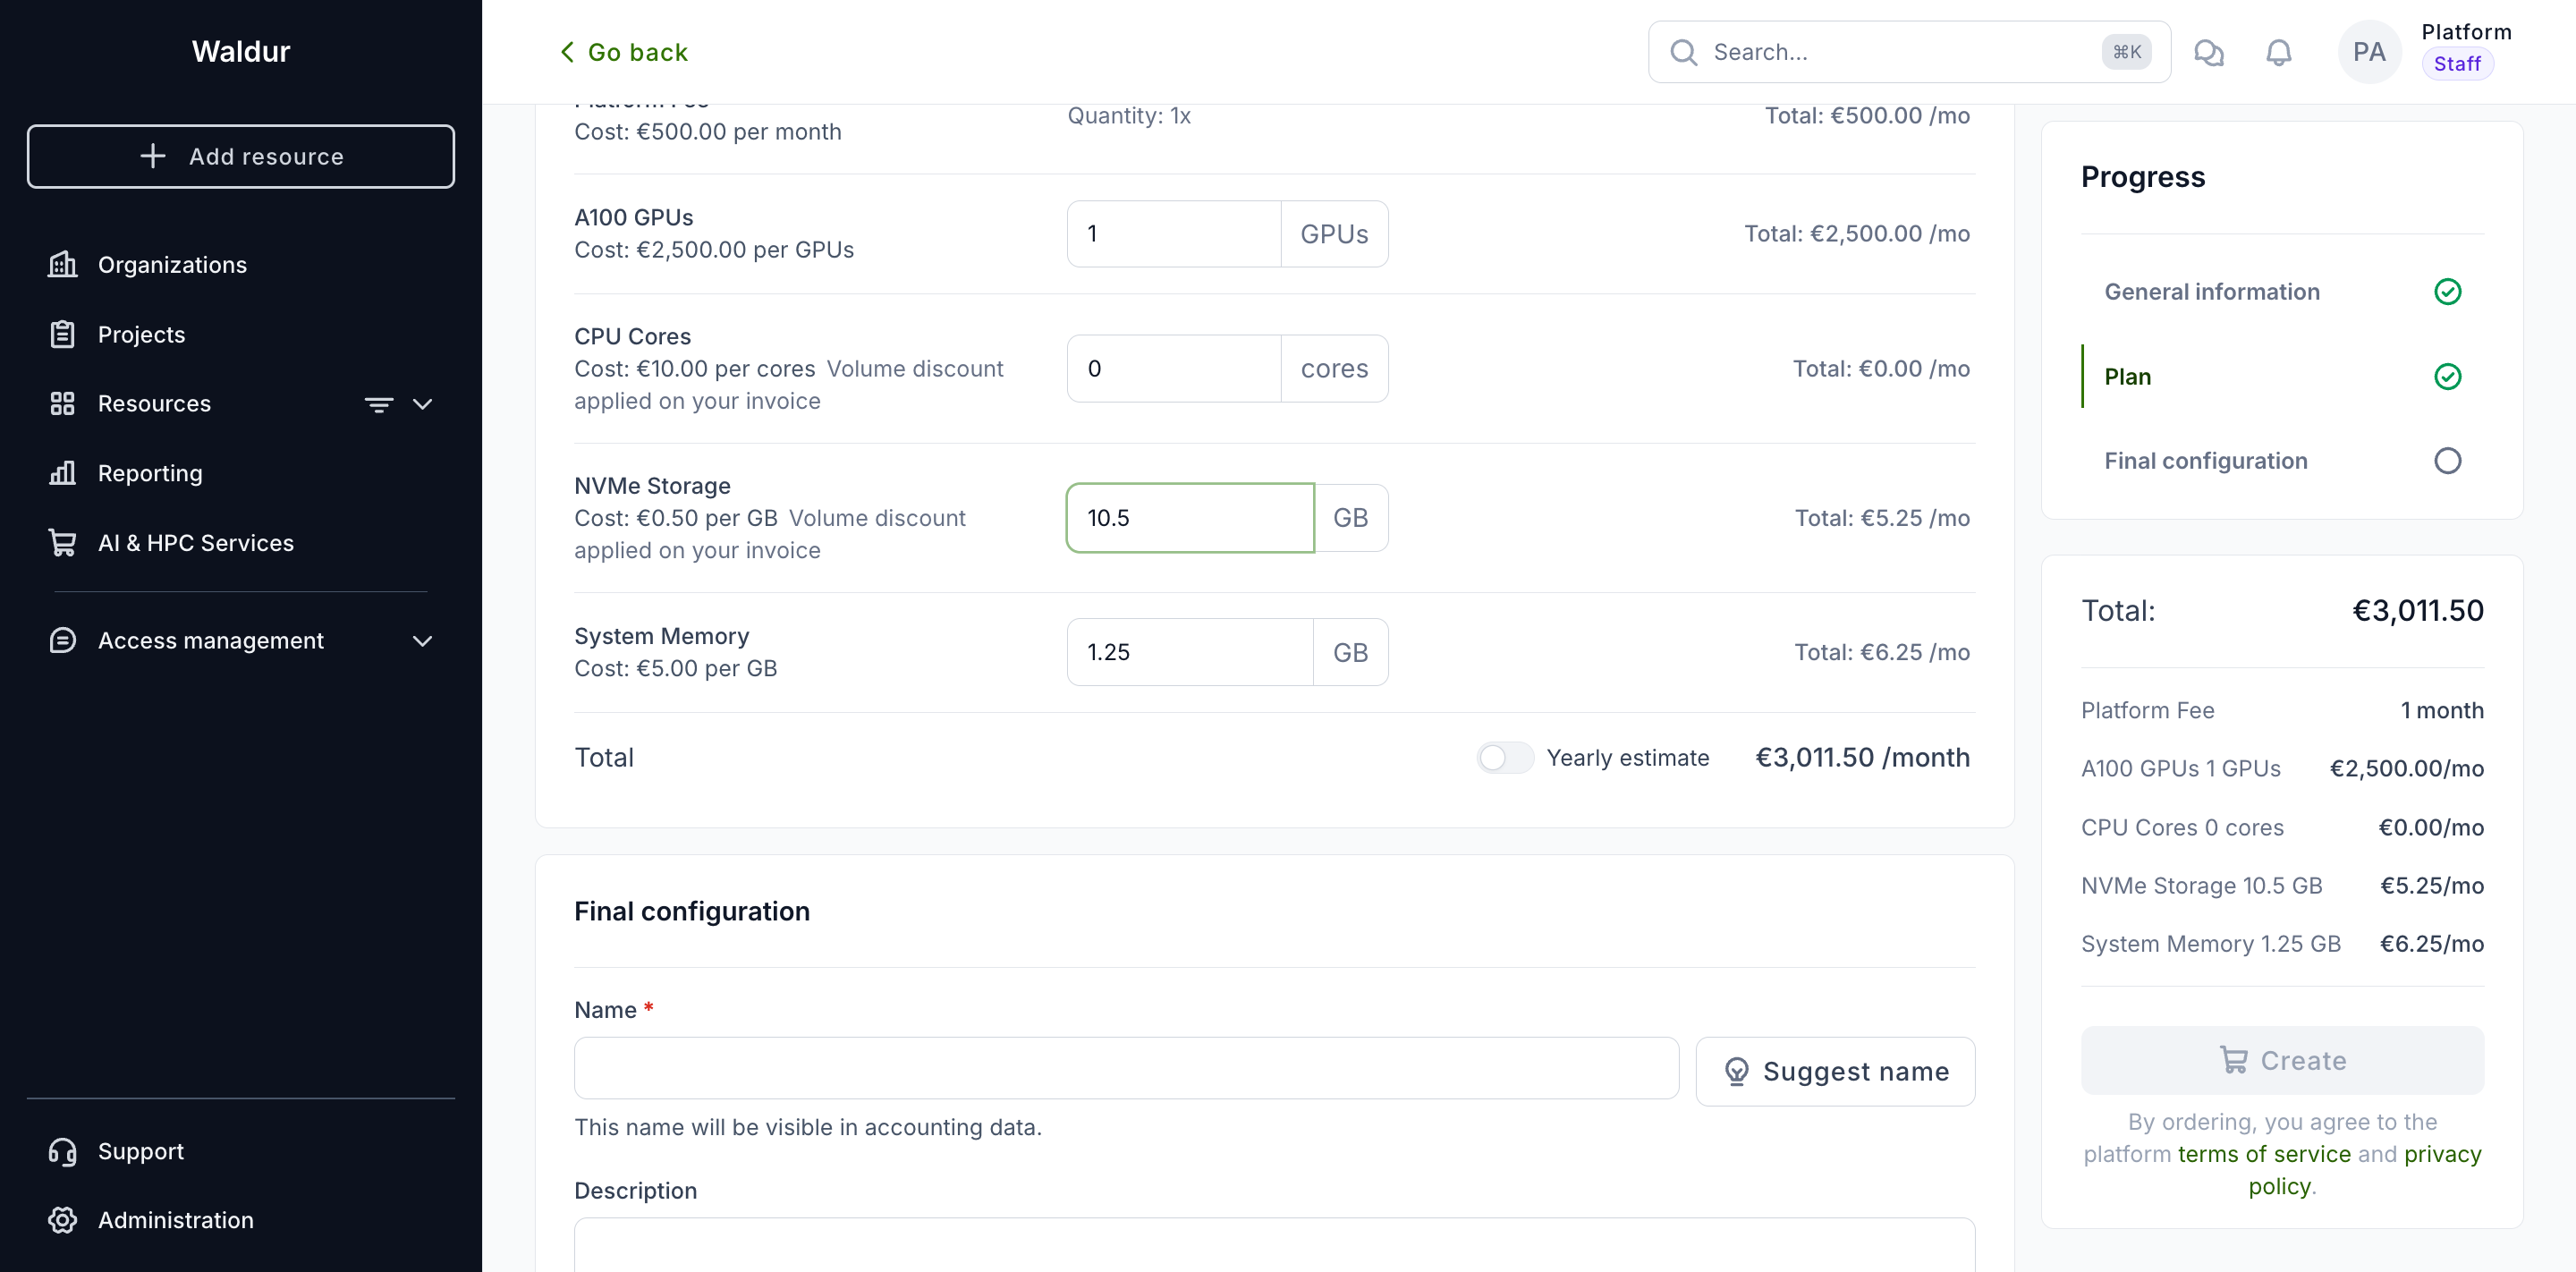
The setting applies to the order form and to every later limit change: the input steps by the matching amount (0.1 for one place, 0.01 for two), rejects a finer value, and the price follows the fraction.
Note
Precision is per component. One offering can price storage in tenths of a TB while keeping CPU cores whole, which is usually what you want — half a core is rarely meaningful.
Offering types whose backend maps a limit onto an integer quota refuse the setting outright. OpenStack Tenant and VMware components, for example, reject anything above 0 decimal places with an explanatory error when you save.
Site agent offerings
A Waldur site agent offering is the exception. One offering type covers every backend an agent can front — SLURM, Kubernetes, LiteLLM, Harbor and others — and they disagree about fractions: a SLURM allocation must be whole numbers, an LLM budget must not be.
Waldur cannot decide that for you, so it does not refuse the setting. When the agent reports a backend that stores whole numbers, the dialog warns you and leaves the choice in your hands:
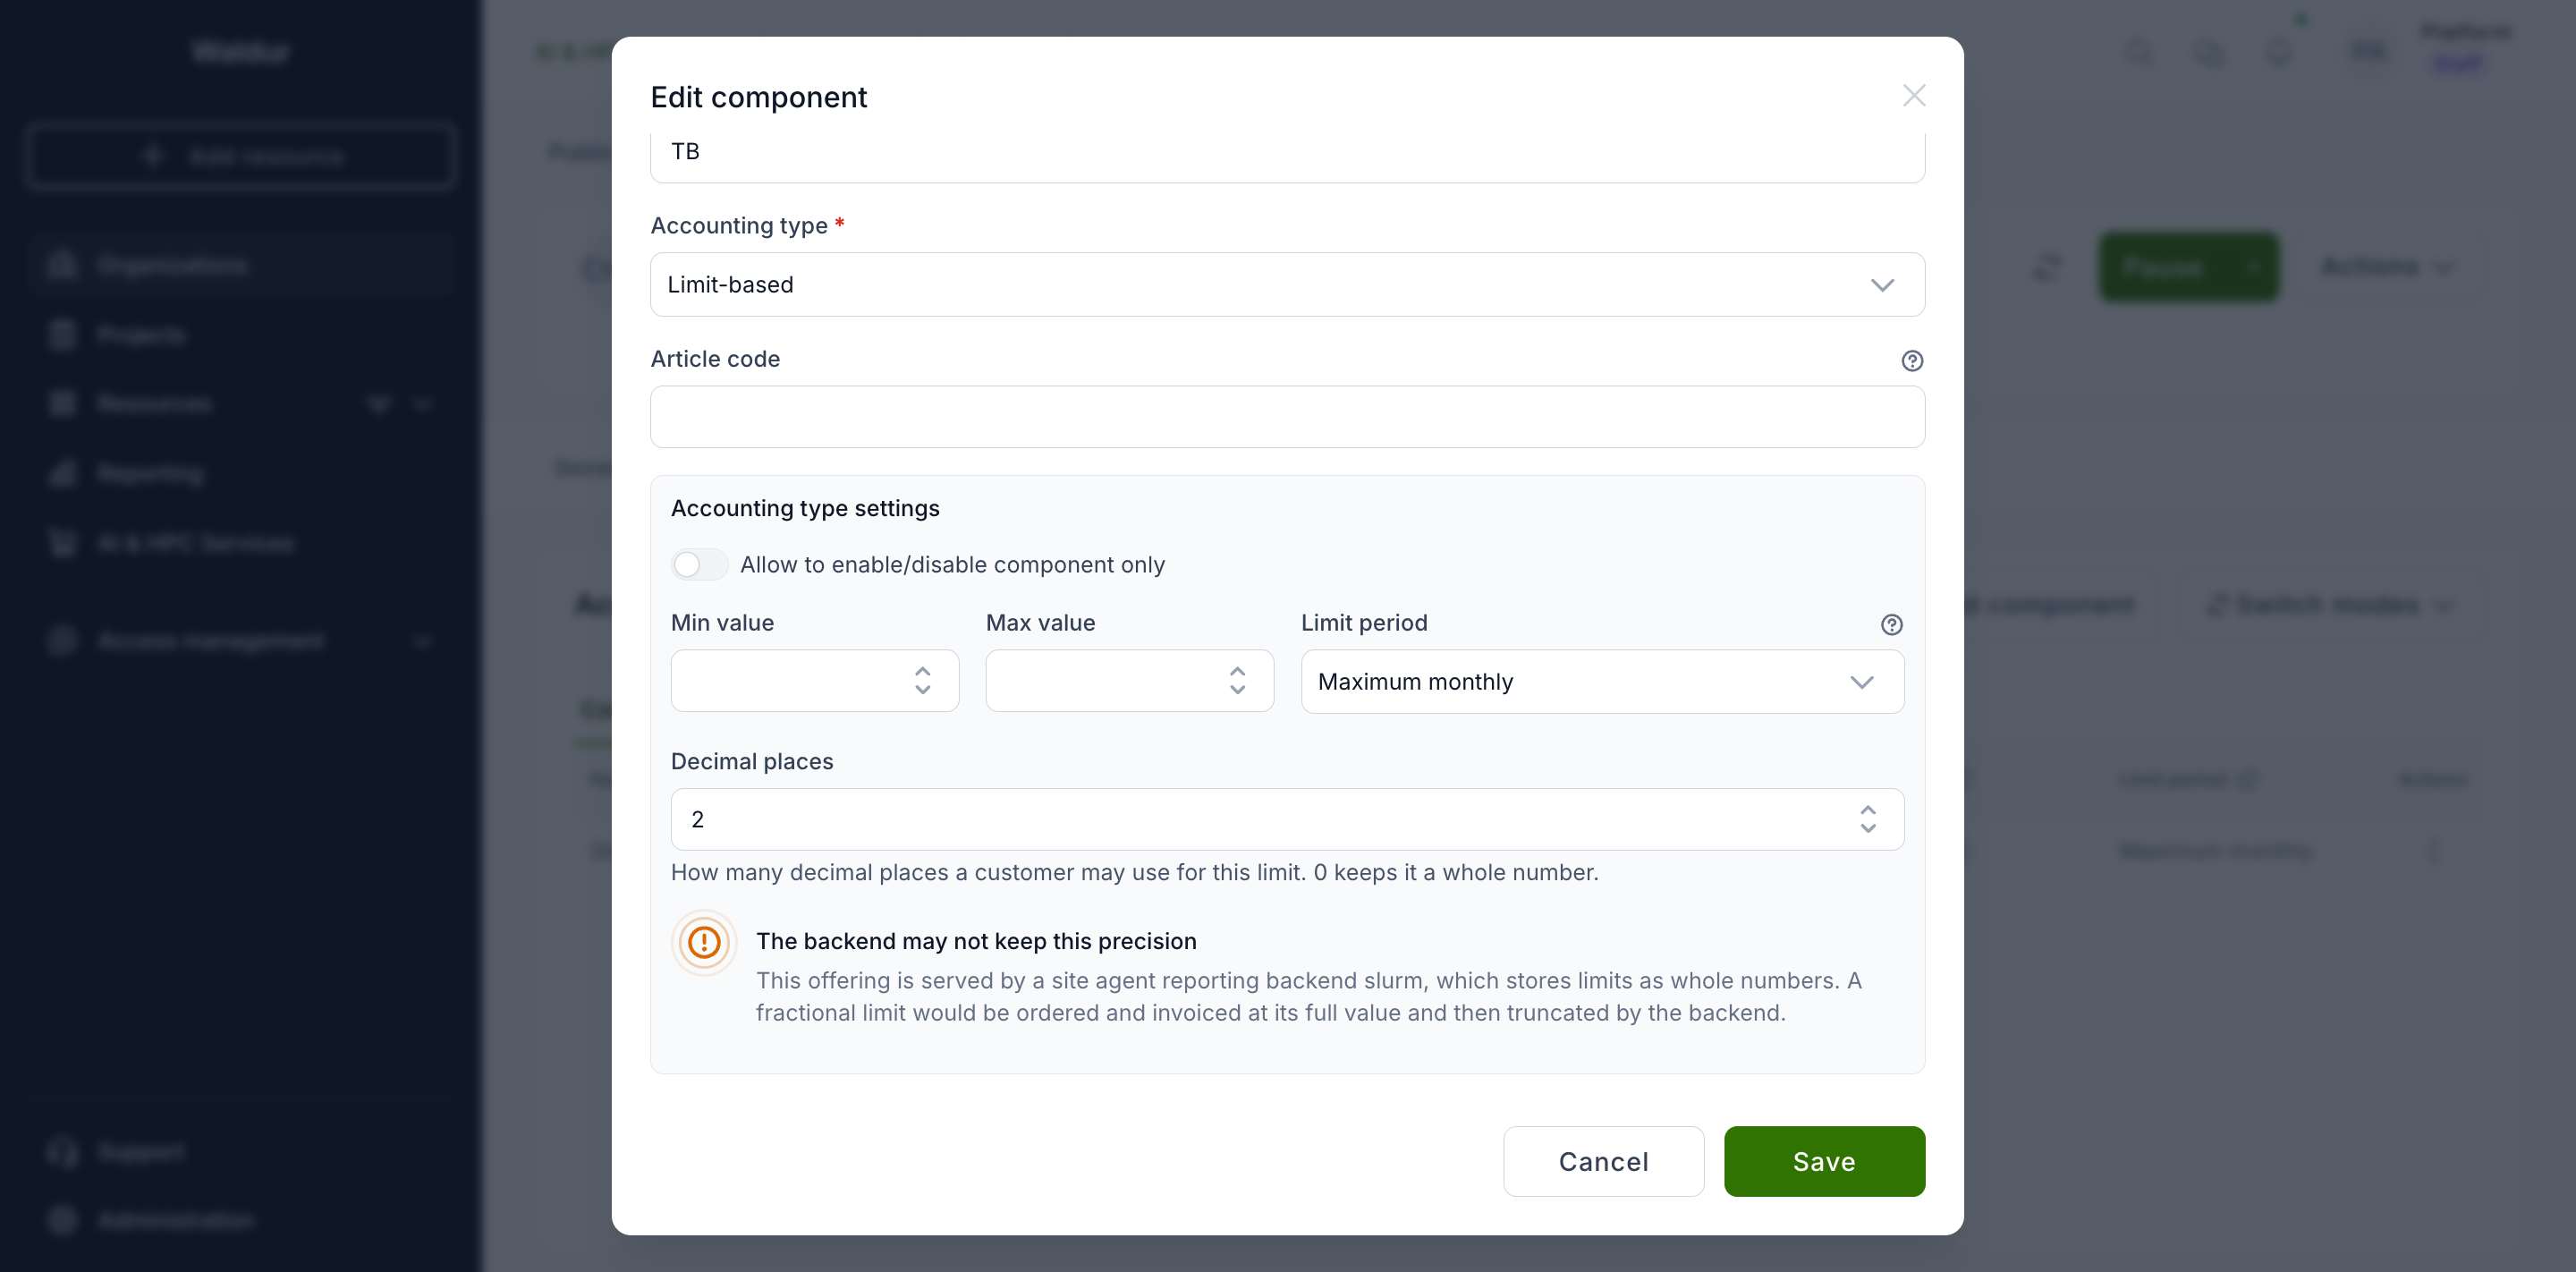
Warning
Keeping a fractional precision on a backend that cannot hold one means the customer is invoiced for the fraction they requested while the backend receives the truncated value. Ordering 0.5 TB against a whole-number backend is paying for 0.5 TB and being granted 0.
The warning appears only once the precision is above 0, and only when an agent has reported such a backend. Its absence is not a guarantee: if no agent has registered yet, Waldur has nothing to go on.
Offering a limit-based and a usage-based plan side by side
The accounting type on a component applies to every plan of the offering. To sell the same OpenStack Tenant offering both as a reserved product and as a pay-as-you-go product, give each plan its own billing mode. The mode overrides how the built-in components (Cores, RAM, Storage and the per-volume-type storage) are billed under that plan; custom components keep their own accounting type.
- Open the offering's Edit → Accounting → Plans tab and click Add plan.
- Set Billing mode to one of:
- Inherit from components (default): the built-in components are billed as configured on the Components tab.
- Limit-based (monthly): customers request cores, RAM and storage when
ordering and are billed
price × limitevery month. - Usage-based: customers order without limits; the tenant starts with the backend's default quotas, and the plan bills accumulated consumption (core-hours, GB-hours) at the plan's prices. Adjust quotas with the resource's Set quotas action.
- Enter the prices for each component. Under a usage-based plan the prices are per core-hour and per GB-hour.
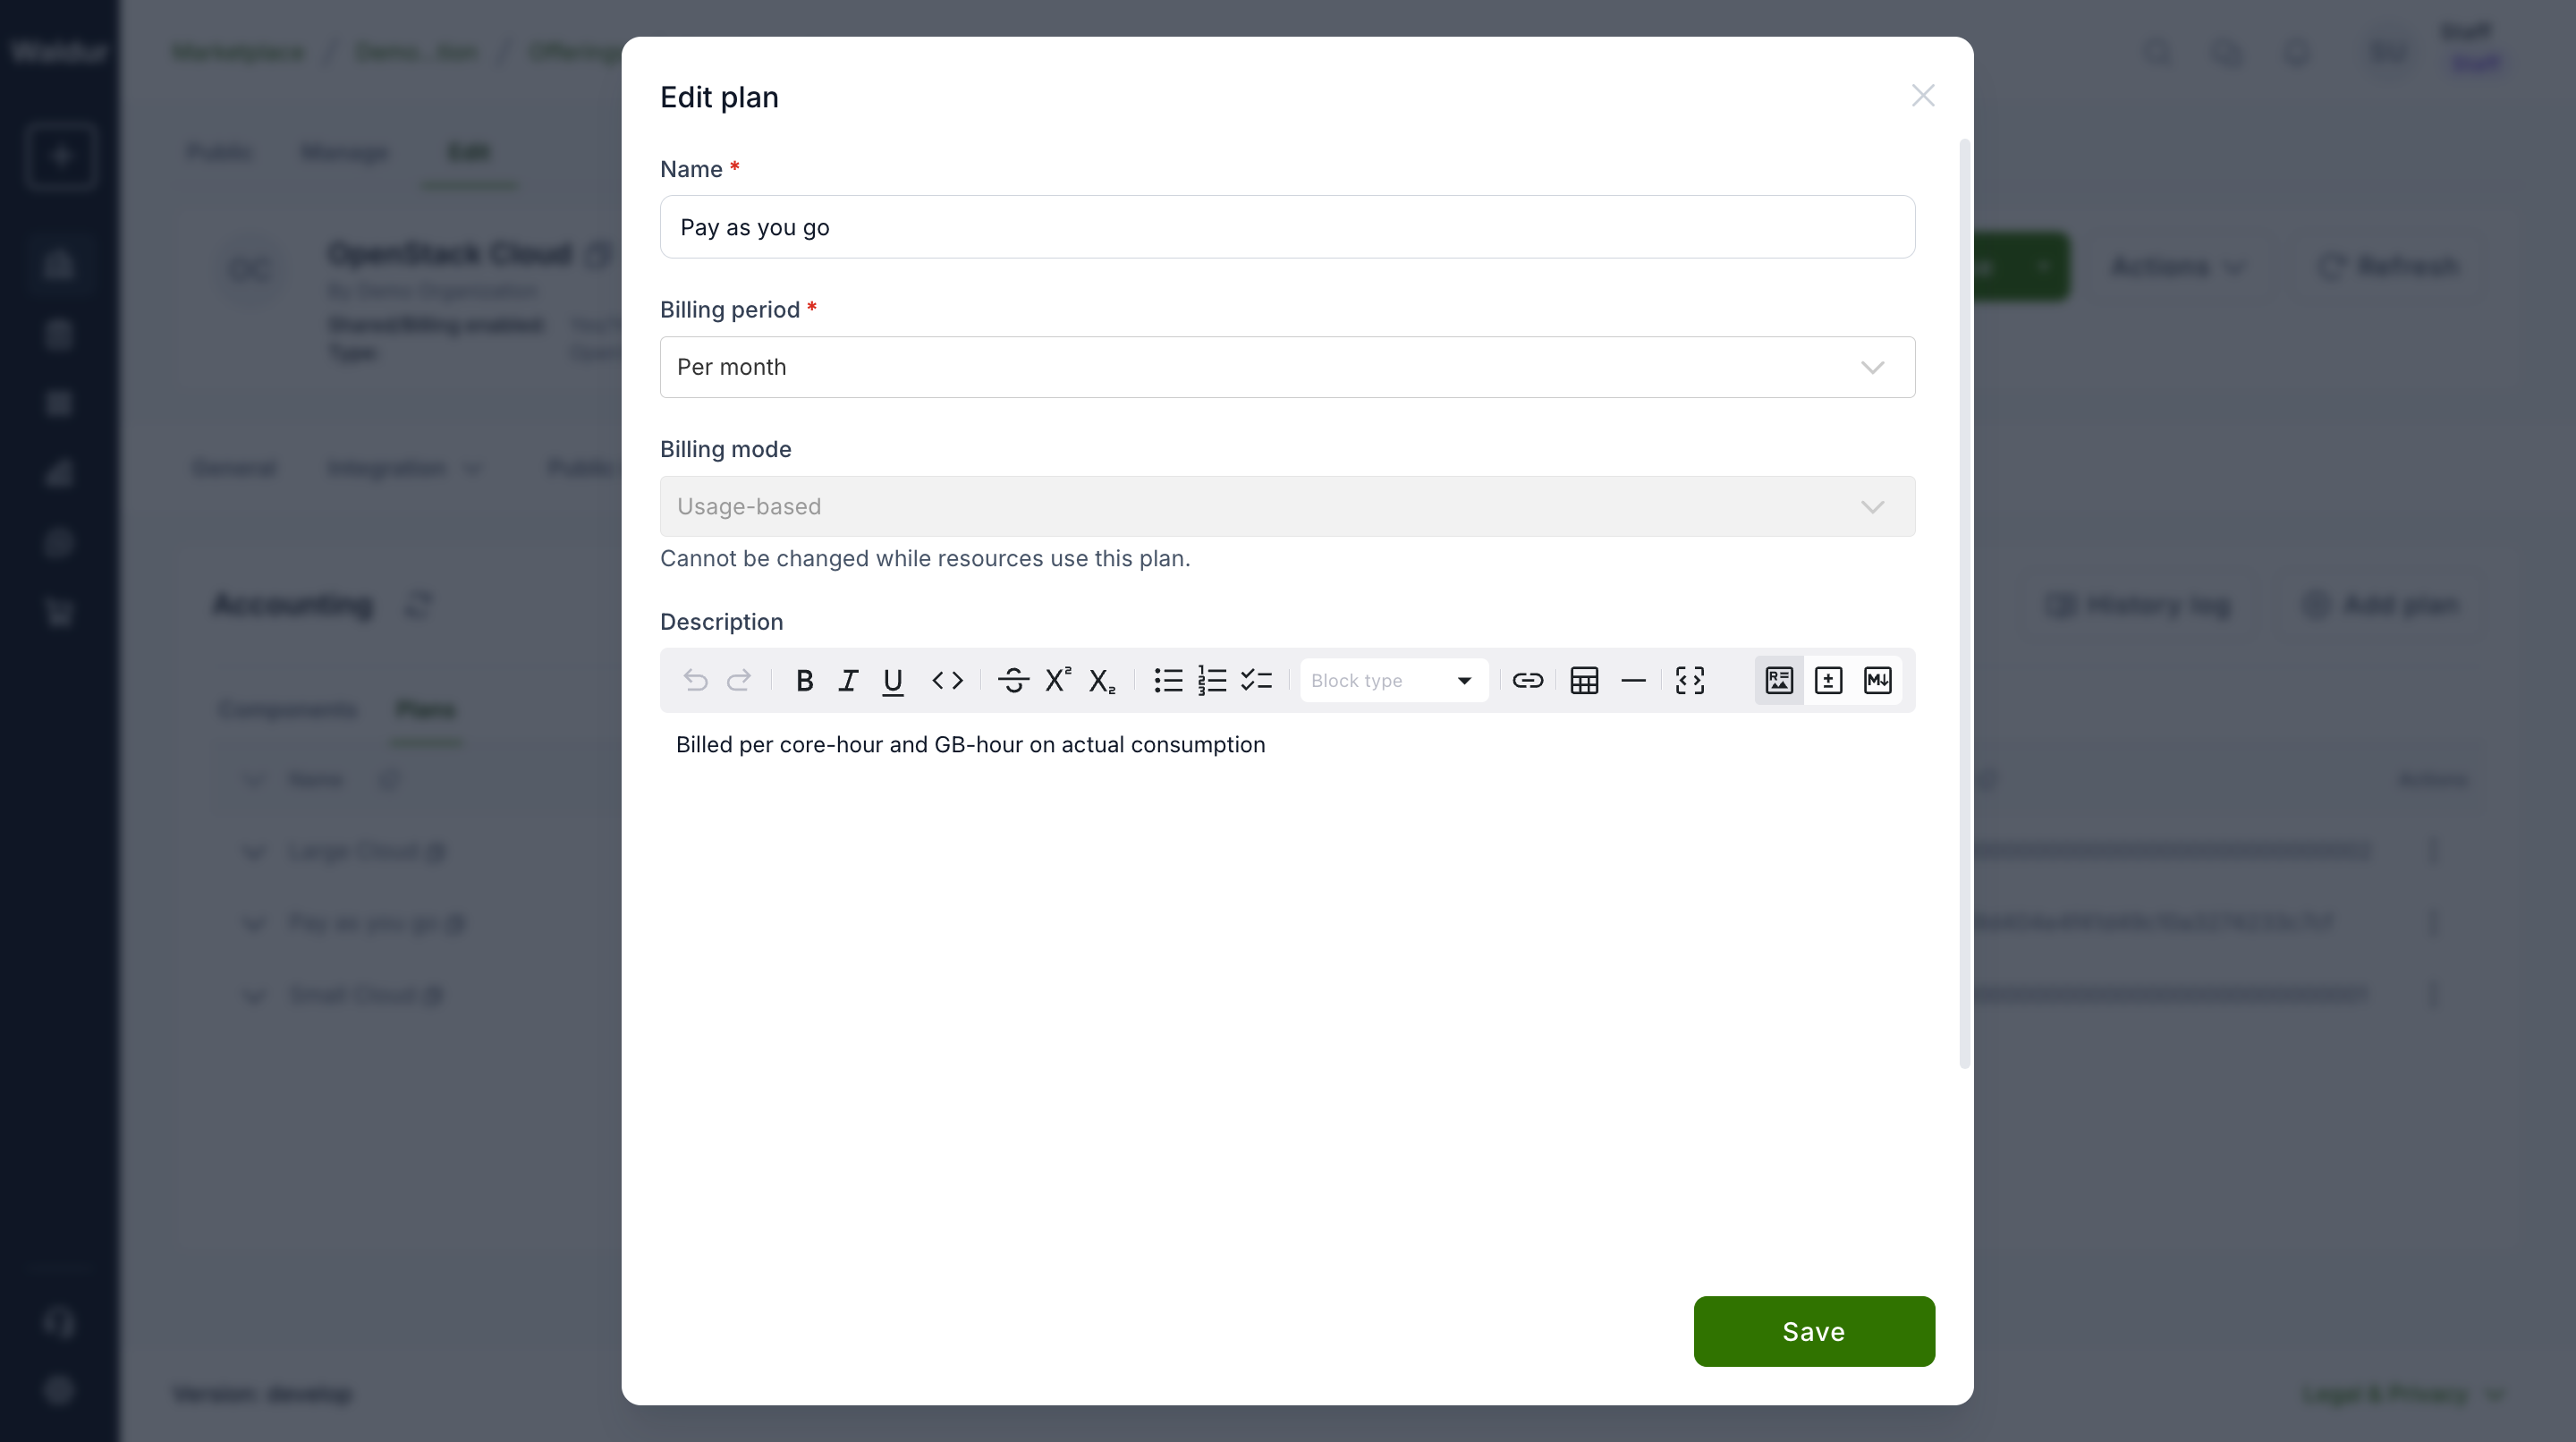
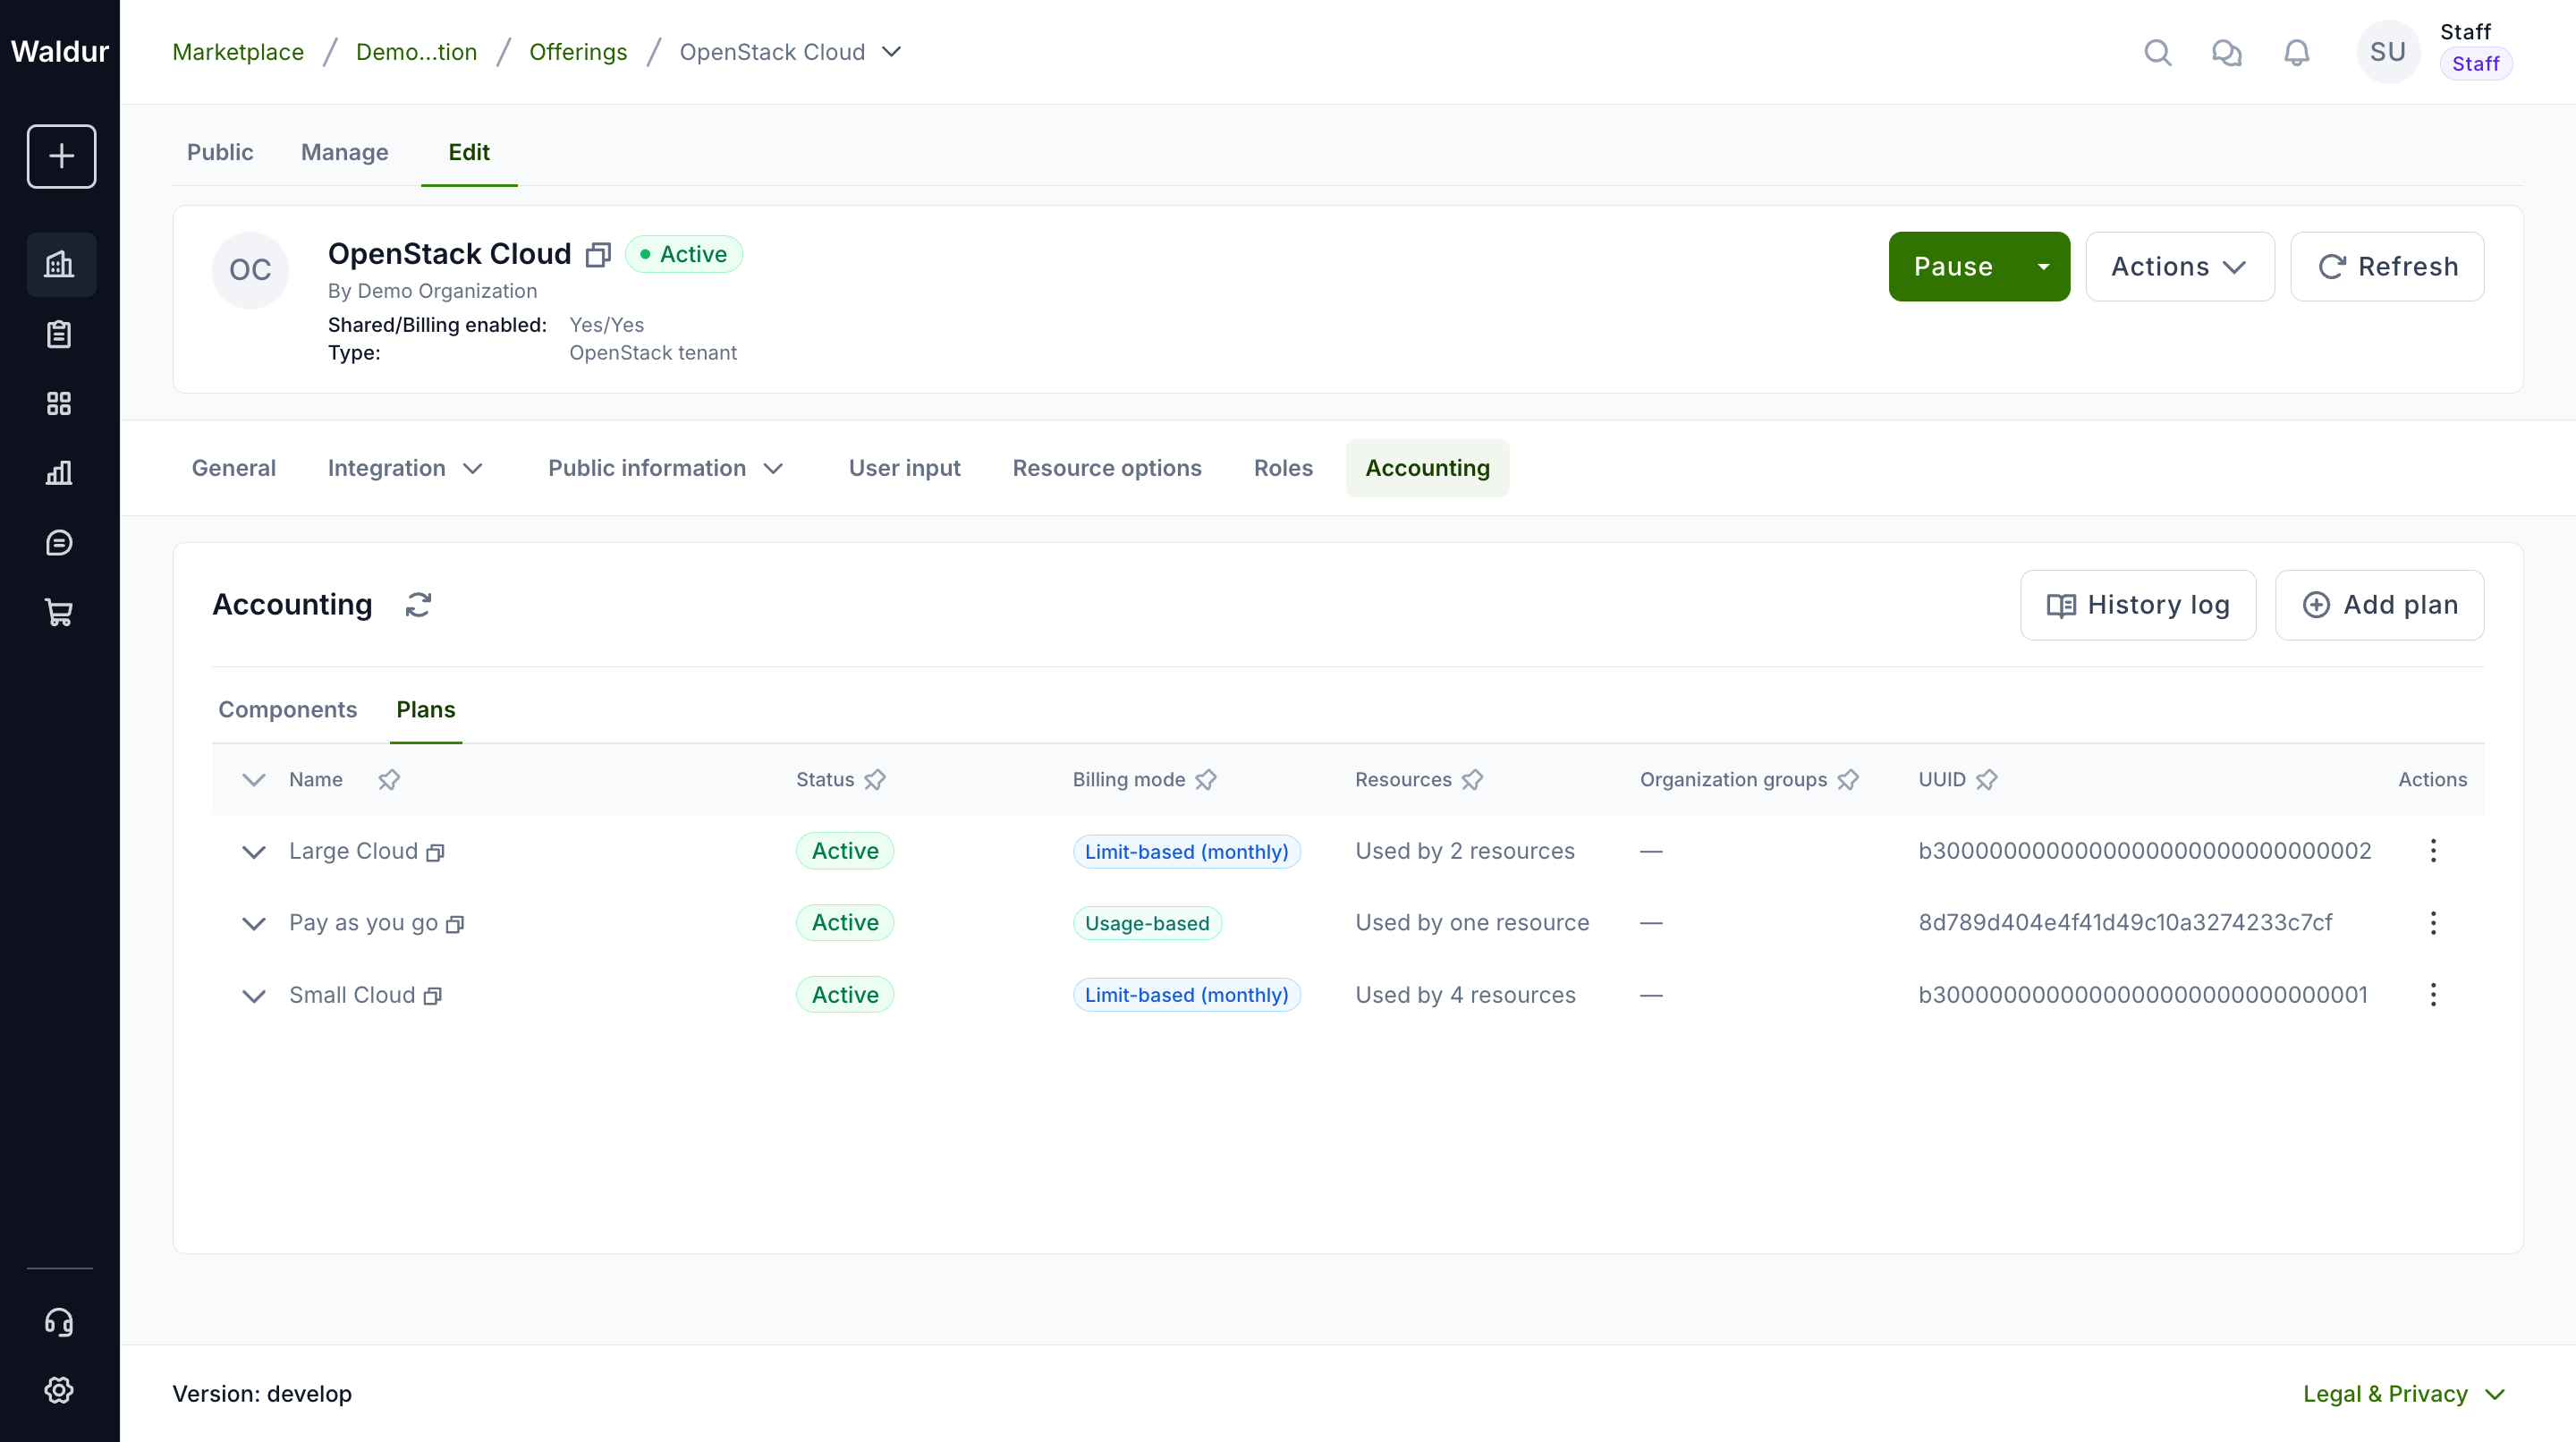
The Plans tab shows the mode of every plan, and customers see it next to each plan name when ordering. A plan's billing mode cannot be changed while resources use the plan.
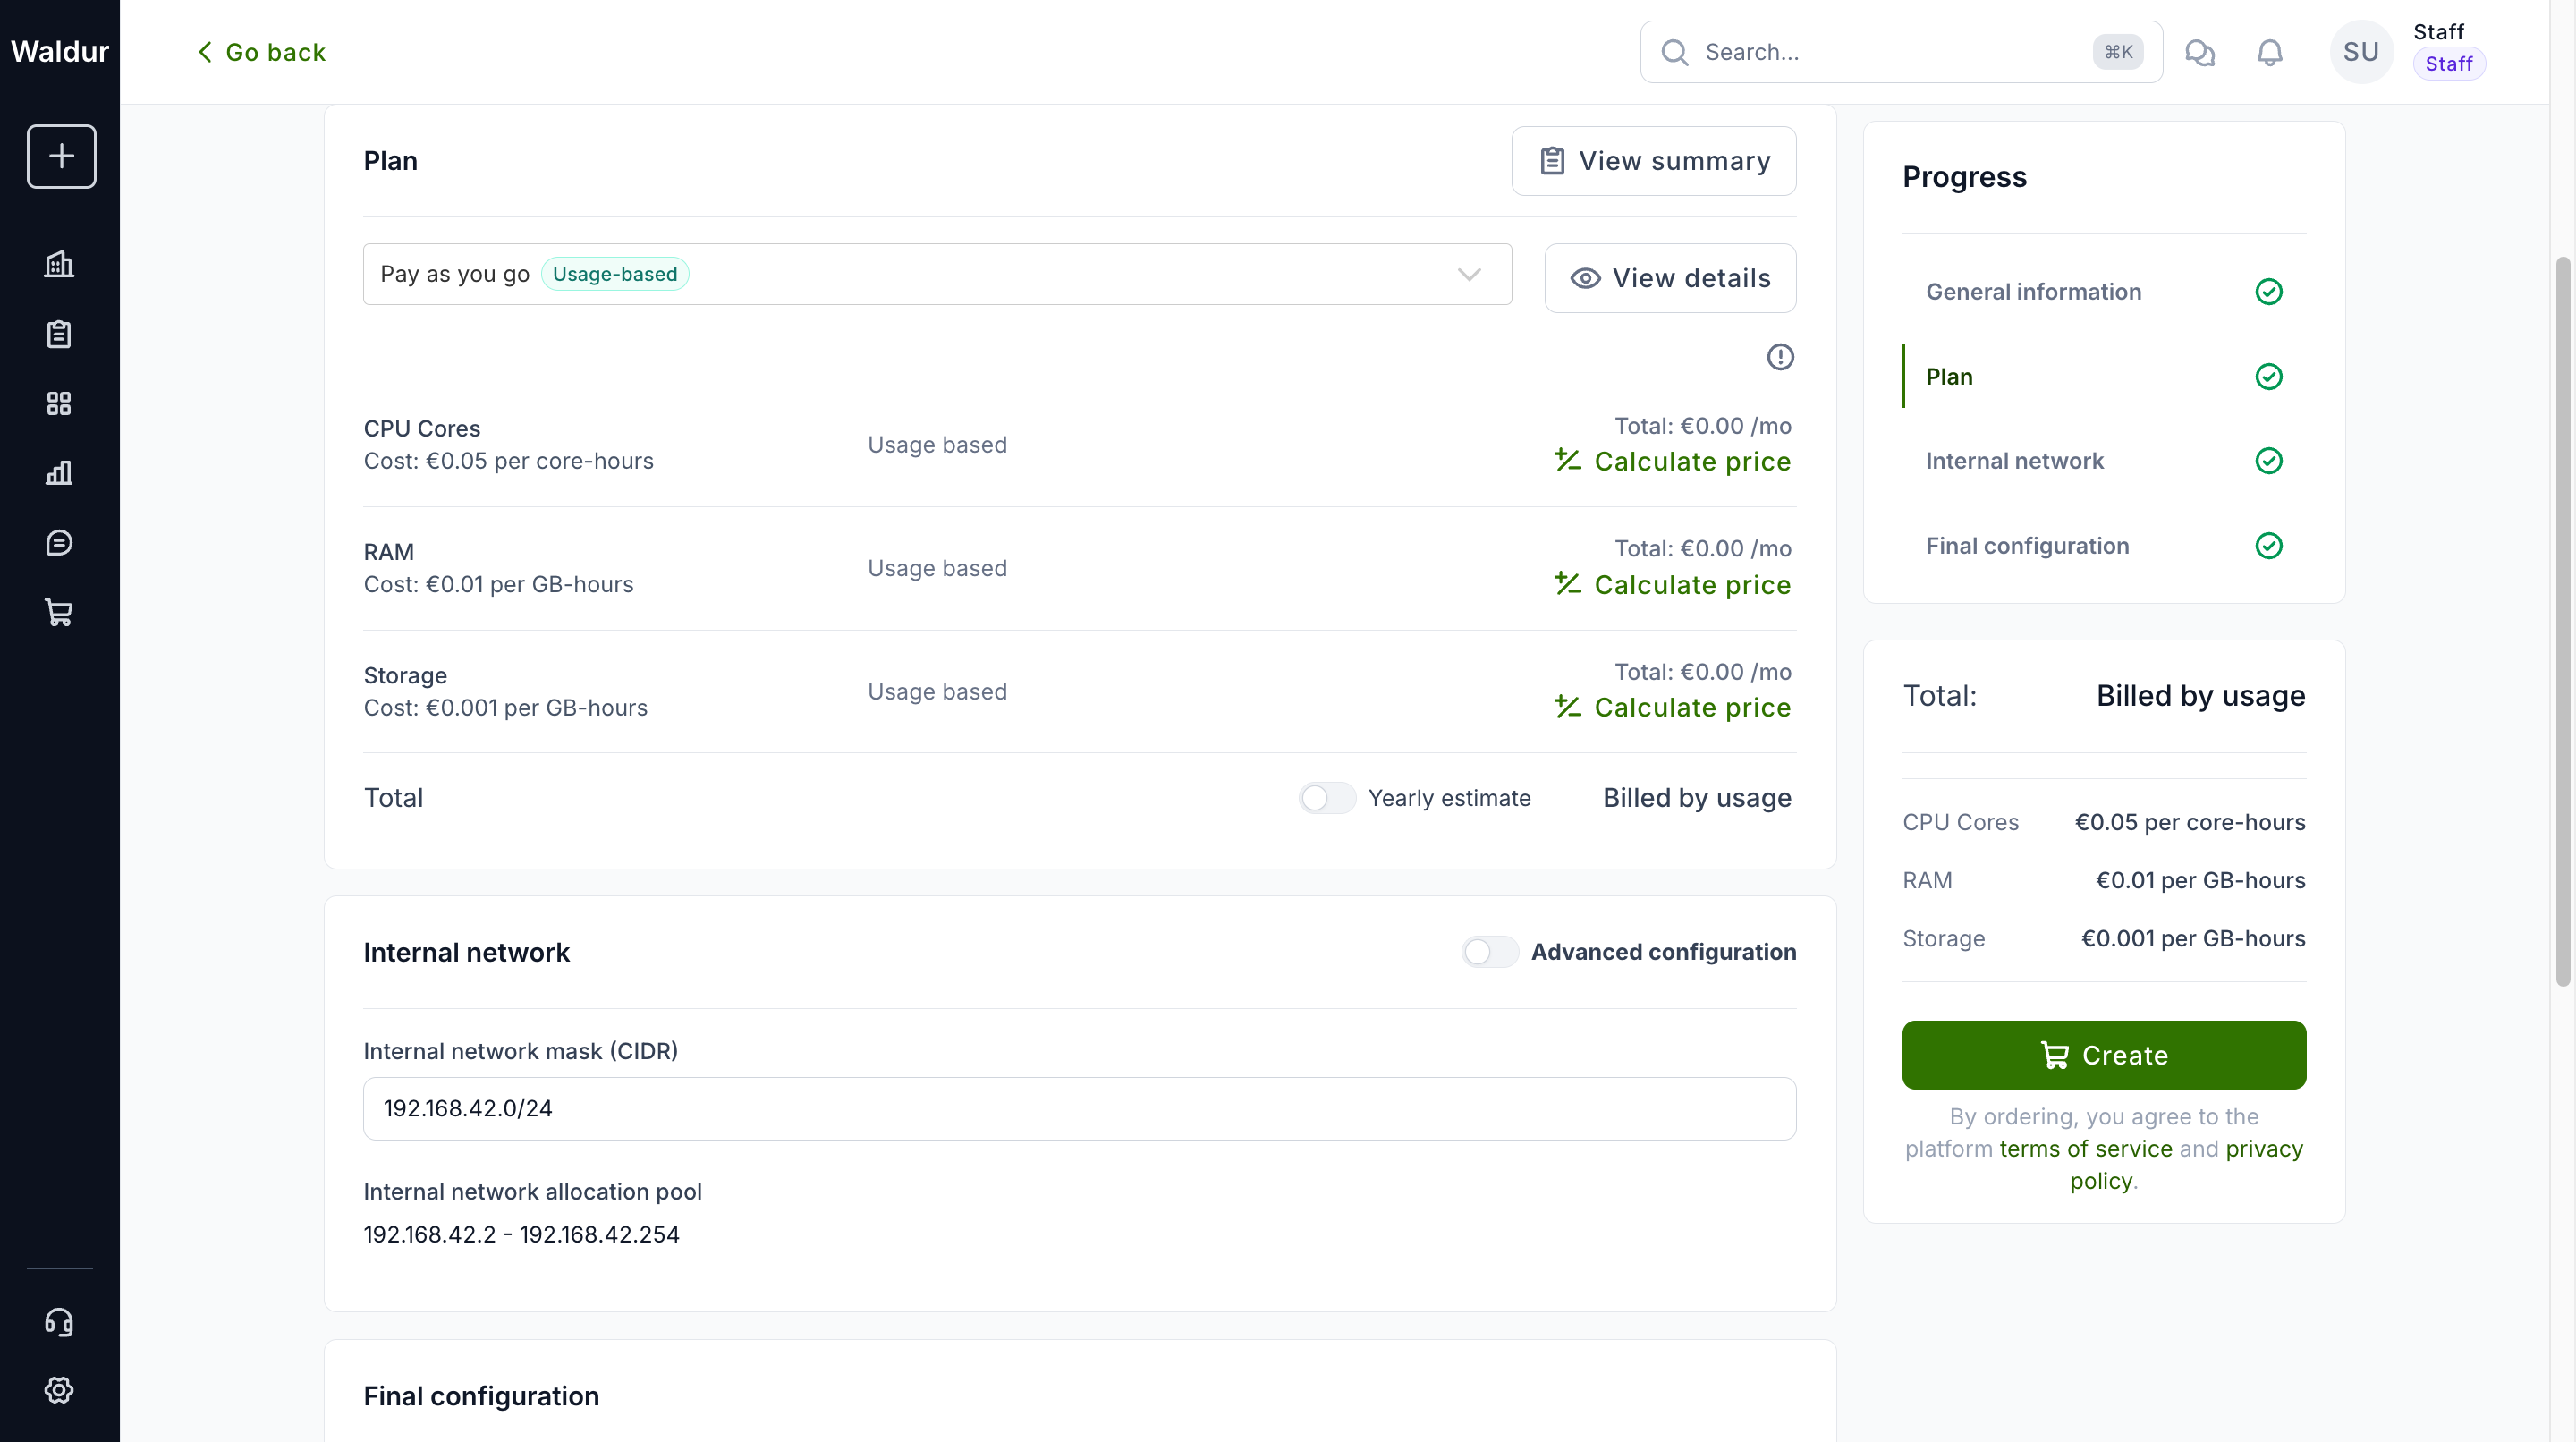
When a customer picks the usage-based plan, the order form shows no quota inputs: each built-in component is listed with its per-unit price and the total reads "Billed by usage".
The Switch modes dialog still rewrites the components, and it now applies the same choice to every plan of the offering, so the switch changes what is billed whatever mode the plans were on. Switching to Prepaid puts the plans back on Inherit from components: prepaid is a property of the components, not a plan mode, and inherit is what defers to them.
Note
An offering whose built-in components are prepaid has no plan-level choice to make — every mode would bill those components per period instead of upfront — so the Billing mode selector is not shown on its plans. Move the offering off prepaid with Switch modes first.
Switching between the two plans
Customers can move a resource between the plans with Change plan at any time. Both plans must share the same billing period.
- Limit-based → usage-based: the limit fee is charged for the current billing period of the plan: a plan billed per month keeps the whole month's fee, a plan billed per day is charged for the days used. From the switch the resource is billed on consumption. Its quotas stay unchanged and only cap usage.
- Usage-based → limit-based: usage accrued before the switch is invoiced at the old plan's rates. From the switch the new plan bills the resource's current quotas as limits for its billing period (the whole month for a monthly plan, per day for a daily plan). The switch is refused until the provider has set quotas for cores, RAM and storage.
Note
Limit items of a plan billed per month are not prorated by day: a tenant created or switched on the 20th is charged the full monthly fee, exactly as when it is terminated mid-month. Use a plan billed per day when day-level proration is wanted.
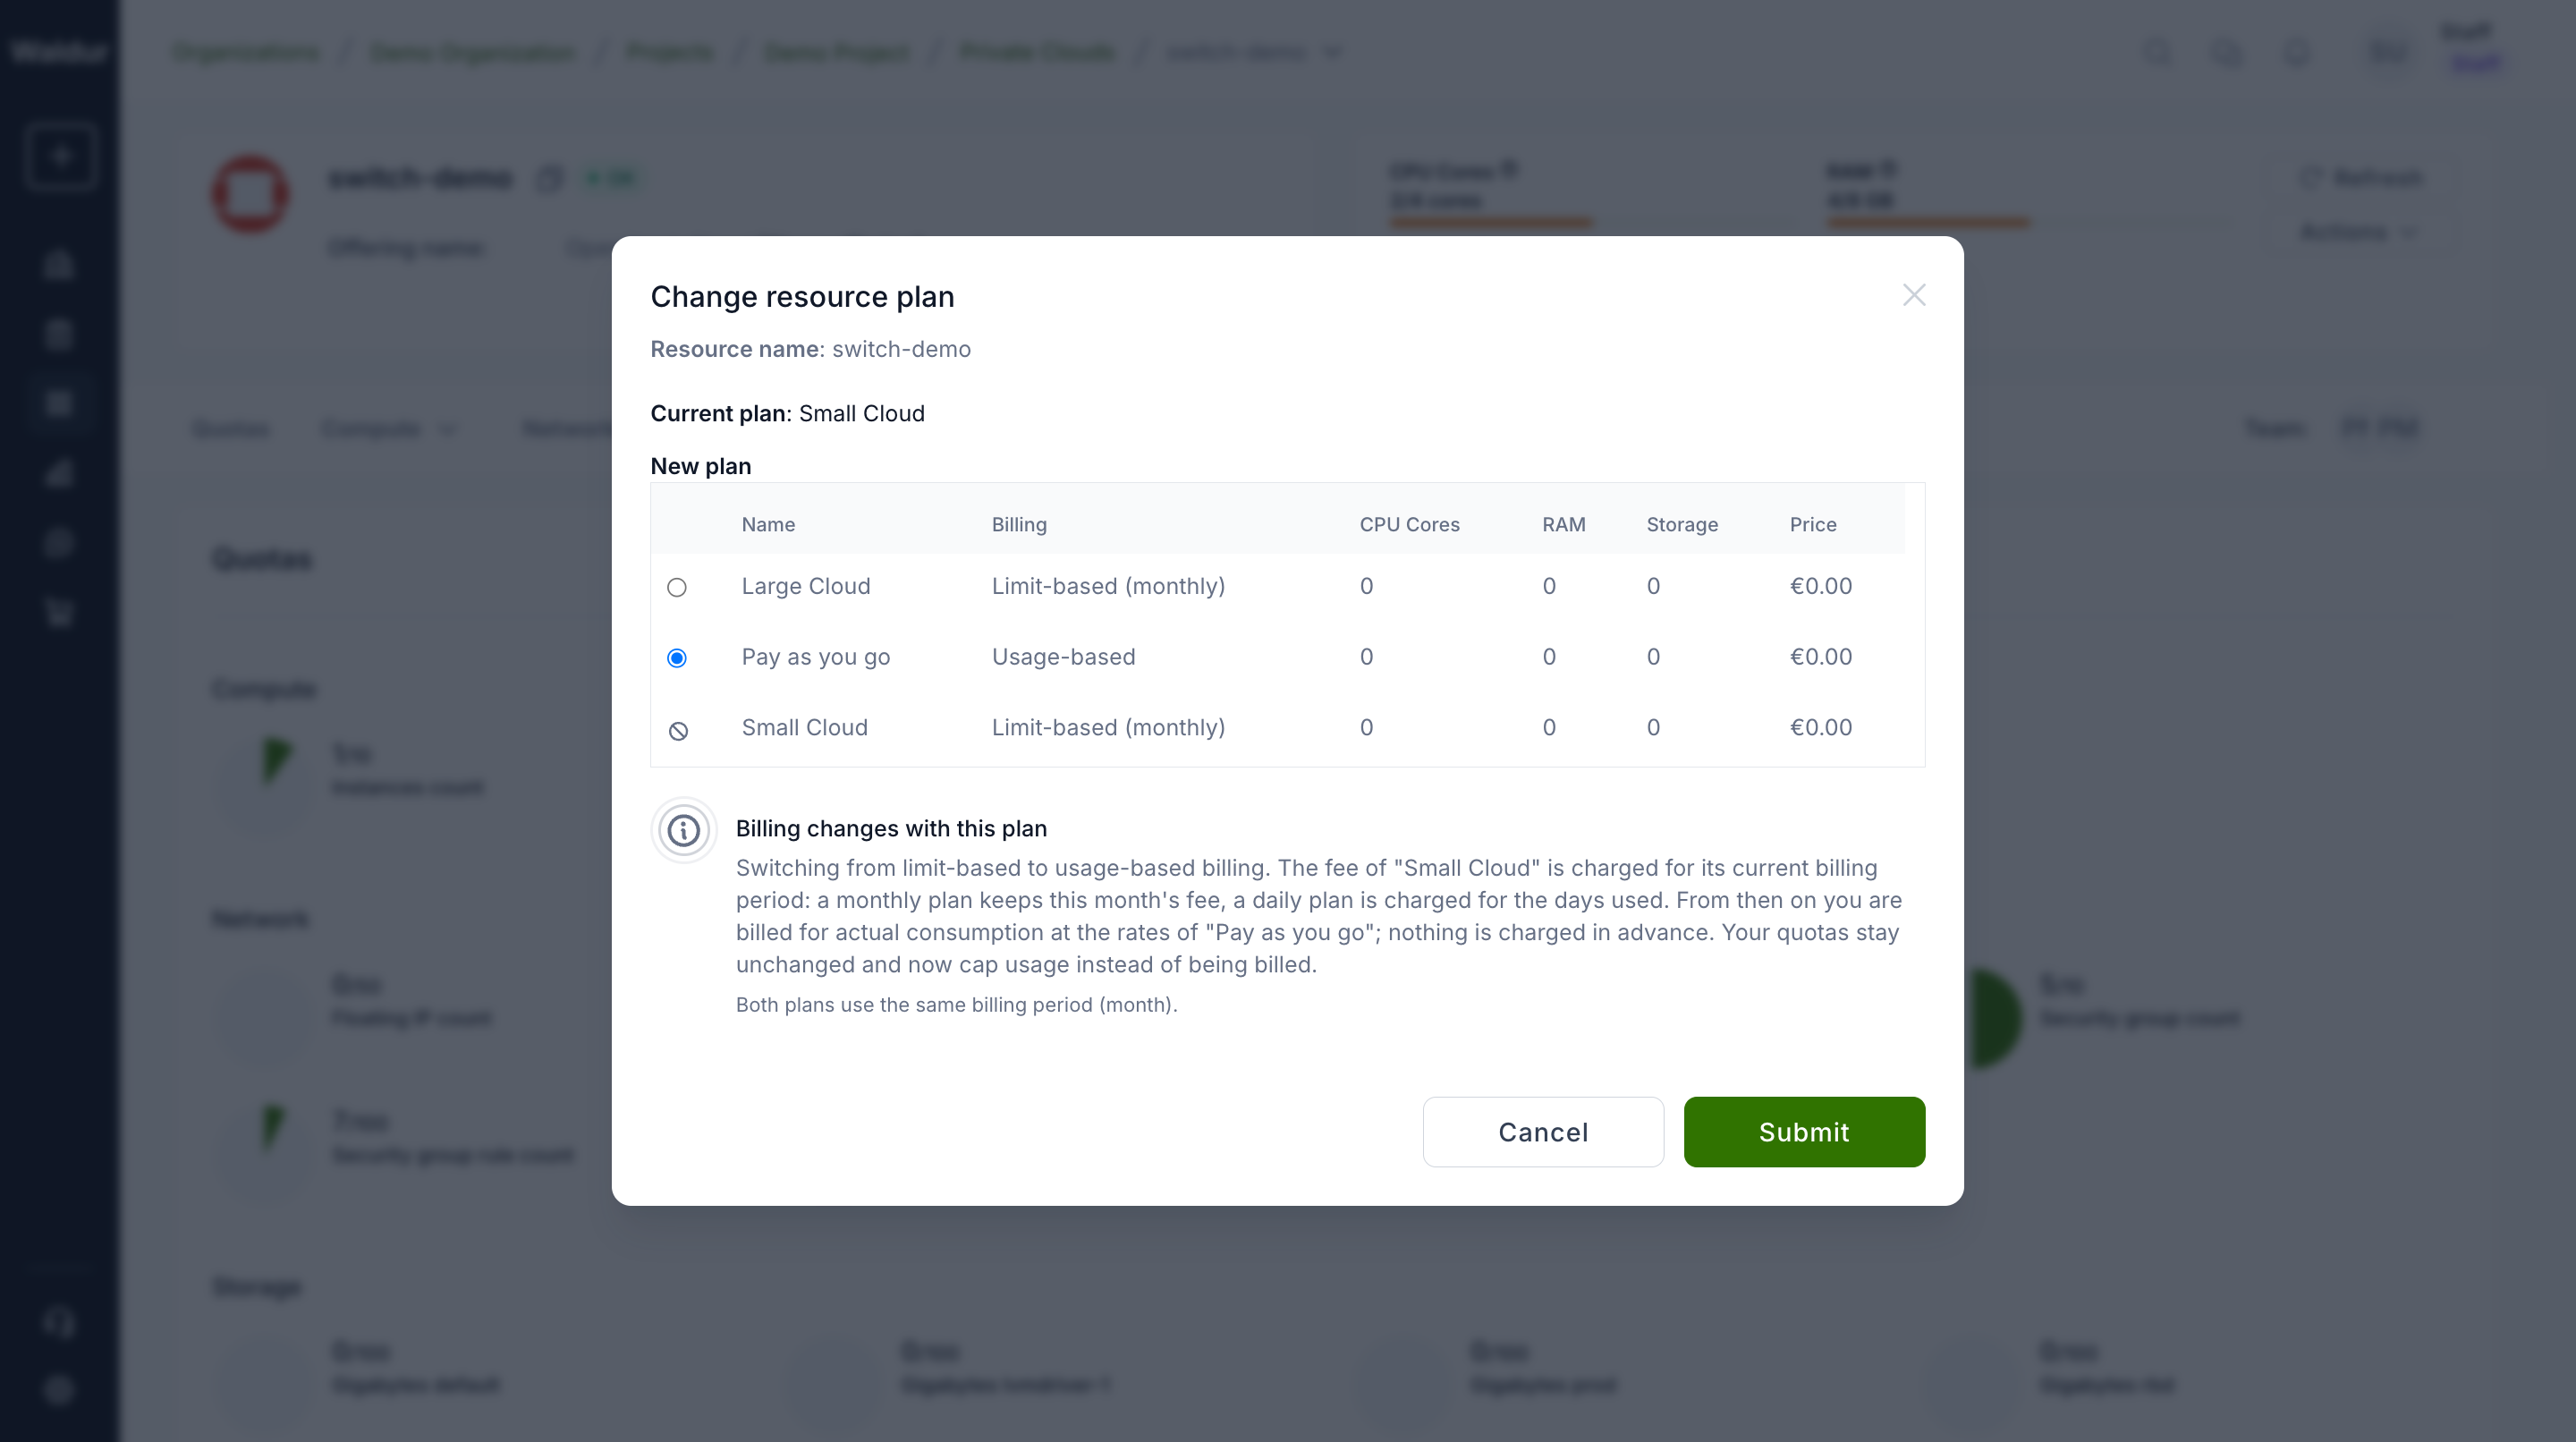
The change-plan dialog explains the consequence before the customer submits, the order shows both plans with their billing modes, and the confirmation email carries the same summary.
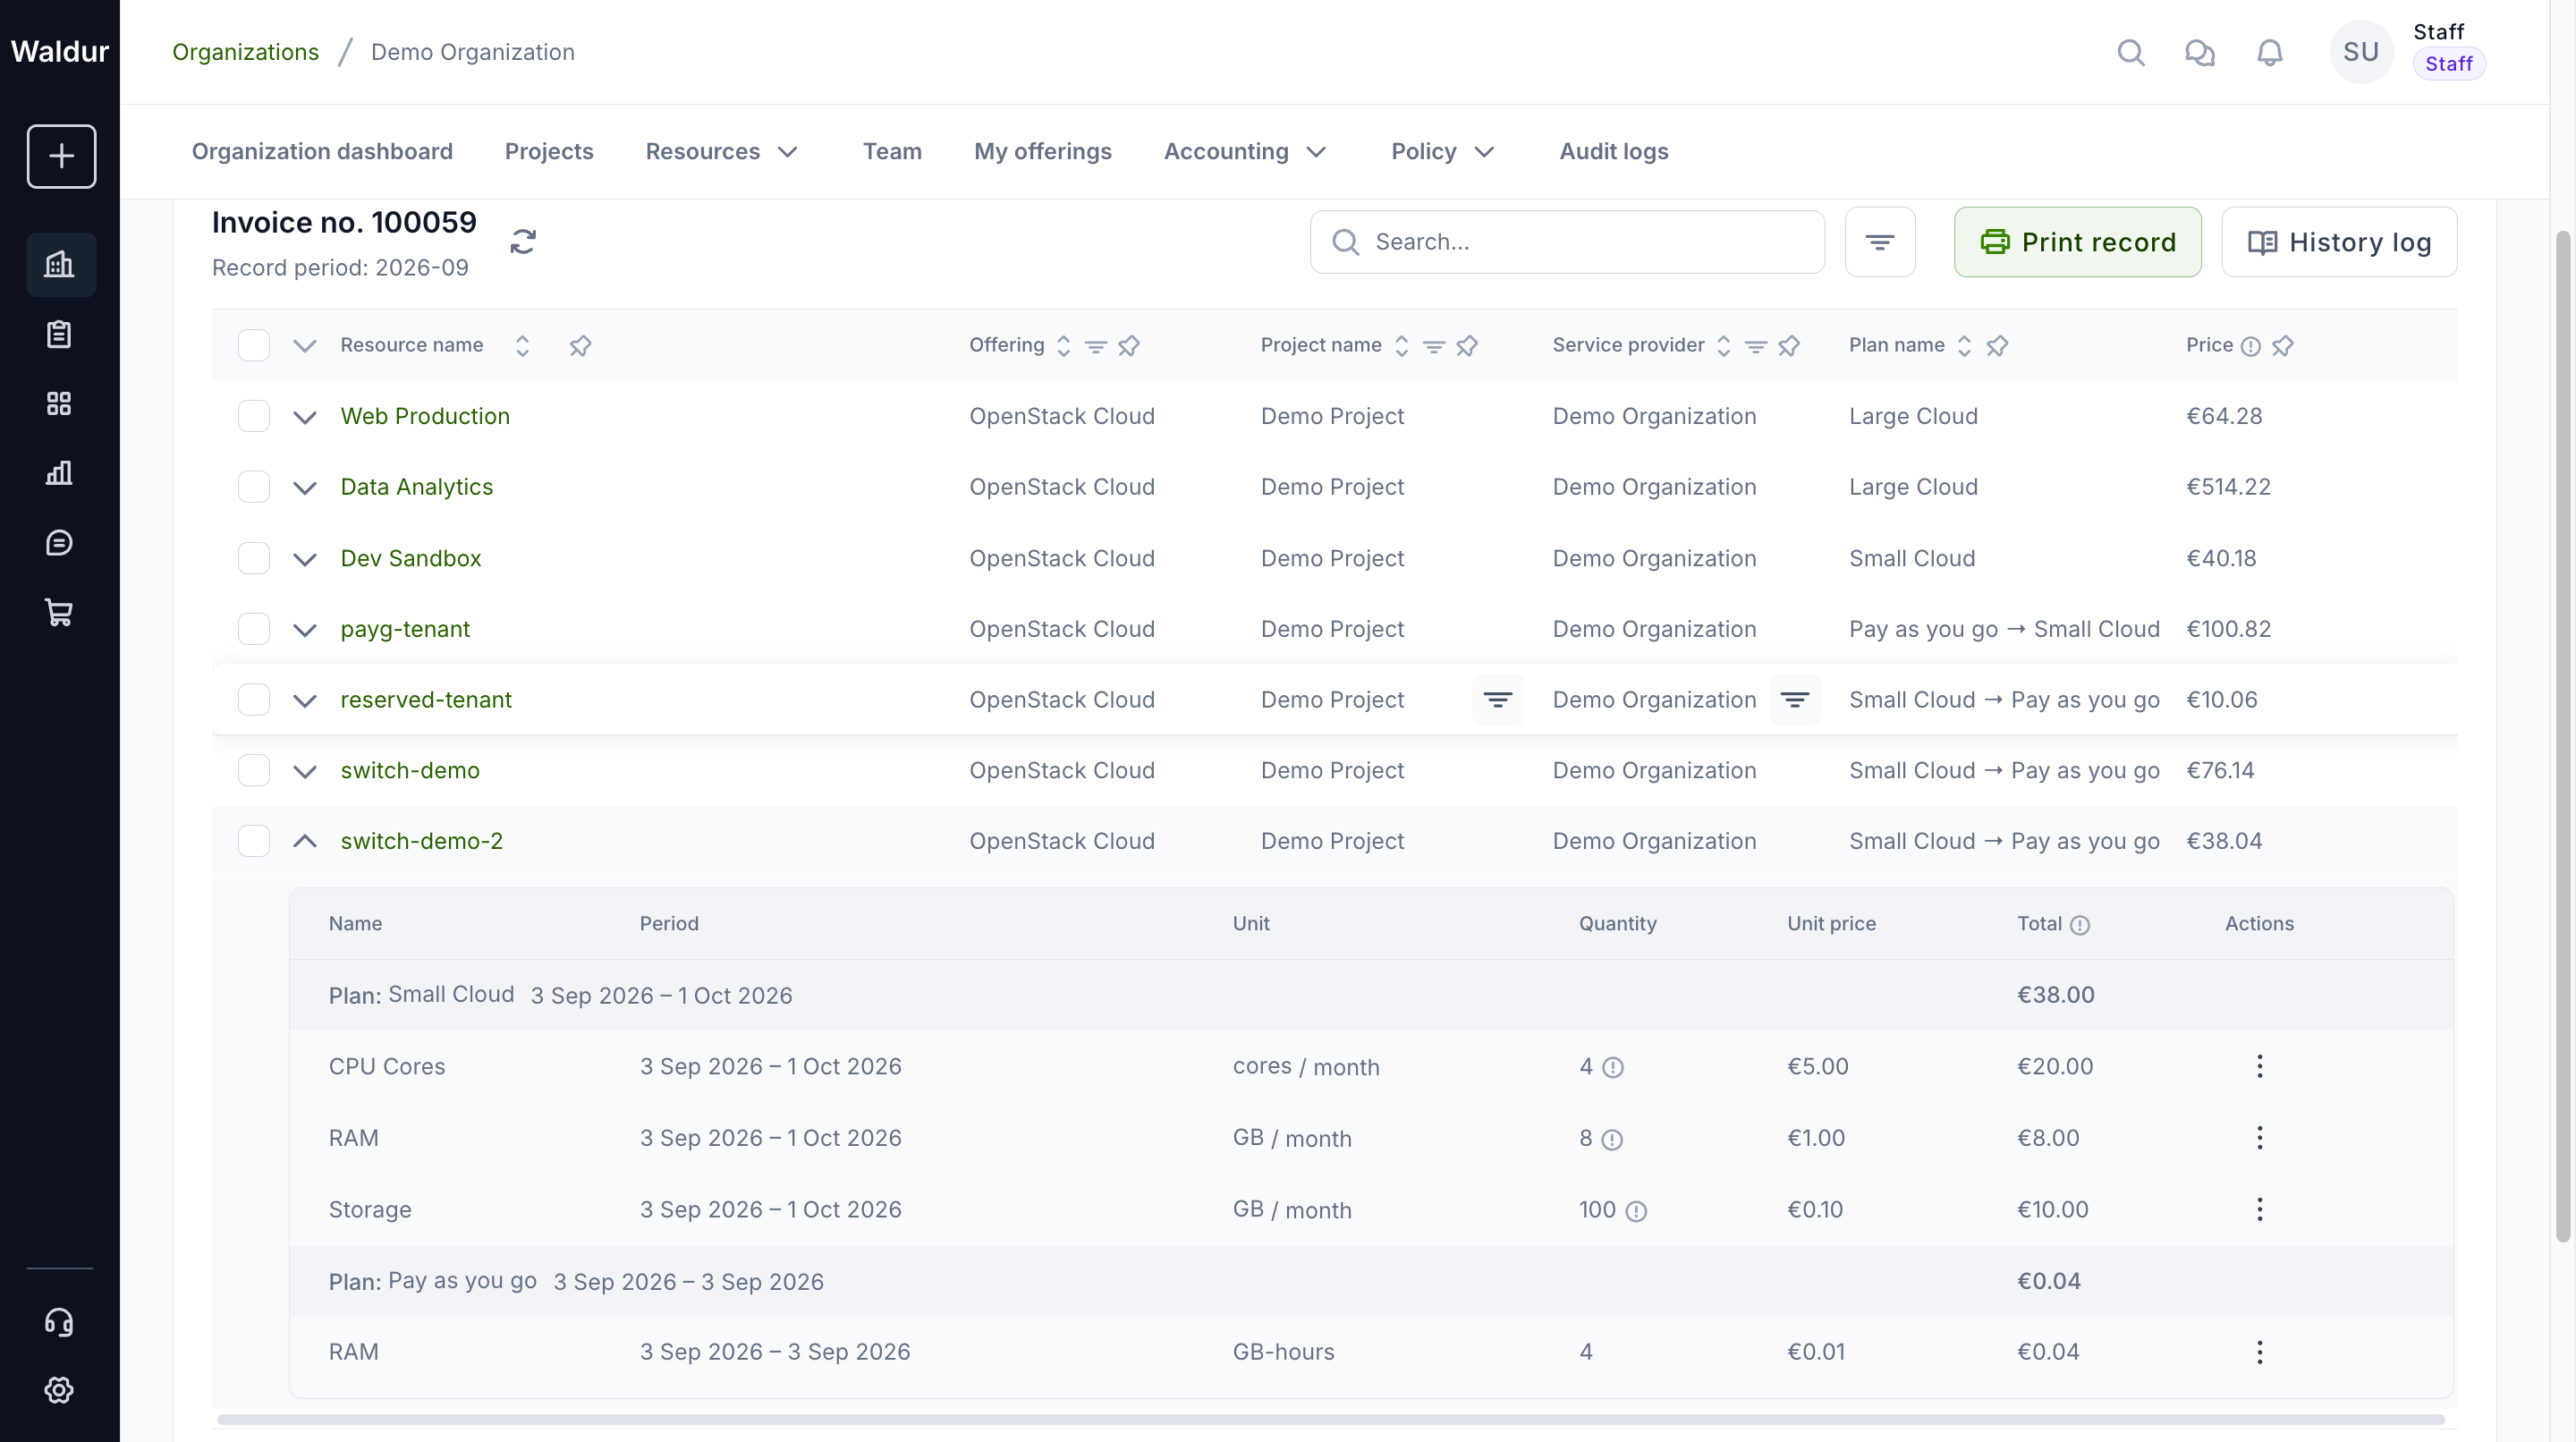
On the invoice the resource lists every plan it was billed with during the month, and its lines are grouped under one header per plan with the period and subtotal, so a month with a switch reads as one reserved block next to the usage block. Switching back to a plan within the same month continues that plan's line rather than charging its fee a second time.
Pausing or downscaling resources on usage limit
For offerings with limit-based components, Waldur can automatically restrict a resource once its reported usage reaches the component's limit for the current accounting period — pausing or downscaling the resource until usage drops back below the limit. Use this when a limit should act as a hard ceiling on consumption, not only as a billing basis.
Prerequisites
- The offering has at least one limit-based component with a limit configured for an accounting period (monthly, quarterly, annual or total).
- Usage is reported against that component, either by the service provider or by the backend.
Enabling it
- Open the offering's Edit page, go to the Integration settings and open the Resource lifecycle tab.
- Set Action on usage limit to one of:
- Pause — the resource is paused when the limit is reached.
- Downscale — the resource is downscaled when the limit is reached.
- Leave the field empty to disable the behavior.
- Click Save.
Pause and downscale are mutually exclusive — an offering uses at most one of them.
How it behaves
- When the reported usage of any limit-based component reaches or exceeds its limit for the current period, the resource is automatically paused or downscaled, according to the offering setting.
- The restriction is lifted automatically when usage drops back below the limit — for example, when a new billing period resets the period's usage, or when the component's limit is raised.
- For the Total accounting period, usage accumulates over the whole life of the resource and never resets, so the restriction is lifted only if the limit is increased.
- The feature toggles the same Paused / Downscaled state shown on the resource page. Only restrictions applied by this feature are lifted automatically — a resource paused manually, by a grace period, or by a cost and usage policy is left untouched.
- While the resource's project is in its grace period, a pause is not lifted even when usage drops below the limit; it is lifted once the grace period no longer applies.
Note
For provider backends that enforce these states (such as SLURM via the site agent), pausing blocks further usage and downscaling reduces the resource's share. For other backends the state is recorded and visible, but enforcement depends on the backend.
Adding custom components
Service providers can add custom accounting components to any offering alongside the built-in ones. This is useful for non-infrastructure services like consultancy hours, support packages, or training credits.
To add a custom component:
- Navigate to the offering's Edit → Accounting → Components tab.
- Click Add component.
- Fill in:
- Internal name: a machine-readable identifier (e.g.,
consultancy_hours) - Display name: shown to users (e.g., "Consultancy Hours")
- Measured unit: the unit label (e.g., "hours")
- Accounting type: select the billing model (e.g., "Limit-based" with "Maximum total" for one-time flat charges)
- Internal name: a machine-readable identifier (e.g.,
- Click Confirm.
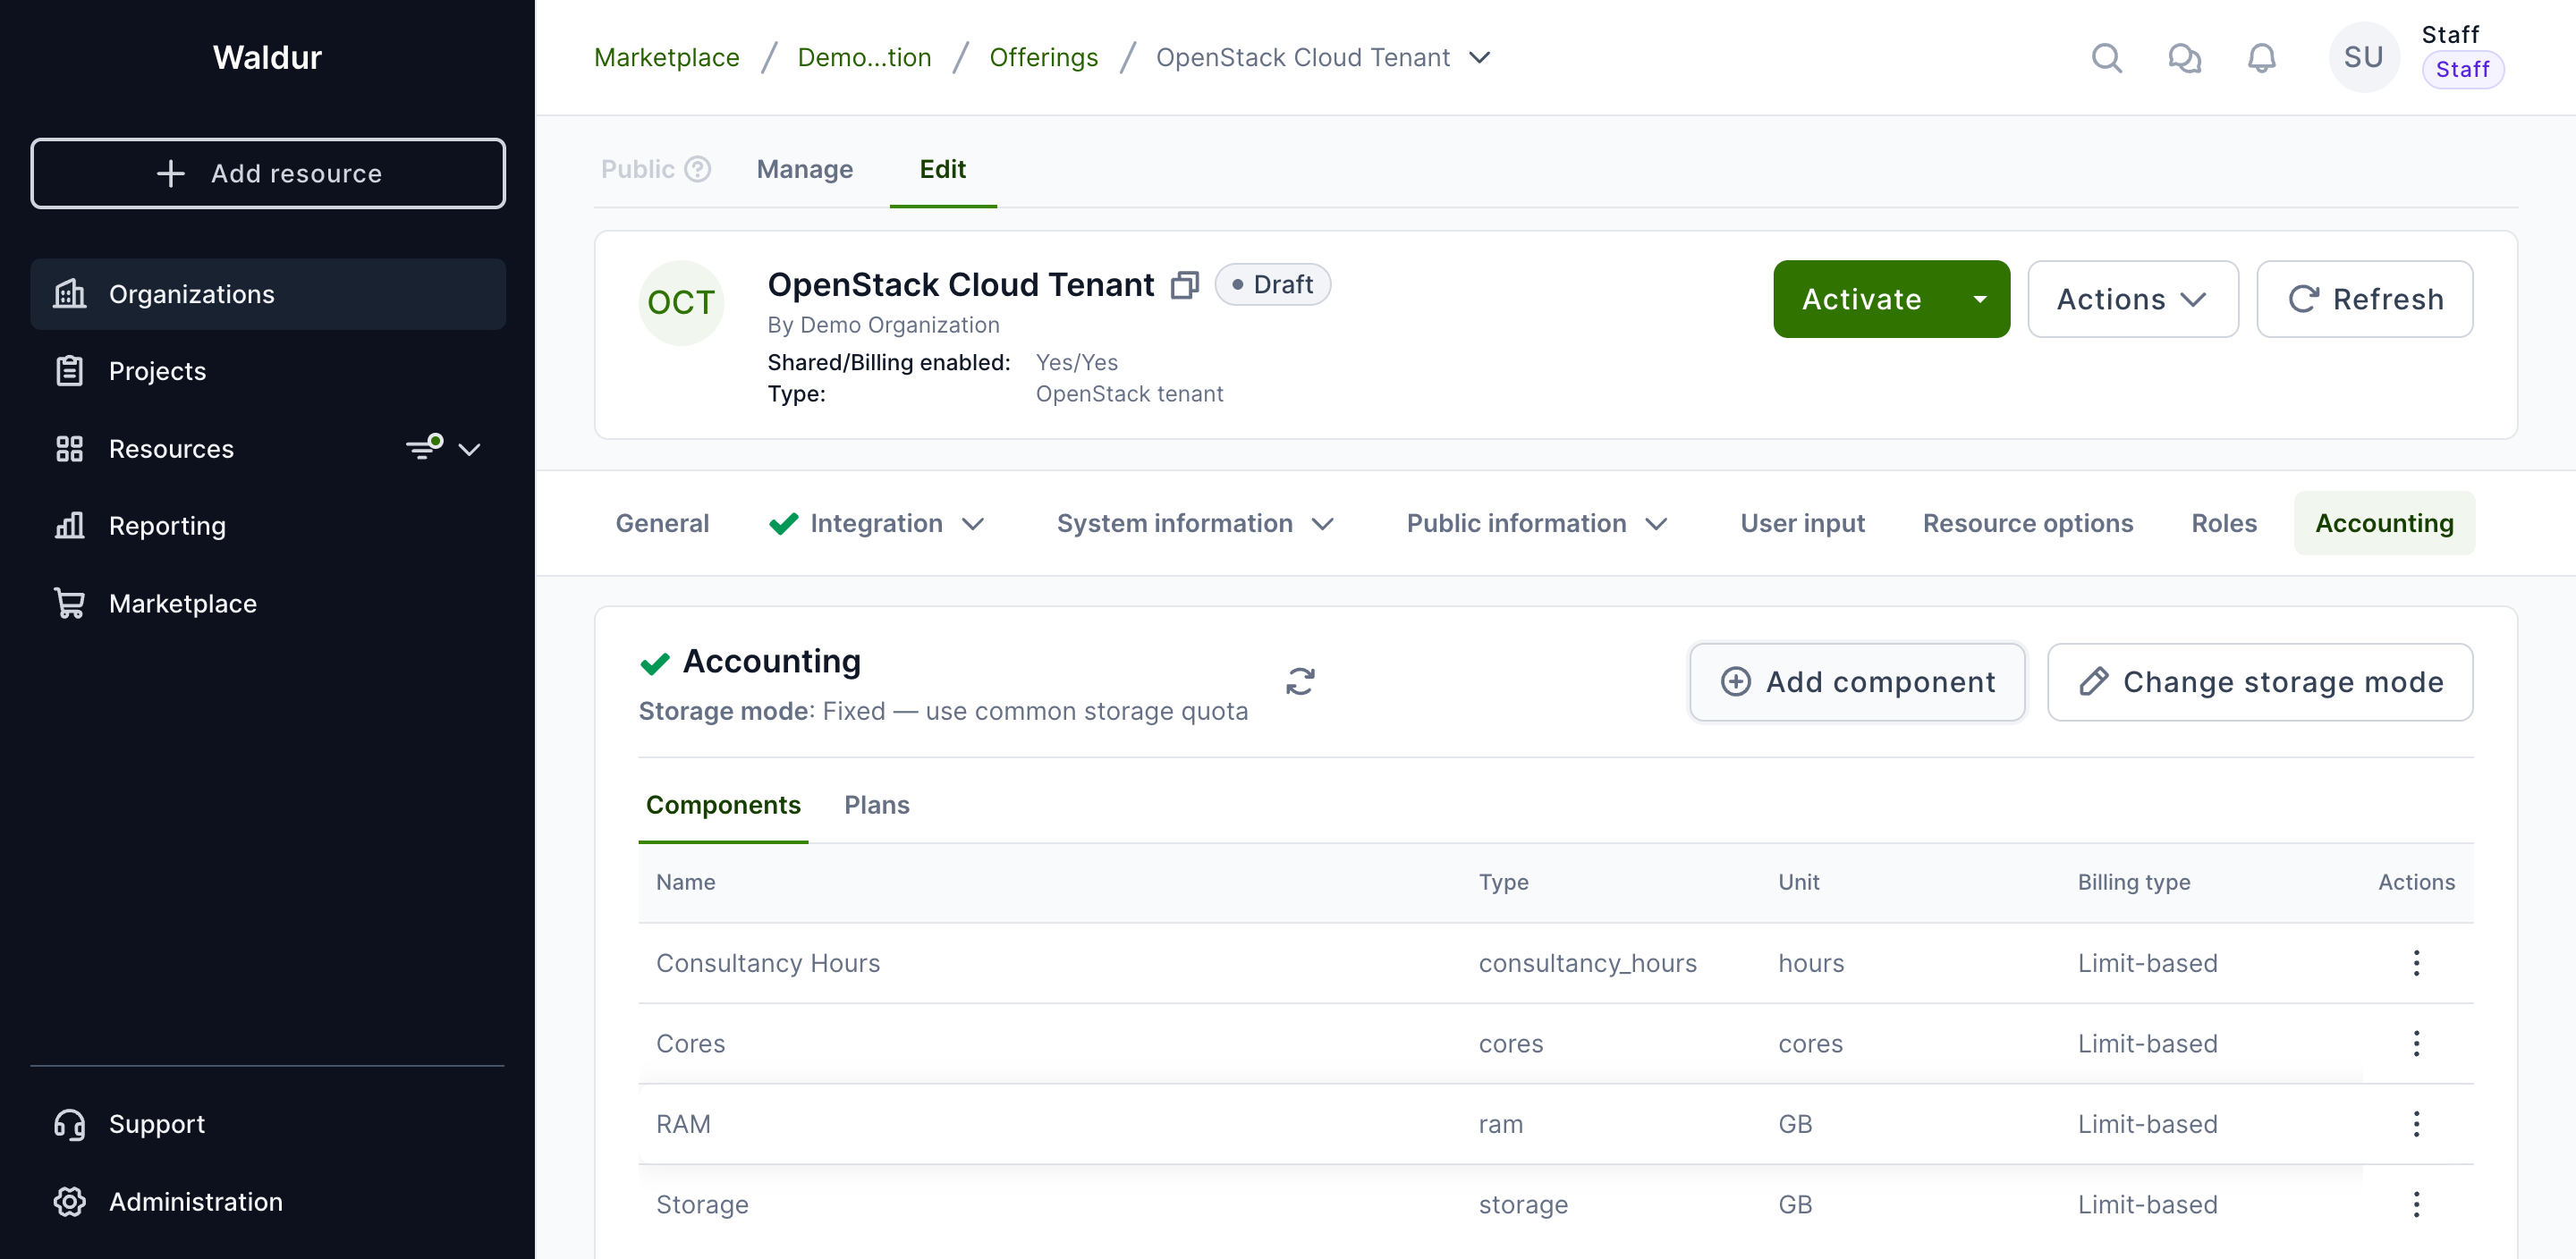
Custom components appear alongside built-in components in the order form and pricing views. They are billed according to their configured accounting type but are not pushed to the OpenStack backend as quotas.
Tip
Use Limit-based with Maximum total period for one-time flat-rate services like consultancy hours. Use One-time + Pre-paid for subscription-based add-ons that scale with duration.
Built-in components
Every offering has an Accounting tab with Components and Plans, and selecting Accounting opens Components first. Some offering types come with built-in components that their integration defines and relies on — for example Cores, RAM and Storage for OpenStack tenants, CPU, RAM and Disk for VMware virtual machines, and CPU, RAM and Storage hours for Rancher clusters. Other offering types start without components, and you add your own as described in Adding custom components.
Because the integration looks built-in components up by their internal name, they are protected:
- A built-in component cannot be removed — the Delete action is not offered for it.
- Its Internal name is read-only in the edit dialog.
- Everything else stays editable: display name, measured unit, accounting type, limits and article code. For OpenStack tenant offerings the display name and measured unit are fixed as well.
Custom components can be edited, including their internal name, and removed as long as no resource of the offering uses them. A custom component cannot take the internal name of a built-in one.
Per-tenant Instance and Volume offerings
The OpenStack Instance and Volume offerings that Waldur creates for each tenant are child offerings of the tenant offering. They use the tenant offering's plans and components, so they have no Accounting tab of their own — manage prices and components on the tenant offering.
Volume discounts
Service providers can configure volume discounts on a plan's components to reward larger usage. A discount grants a percentage reduction on a component once the customer's usage reaches a threshold, and is applied automatically when the invoice is finalized.
Configuring discounts
- Navigate to the offering's Edit → Accounting → Plans tab.
- Open a plan's ⋮ actions menu and choose Edit discounts.
- For each component, build the discount and pick its scope, then save.
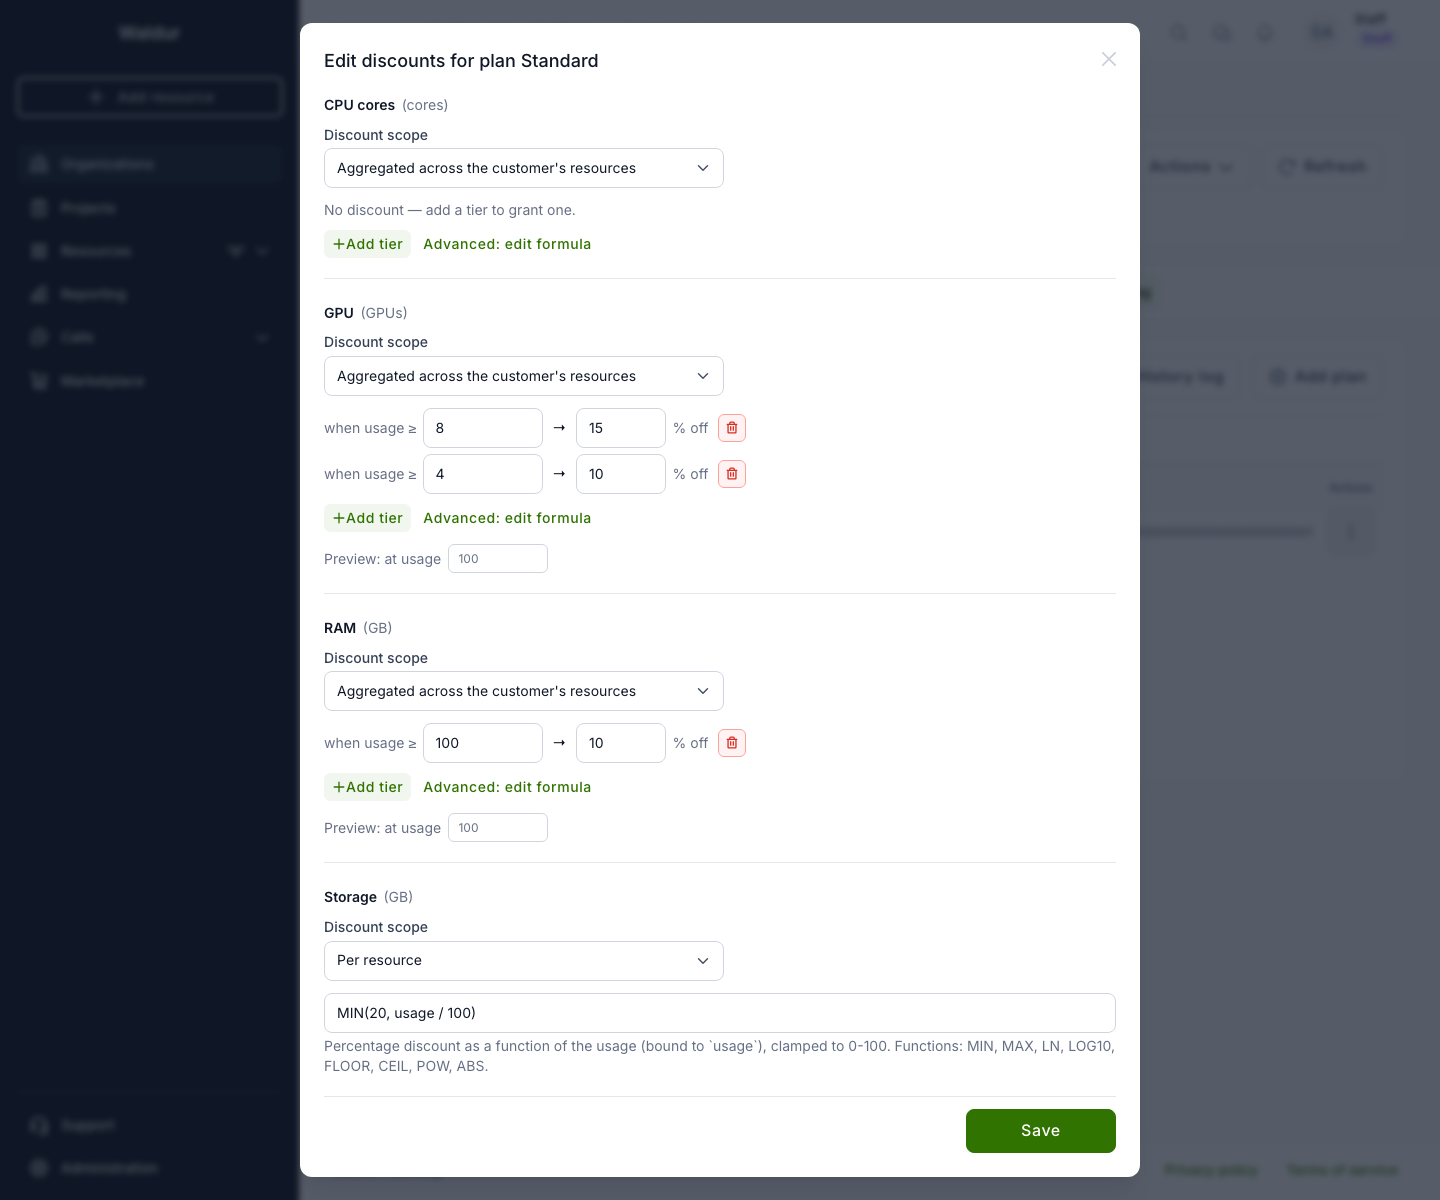
Tier builder
Add one or more tiers — each grants a percentage discount once usage reaches a threshold (when usage ≥ N → X % off). Add several tiers for graduated pricing; higher thresholds take precedence. Use the Preview field to check the resulting discount for a sample usage. Leave a component with no tiers for no discount.
Discount scope
Each component has a Discount scope:
- Aggregated across the customer's resources (default) — usage is summed across all of the customer's resources of the offering before the discount is applied, so consolidating usage can reach a higher tier.
- Per resource — each resource is discounted on its own usage independently.
Advanced formula
For discounts that are not simple tiers (for example a capped continuous
discount such as MIN(20, usage / 100)), switch to Advanced: edit formula
and enter a formula directly. The formula returns a percentage (clamped to
0–100) as a function of the usage bound to usage, and supports the functions
MIN, MAX, LN, LOG10, FLOOR, CEIL, POW and ABS.
How discounts appear
Volume discounts are computed at invoice finalization, not at order time, so the exact saving depends on the customer's actual usage for the month. On the customer's invoice the discount appears as a separate negative line paired with each discounted component — see volume discounts on invoices.
Tip
Discounts are configured per plan. When a customer has resources on different plans of the same offering, keep a component's discount consistent across the plans, since the aggregated discount uses one plan's formula for the whole offering component.
Asking customers for order details
The questions a customer answers when ordering an offering are configured on the offering's User input tab. Each input has a type (for example String, Integer, Boolean, Select, Select multiple options, Date or one of the Kubernetes configurations), a label, an optional help text, and can be marked required. Inputs on the Resource options tab work the same way, except that they cannot be marked required, and their values stay editable on the resource after it is created.
Showing an input only when it applies
A follow-up question often only makes sense after a certain answer. Open the input in the Add option or edit dialog, and under Show only when click Add rule:
- Pick an earlier input. Only Boolean, Select and Select multiple options inputs can control visibility, and the controlling input must come before the dependent one in the list.
- Pick the values that show the input: Checked or Unchecked for a Boolean input, or one or more choices for a select. A Boolean input the customer has not ticked counts as unchecked. For Select multiple options, the input is shown when any of the picked choices is selected.
While the rule does not match, the input is hidden in the order form. A hidden input is never required, and a value it had is cleared and not stored with the order or the resource. Rules can be chained: when an input is hidden, inputs that depend on it are hidden too. Remove rule makes the input always visible again.
For example, to ask which backups a customer wants and, for each of them, which storage account to use:
| Input | Type | Show only when |
|---|---|---|
| etcd snapshots | Boolean | — |
| etcd snapshot storage account | Select: Own account, Request a new account on behalf of the project (required) | etcd snapshots is Checked |
| Velero backups | Boolean | — |
| Velero backup storage account | Select, same choices (required) | Velero backups is Checked |
| Longhorn backups | Boolean | — |
| Longhorn backup storage account | Select, same choices (required) | Longhorn backups is Checked |
A customer who ticks only Velero backups sees and must answer only the Velero account question.
Note
An input that another input's rule refers to cannot be deleted, and it cannot lose its type or a choice the rule uses. Change or remove the rule first.
Kubernetes cluster topology
The Single-Datacenter Kubernetes Configuration and Multi-Datacenter Kubernetes Configuration inputs let the customer describe a cluster: Kubernetes version, OpenStack infrastructure, node groups and access rules. In the input's settings, Cluster topology decides how the controller nodes are placed:
- Single site, 3 controllers — one datacenter holds all three controllers.
- Three sites, 1 controller each — the cluster spans three datacenters, each configured separately.
- Customer chooses — the order form shows a Cluster topology selector with both layouts. Switching it keeps the version, access rules, Longhorn and load balancer choices, and resets the per-datacenter infrastructure and node groups.
When Cluster topology is left empty, the input type decides: one site for the single-datacenter input, three sites for the multi-datacenter one. Orders that request a topology the offering does not allow, or the wrong number of datacenters for their topology, are rejected.
Calculating limits from one answer
Some offerings are billed for several limit components that the customer should not have to size one by one. A managed database, for example, may be billed for primary data, primary write-ahead log (WAL), replica data, replica WAL and a daily full backup, while the customer only knows how much data they want to store. Two input types derive such limits from a single answer:
- Component Formula asks the customer for one number and sets each chosen limit component to a formula of it.
- Component Sum sets a limit component to the sum of other limit components, for example a backup that covers all storage.
The calculated limits are priced like any other limit: the customer sees the quantities and the price before ordering, and the provider is billed for exactly what the form showed. The customer cannot edit them directly.
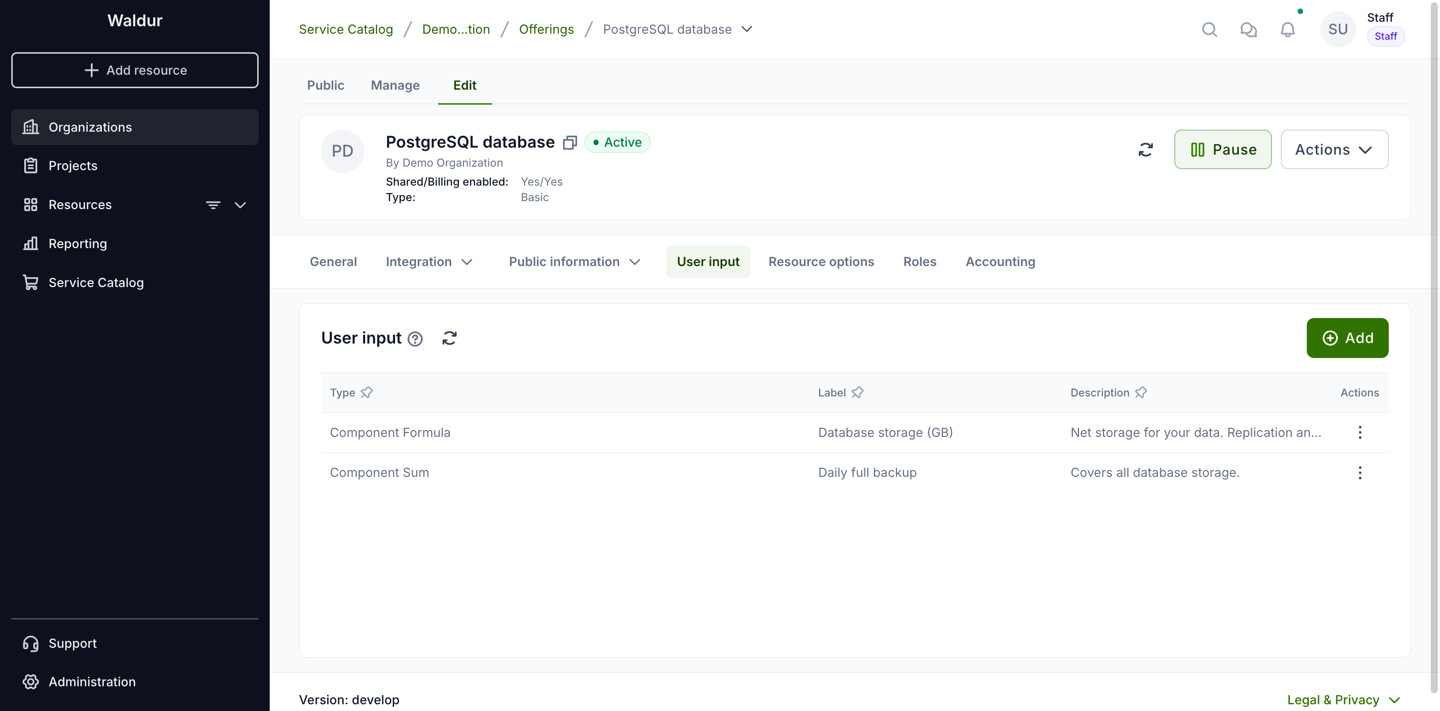
The type picker describes each component type when you add an input:
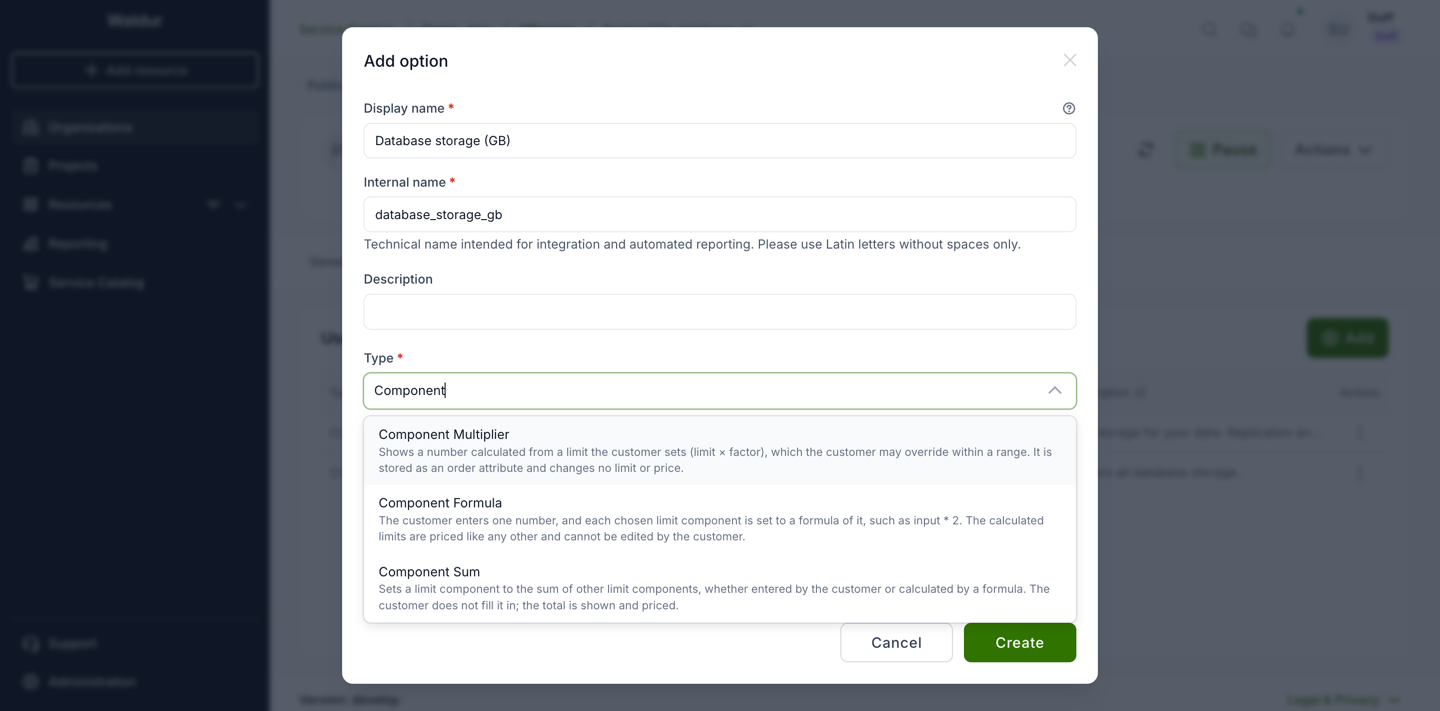
Setting up a Component Formula
- On the User input tab click Add, enter the display name the customer will see (for example Database storage (GB)) and pick Component Formula.
- On the Settings step, set the smallest and largest value the customer may enter.
- Under Calculated components, add a row per limit component and write its formula. A formula may use
input(the value entered), numbers such as2or0.25,+ - * /and parentheses, for exampleinput * 2 * 0.25. Other names and functions are not accepted, and an invalid formula is flagged before you save.
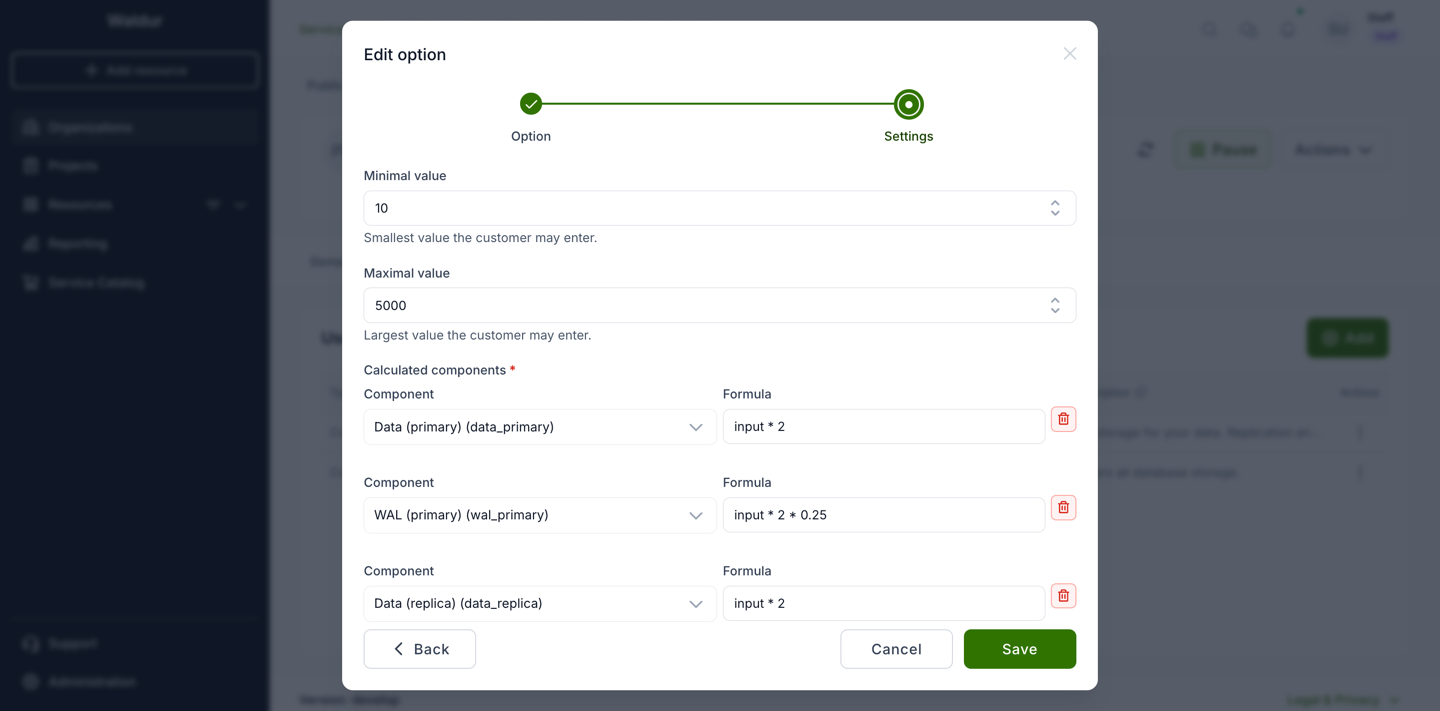
Results are rounded up to the precision of each component, so a whole-number component calculated as 166.5 becomes 167.
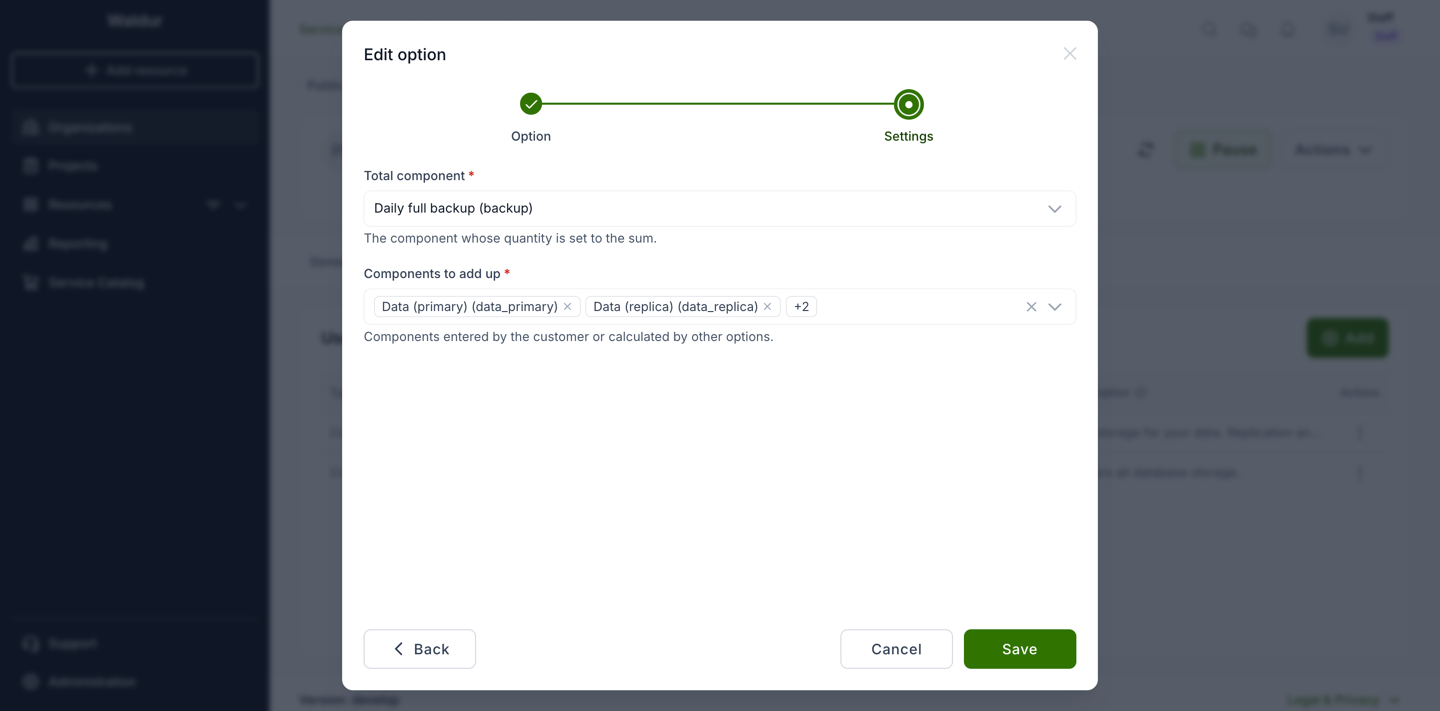
Setting up a Component Sum
Add an input of type Component Sum. On the Settings step pick the Total component and the Components to add up. These can be components the customer enters, components calculated by a formula, or other sums; the total cannot include itself.
What the customer sees
The order form shows the calculated quantities under the input, and the plan table and order summary price them as the customer types:
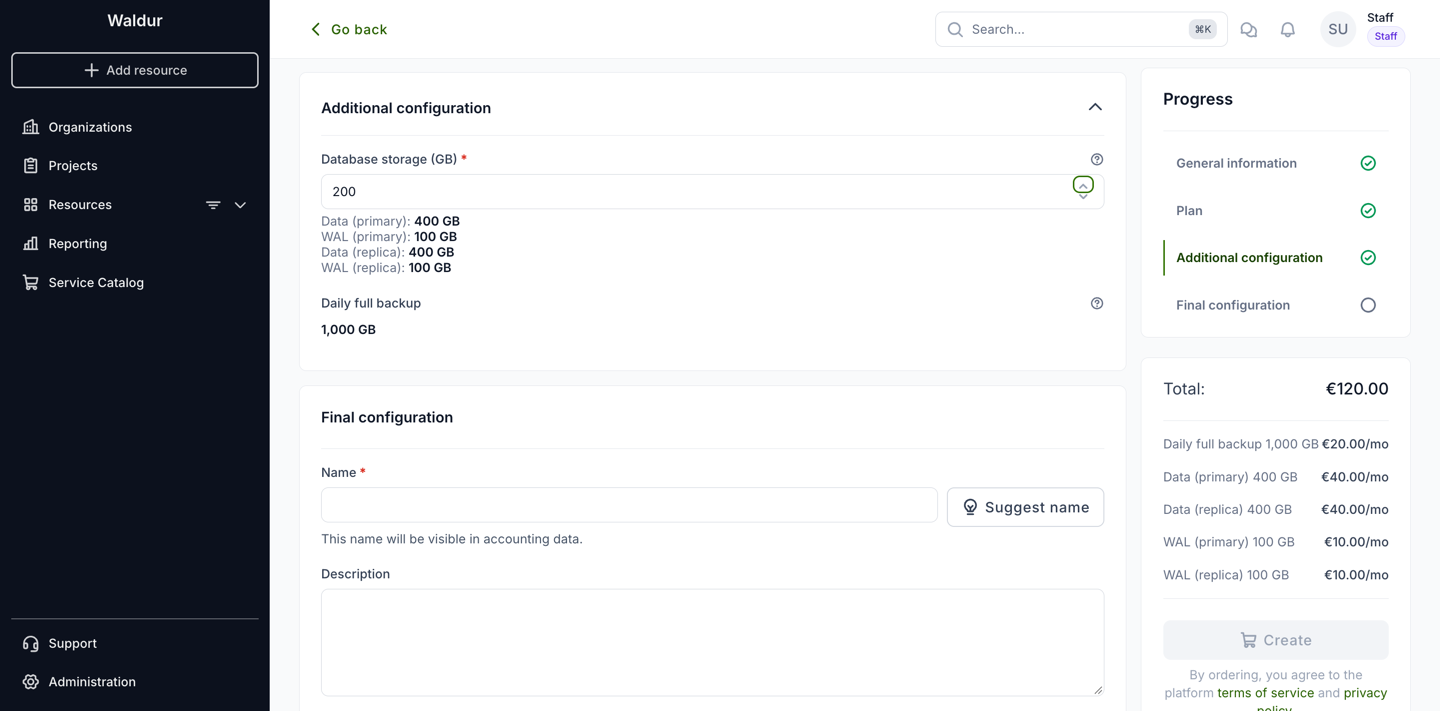
Only limit-based components can be calculated. While an input refers to a component, the component cannot be removed, renamed or switched to another billing type on the Accounting tab.
Letting customers change the value later
To let customers change the number after ordering, for example to grow the database, add it as a resource option too. On the Resource options tab click Add, pick Component Formula and, under Order option, the order input it belongs to. It has no settings of its own: the formulas and the smallest and largest values of the order input apply.
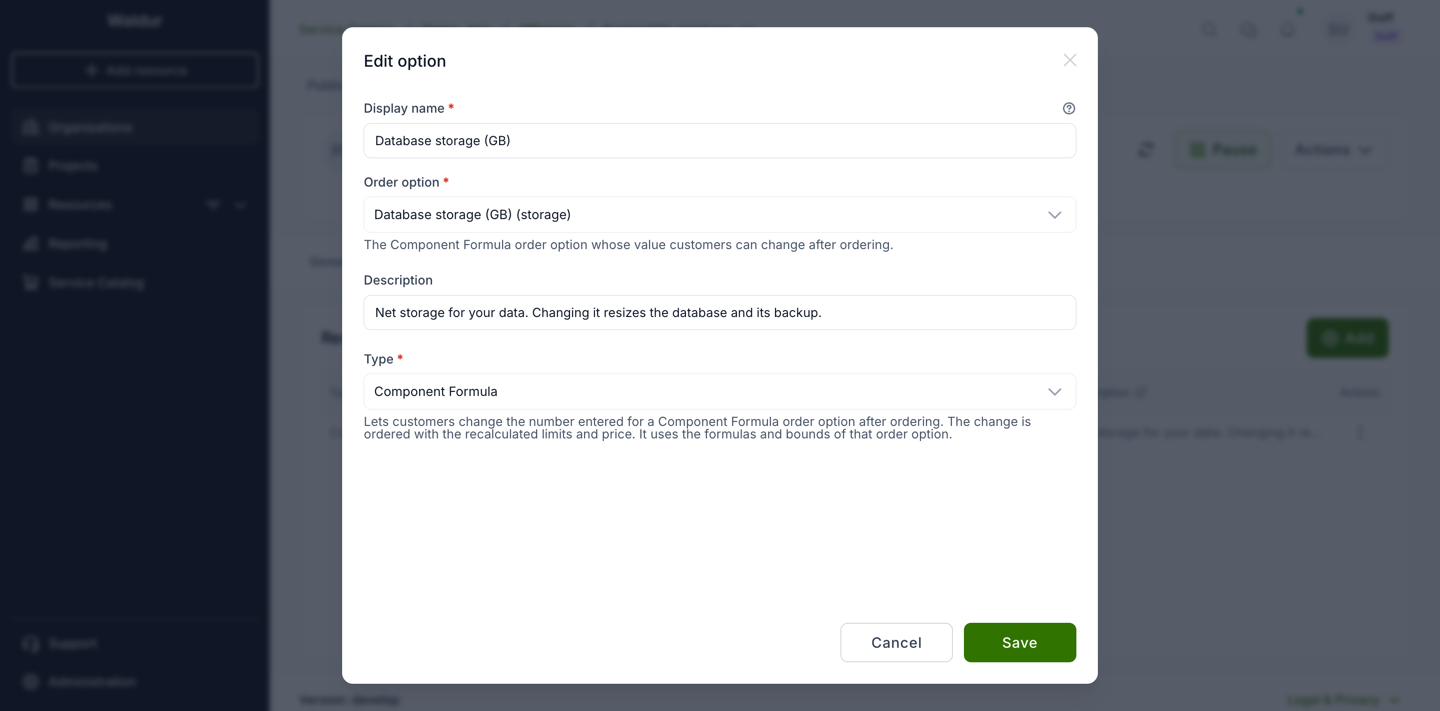
The ordered value is then shown on the resource's Options tab, where customers can change it. A change is always submitted as an order carrying the new value and the recalculated limits, so it is priced, approved and provisioned like any limit change — see Changing a calculated size. A provider who changes the value while approving the order changes the limits and price with it.
Note
A Component Sum cannot be a resource option: it follows the components it adds up.
Offering management
The offering's state is changed from its Edit tab. The button in the top-right corner shows the next step for the current state:
- Activate (draft offering) — publishes the offering in the marketplace. When service providers may not manage the offering lifecycle themselves, the button reads Request publishing and sends the request to staff.
- Pause (active offering) — temporarily unpublishes the offering, for example if the service is down for a longer maintenance.
- Resume (paused offering) — publishes the offering again.
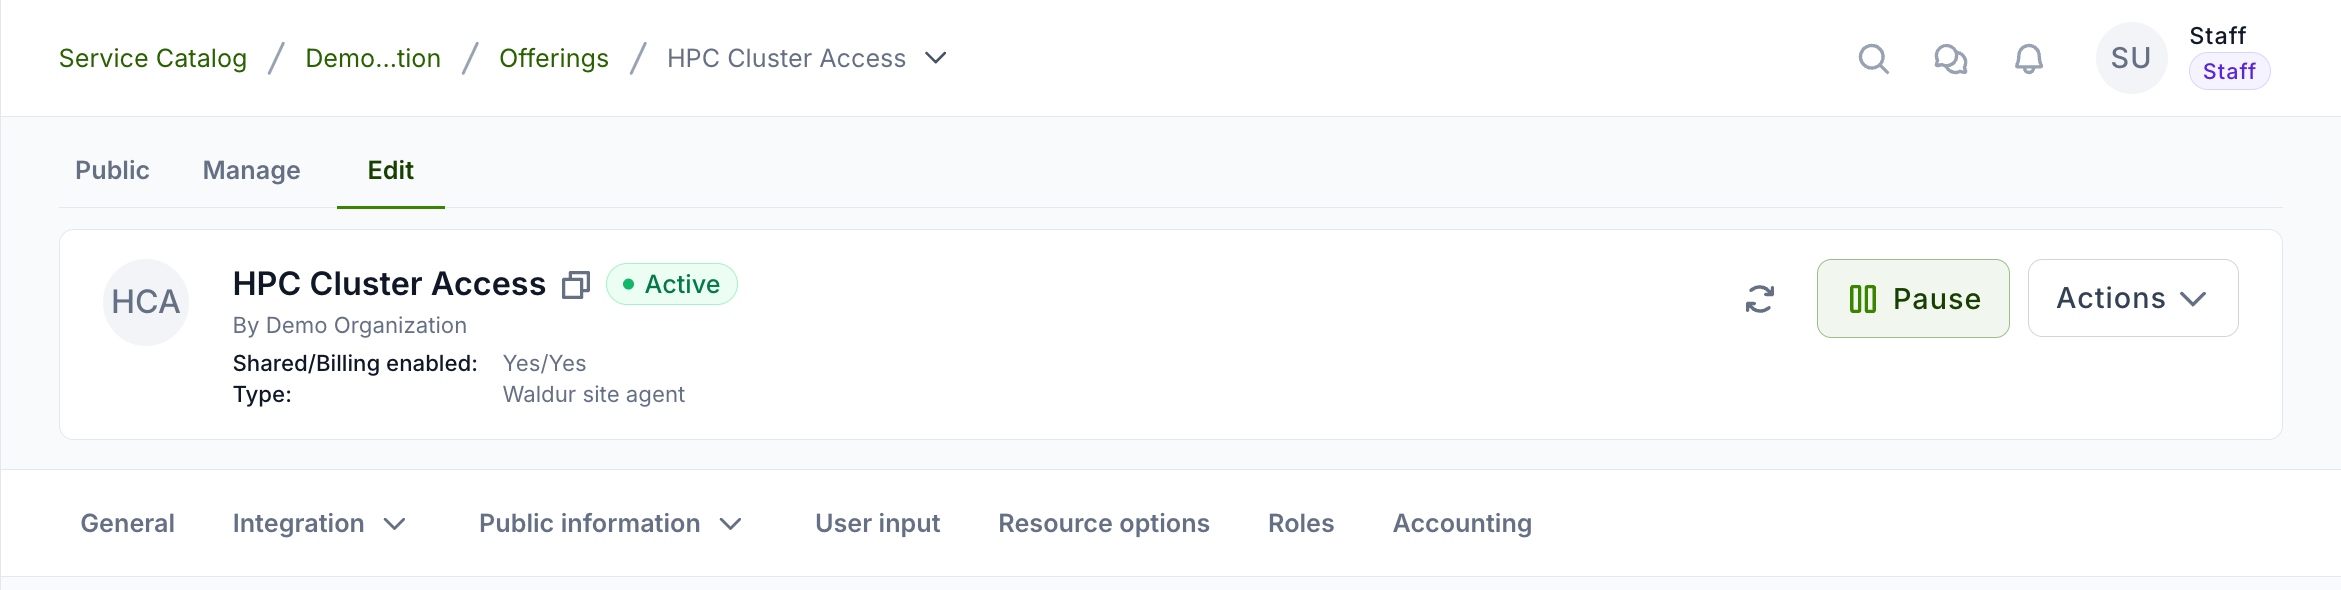
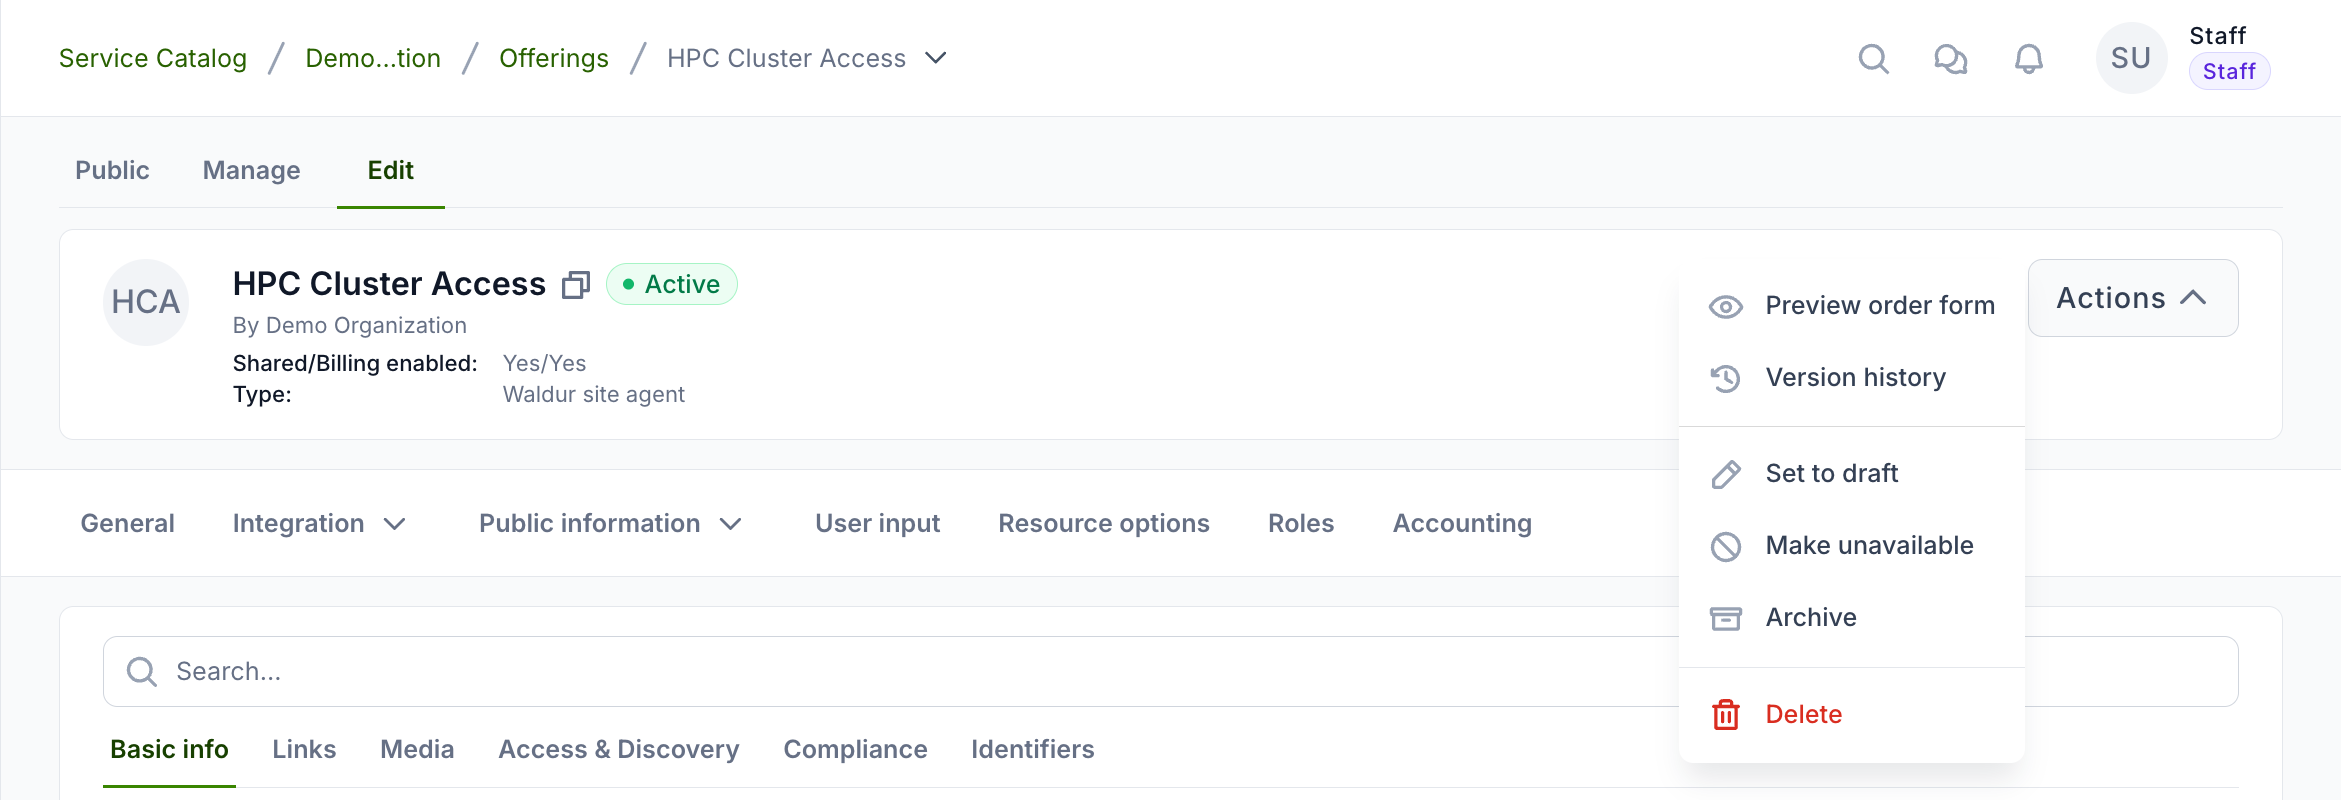
The other lifecycle actions are in the Actions menu next to that button:
- Set to draft — returns the offering to draft so it can be edited before publishing it again. Shown as Request editing when the change needs staff approval.
- Make unavailable — marks the offering as down. The dialog lists the affected resources and takes an optional reason, which is shown to users. An unavailable offering can be restored later from the same place.
- Archive — retires an offering that is not needed anymore. An archived offering can be returned to draft with the button in the top-right corner.
- Delete — removes the offering permanently. Staff can delete any offering; service providers can delete only a draft offering that has no resources.
Note
The lifecycle actions are shown only on the Edit tab. Make unavailable and Delete are available to service providers only when ALLOW_SERVICE_PROVIDER_OFFERING_MANAGEMENT is enabled; otherwise they are staff-only.
Restricting who can see and order an offering
By default a shared offering is visible to everyone in the marketplace catalog. You can restrict an offering so that only users holding specific project or organization roles can see and order it.
Open the offering's edit page and go to Integration → Operations → Orders & approval. In the Restrict to roles field, select one or more roles (for example Project manager and Project administrator).
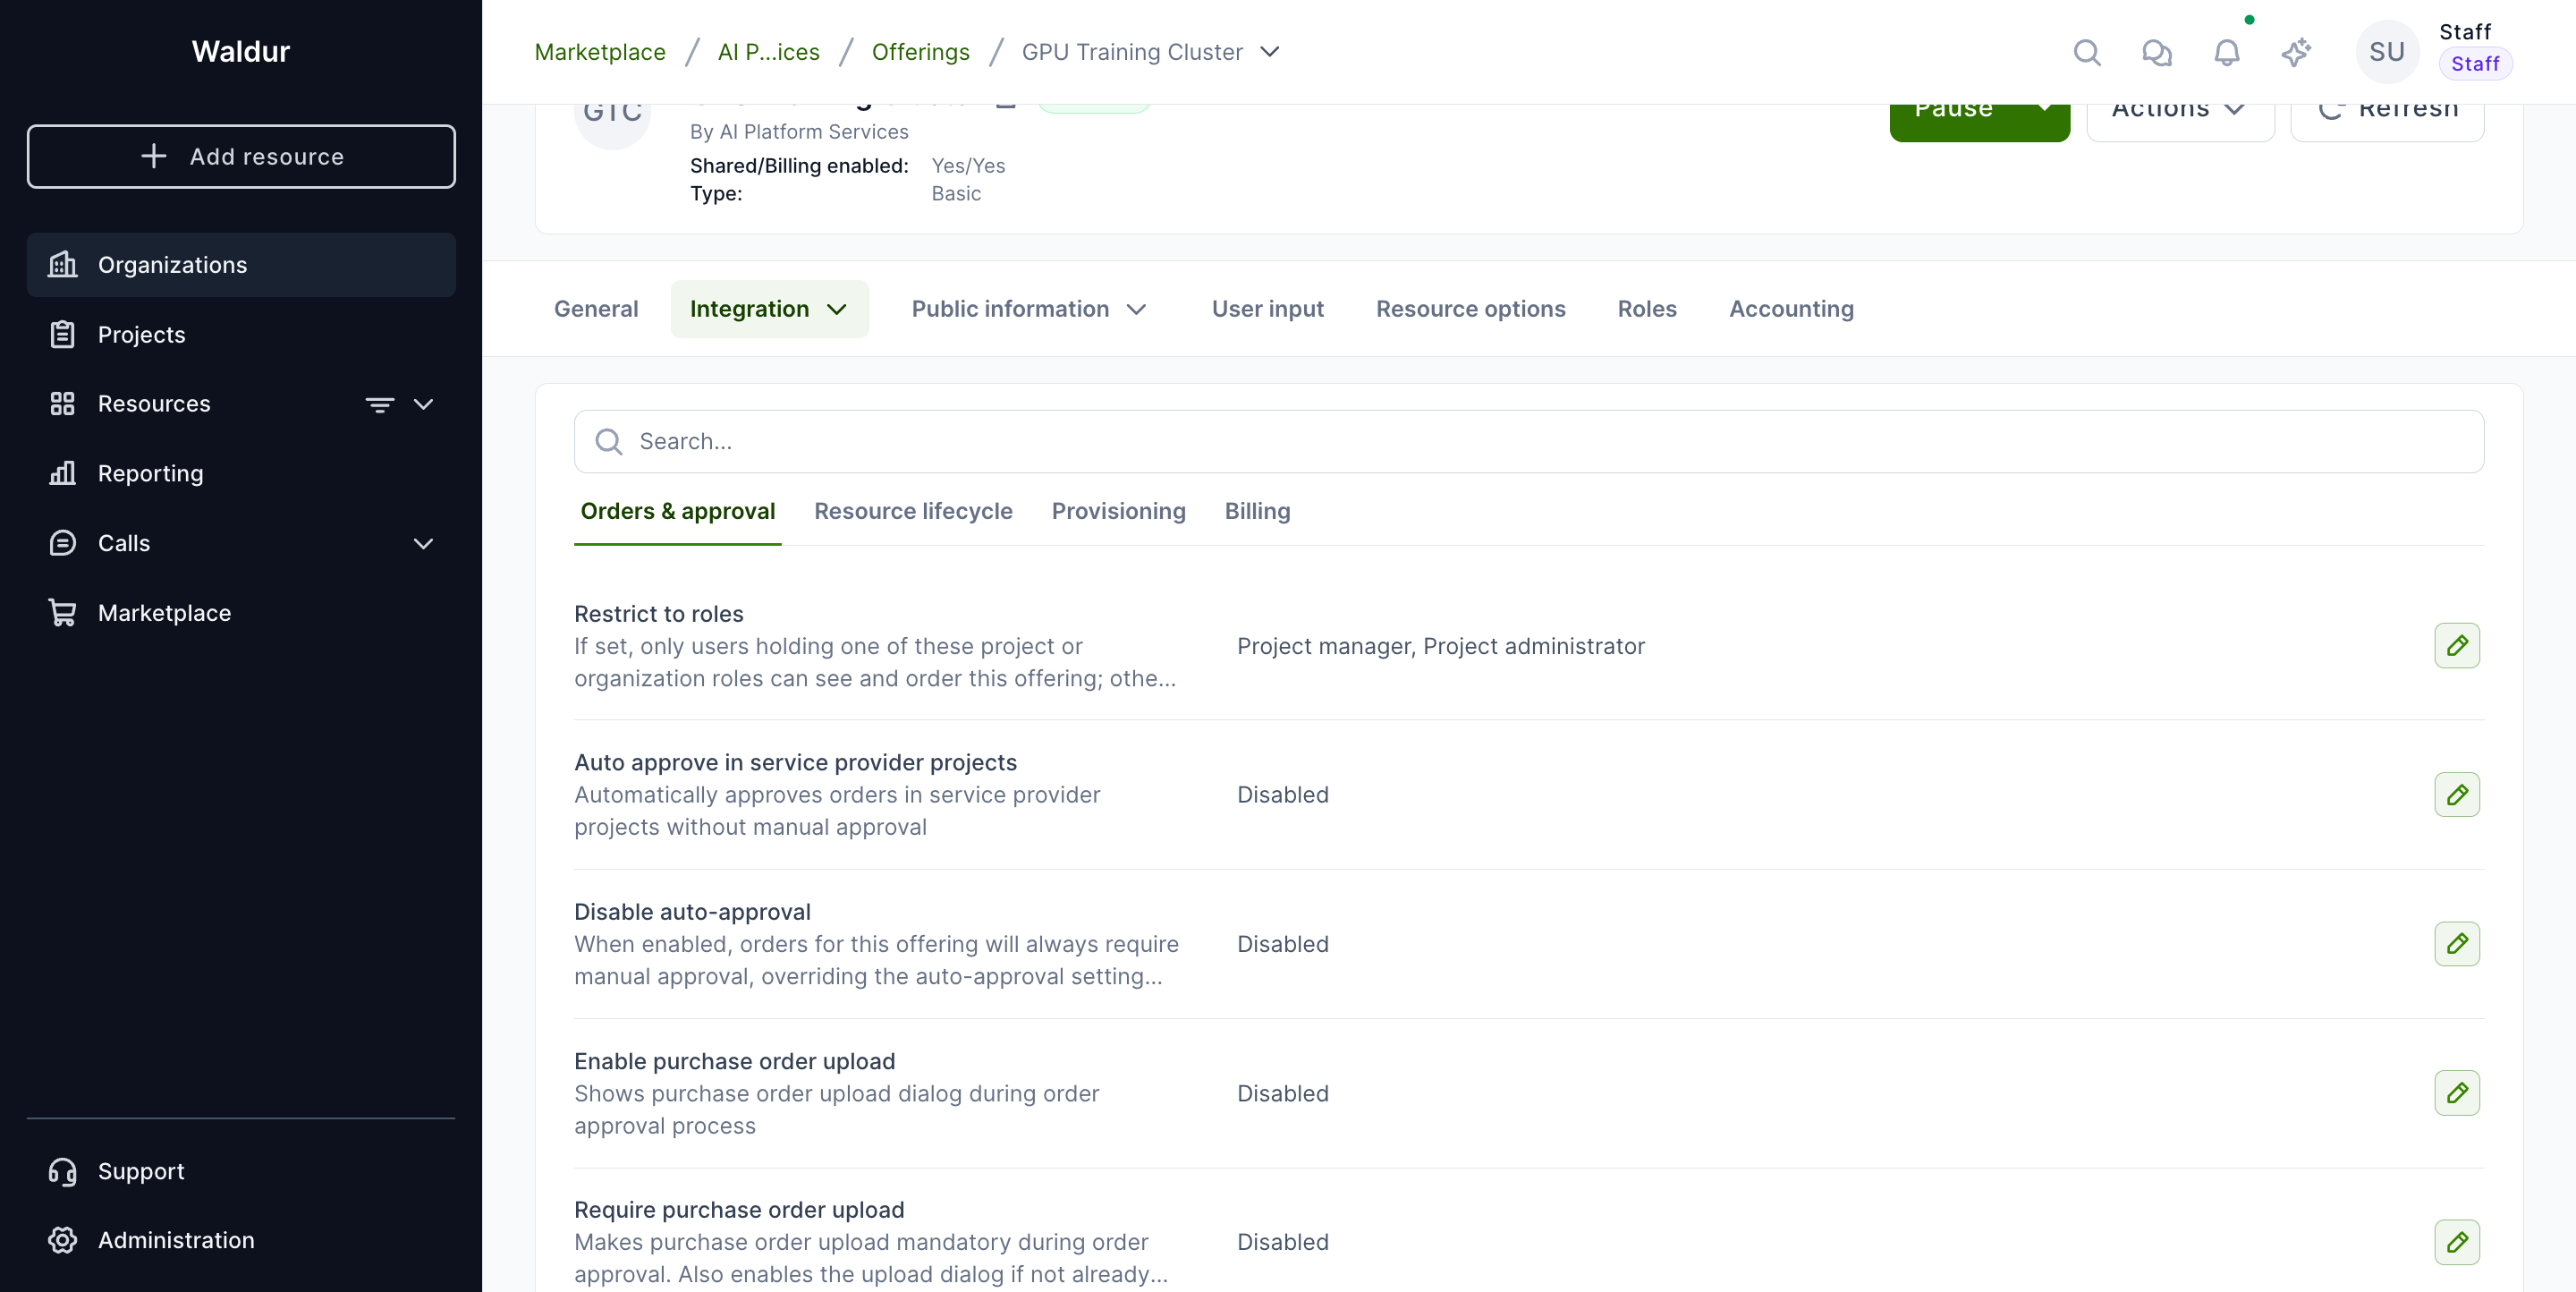
The dropdown lists both project roles and organization roles, so you can combine them (for example Organization owner and Project manager):
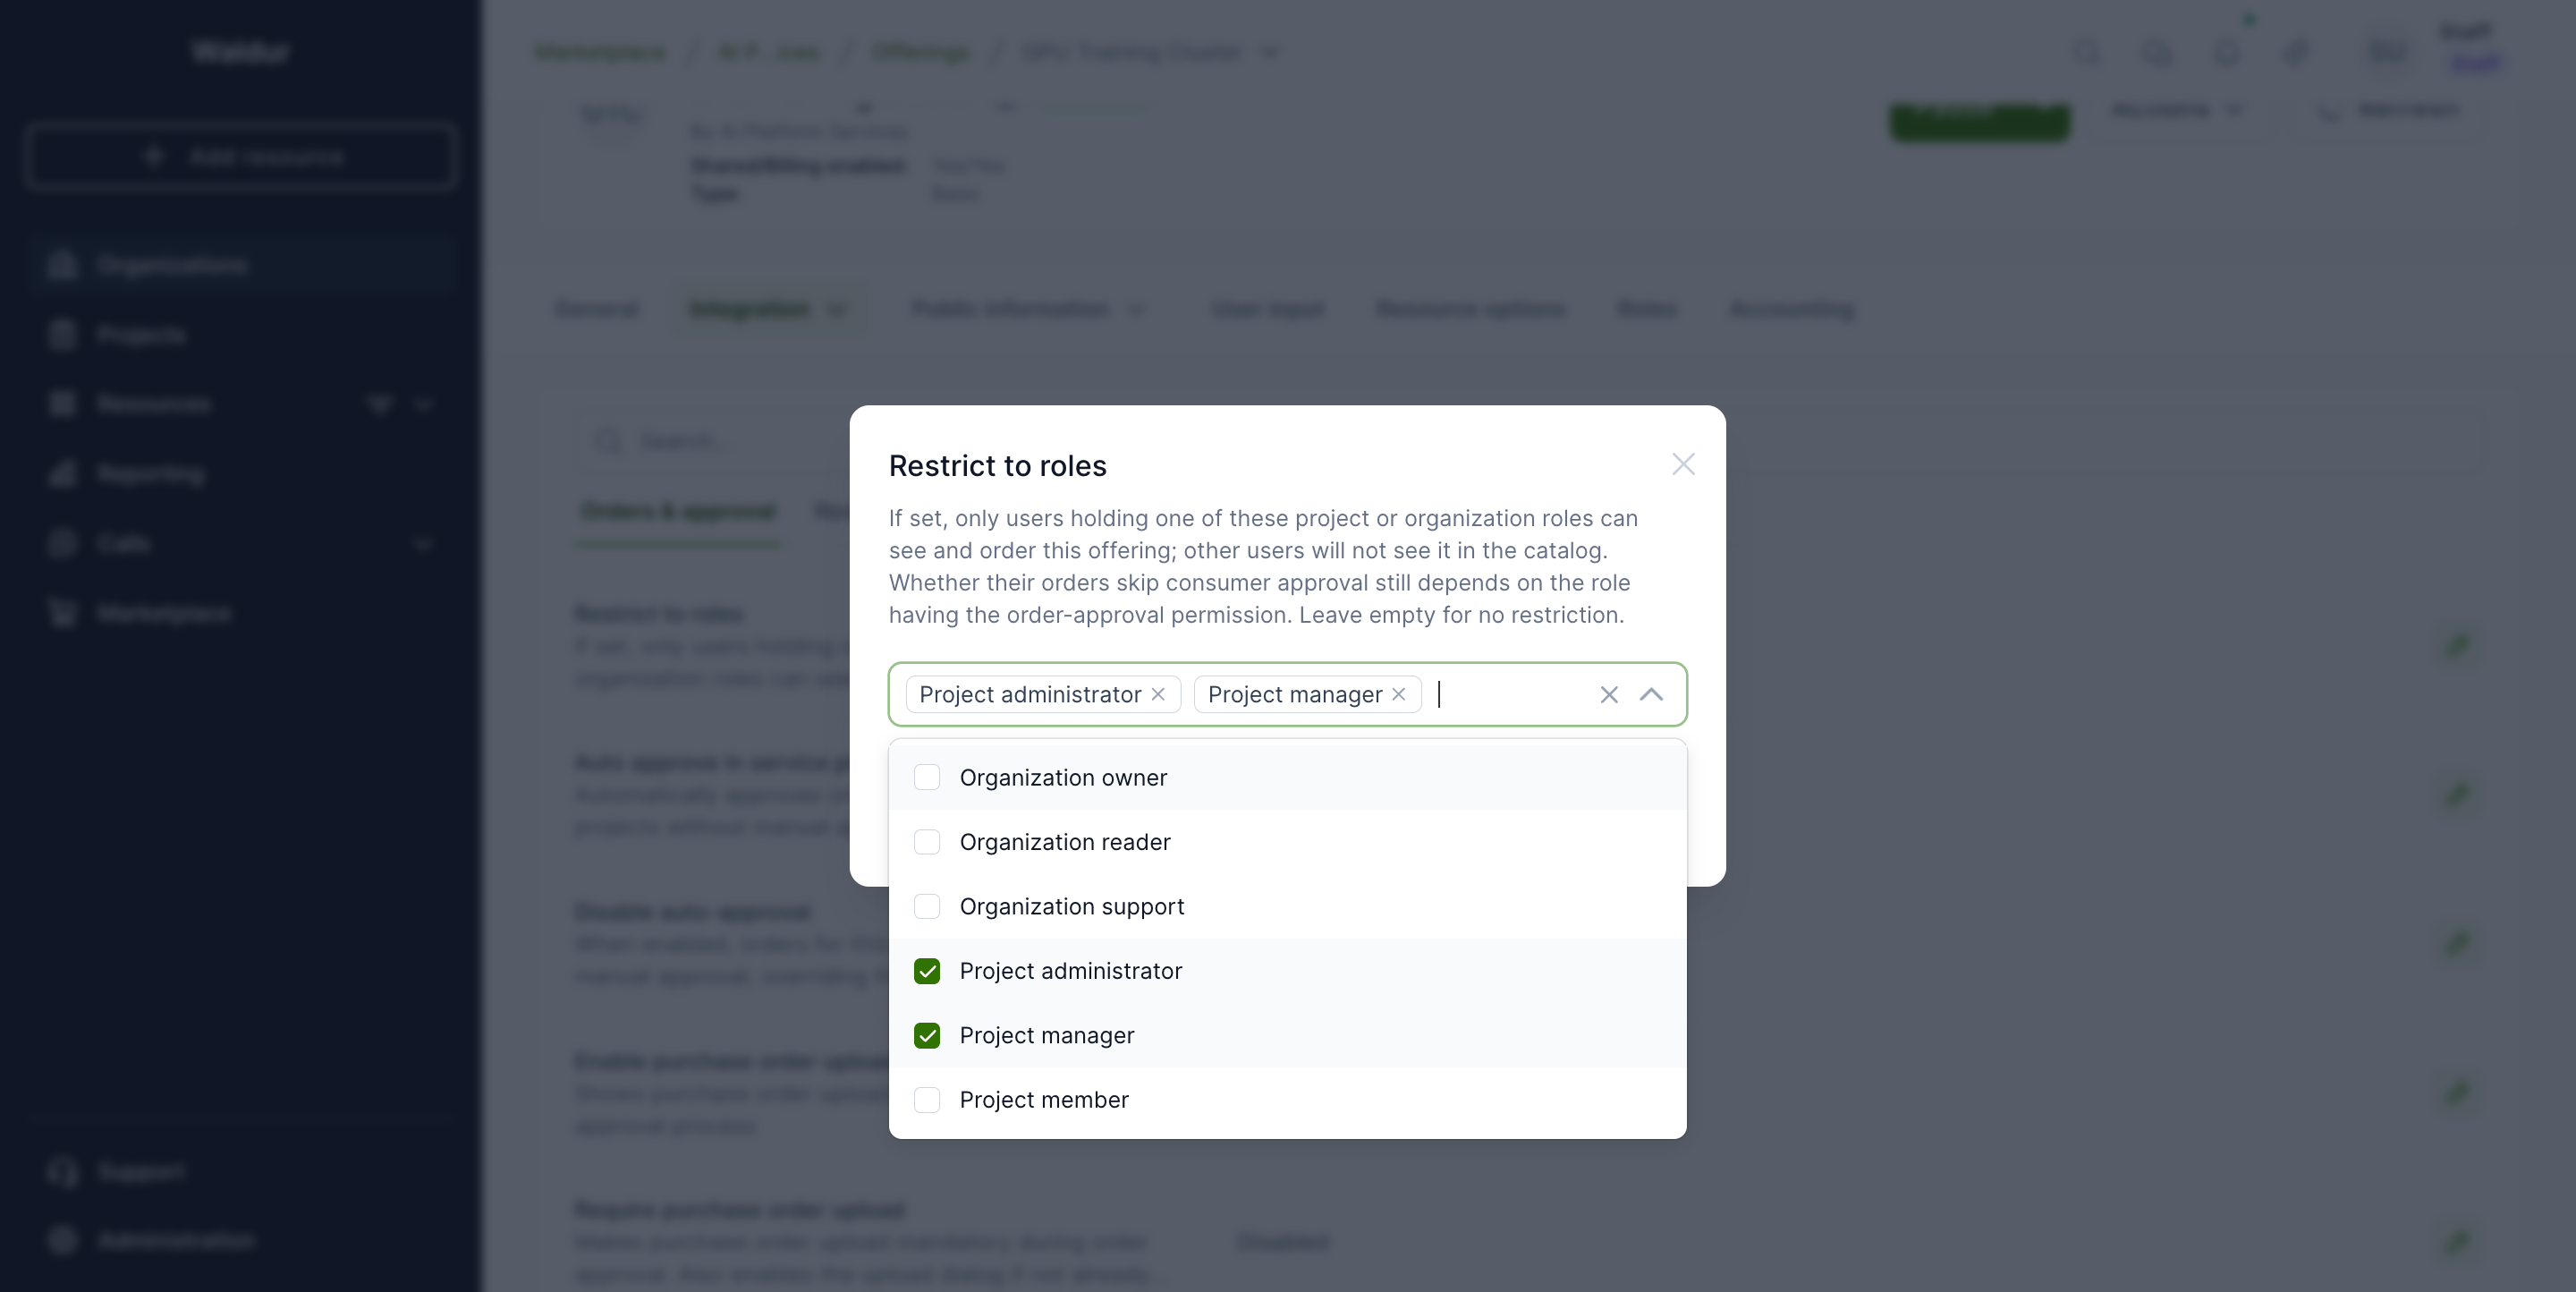
When the field is set:
- The offering is hidden from the marketplace catalog for users who do not hold one of the selected roles. Existing consumers who already have resources from the offering keep access to it.
- Only users holding one of the selected roles in the target project or its organization can create an order for it. Other users get a "restricted to designated project roles" error.
- When the offering is opened from the marketplace, the order form's organization and project selectors only list the organizations and projects where the user holds one of the required roles, so a user cannot accidentally order into a project where they lack access.
- Staff and support users are not affected and can always see and order the offering.
Note
This setting controls visibility and ordering only. Whether a user's order skips consumer-side approval depends on whether their role has the order-approval permission — it is not granted by this restriction. Provider-side review continues to follow the offering's type.
Leave the field empty to remove the restriction and make the offering available to everyone again.
Embedding images in the offering description
The Description and Full description fields use a rich Markdown editor. When image support is enabled, you can embed images directly into these descriptions — for example, an architecture diagram or a screenshot of the service.
Note
This feature must be enabled by the platform administrator. Image embedding becomes available only when the allow_display_of_images_in_markdown feature is turned on, and uploading from your device additionally requires the ENABLE_MARKDOWN_IMAGE_UPLOAD setting. Uploaded images are limited to the size configured in MARKDOWN_IMAGE_MAX_SIZE_MB (5 MB by default).
To add an image:
- On the offering's Edit page, find the Description or Full description field and click its Edit button.
-
In the editor toolbar, click the Insert image button.
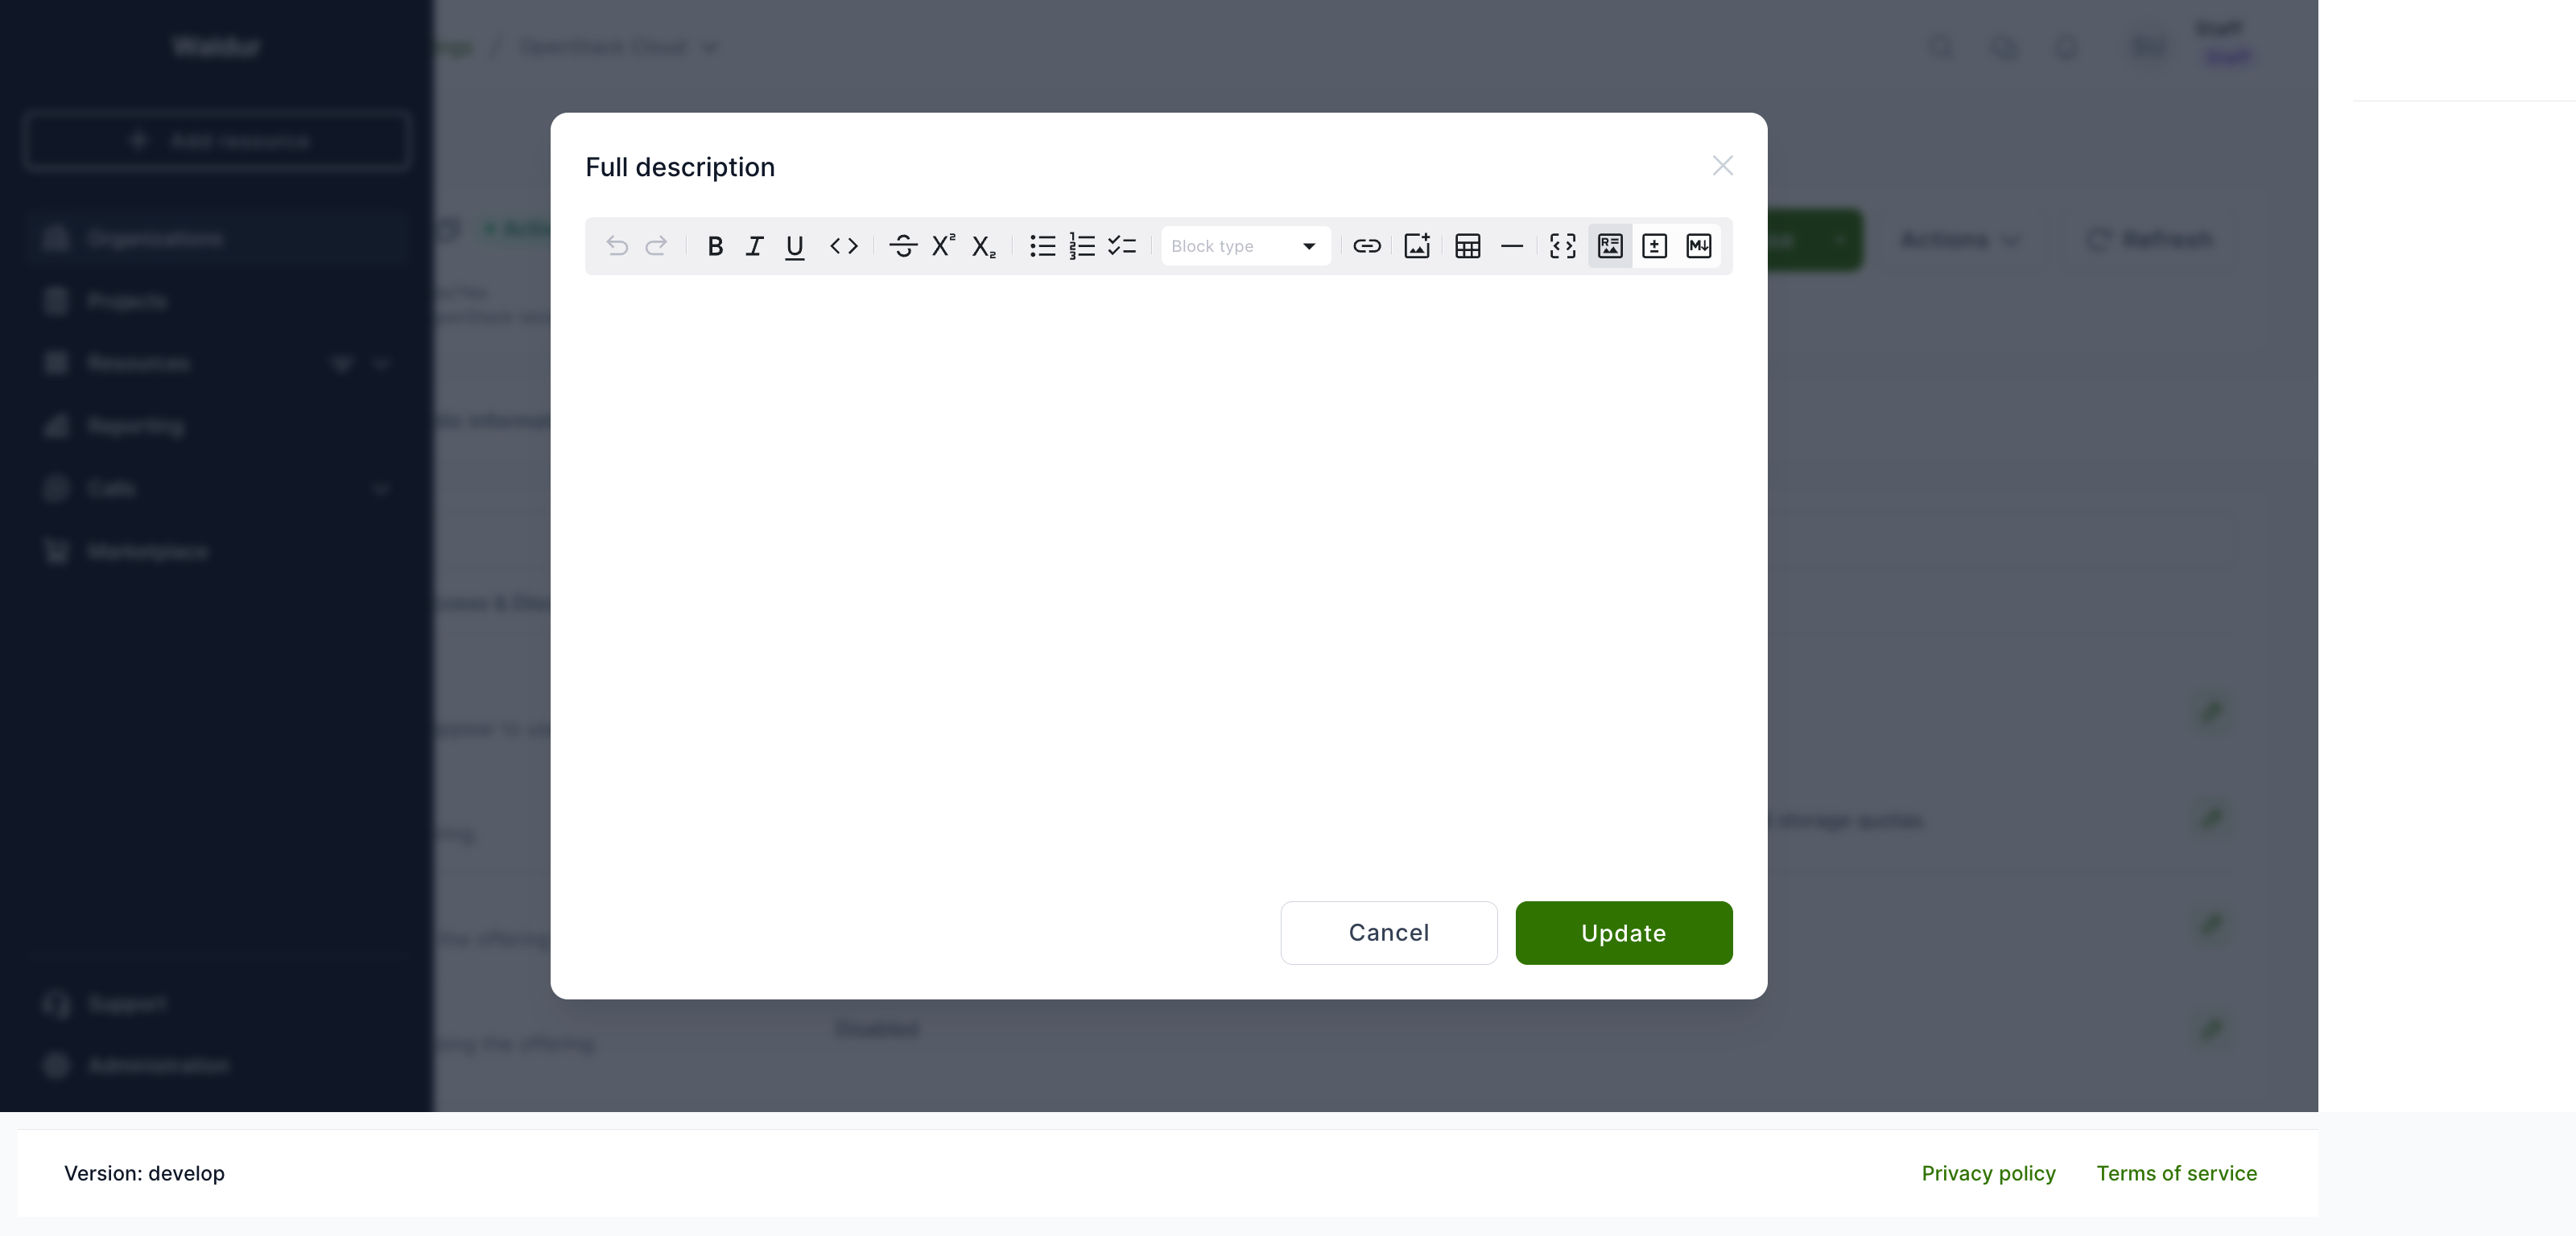
-
In the dialog, either choose a file from your device to upload, or paste an image URL. Optionally fill in the Alt and Title fields, then click Save.
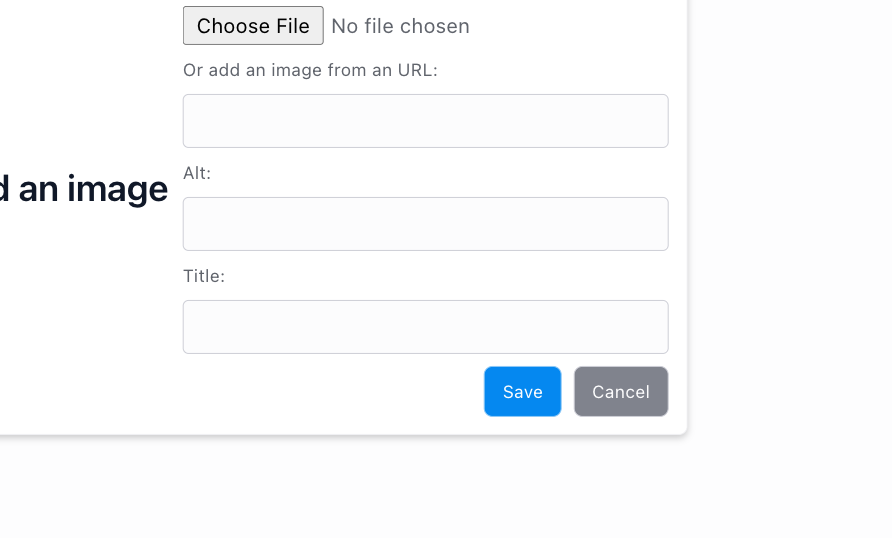
-
The image is uploaded and embedded in the description. Click Update to save your changes to the offering.
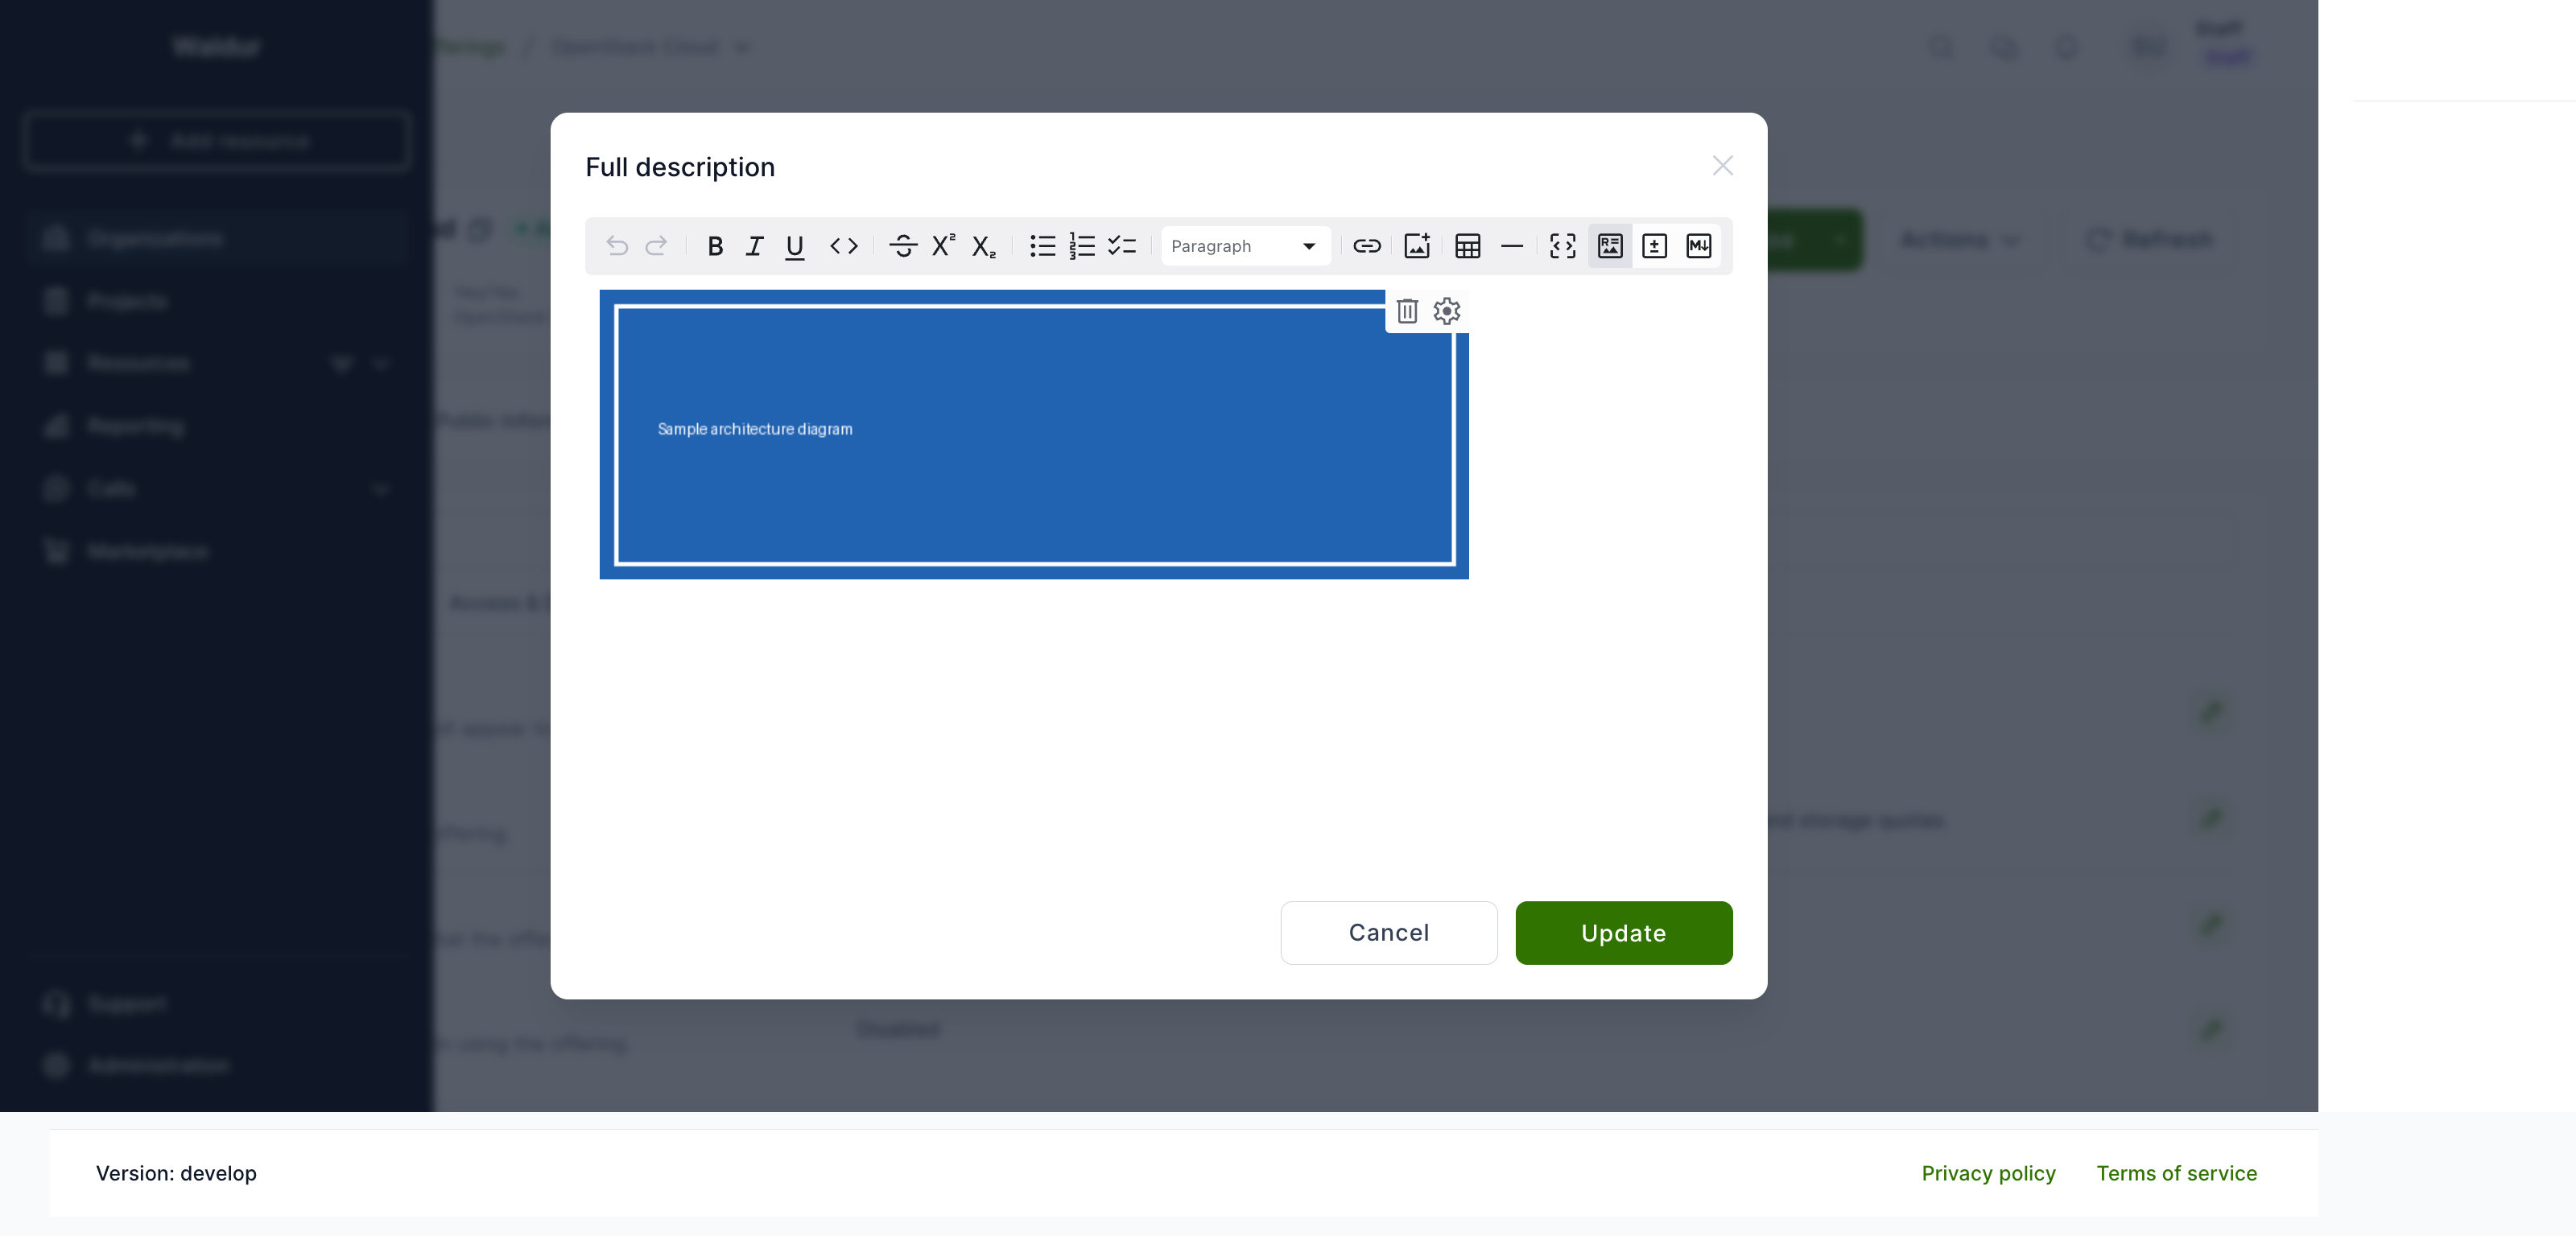
Warning
Images are uploaded to the platform's media storage as soon as you add them, before you save the offering. Keep image sizes reasonable to stay within the configured upload limit.
Description length limit
Short description fields are limited to 4,096 characters. The limit applies to the offering description, plan descriptions, project descriptions and call descriptions. It is a fixed limit built into Waldur — it is not a deployment setting, and cannot be raised by configuration.
Long-form fields are not affected: the offering's Full description and Vendor details have no length limit, so a description that has outgrown 4,096 characters usually belongs in Full description instead. Both fields sit next to each other on the offering's Edit → Public information → Basic info panel:
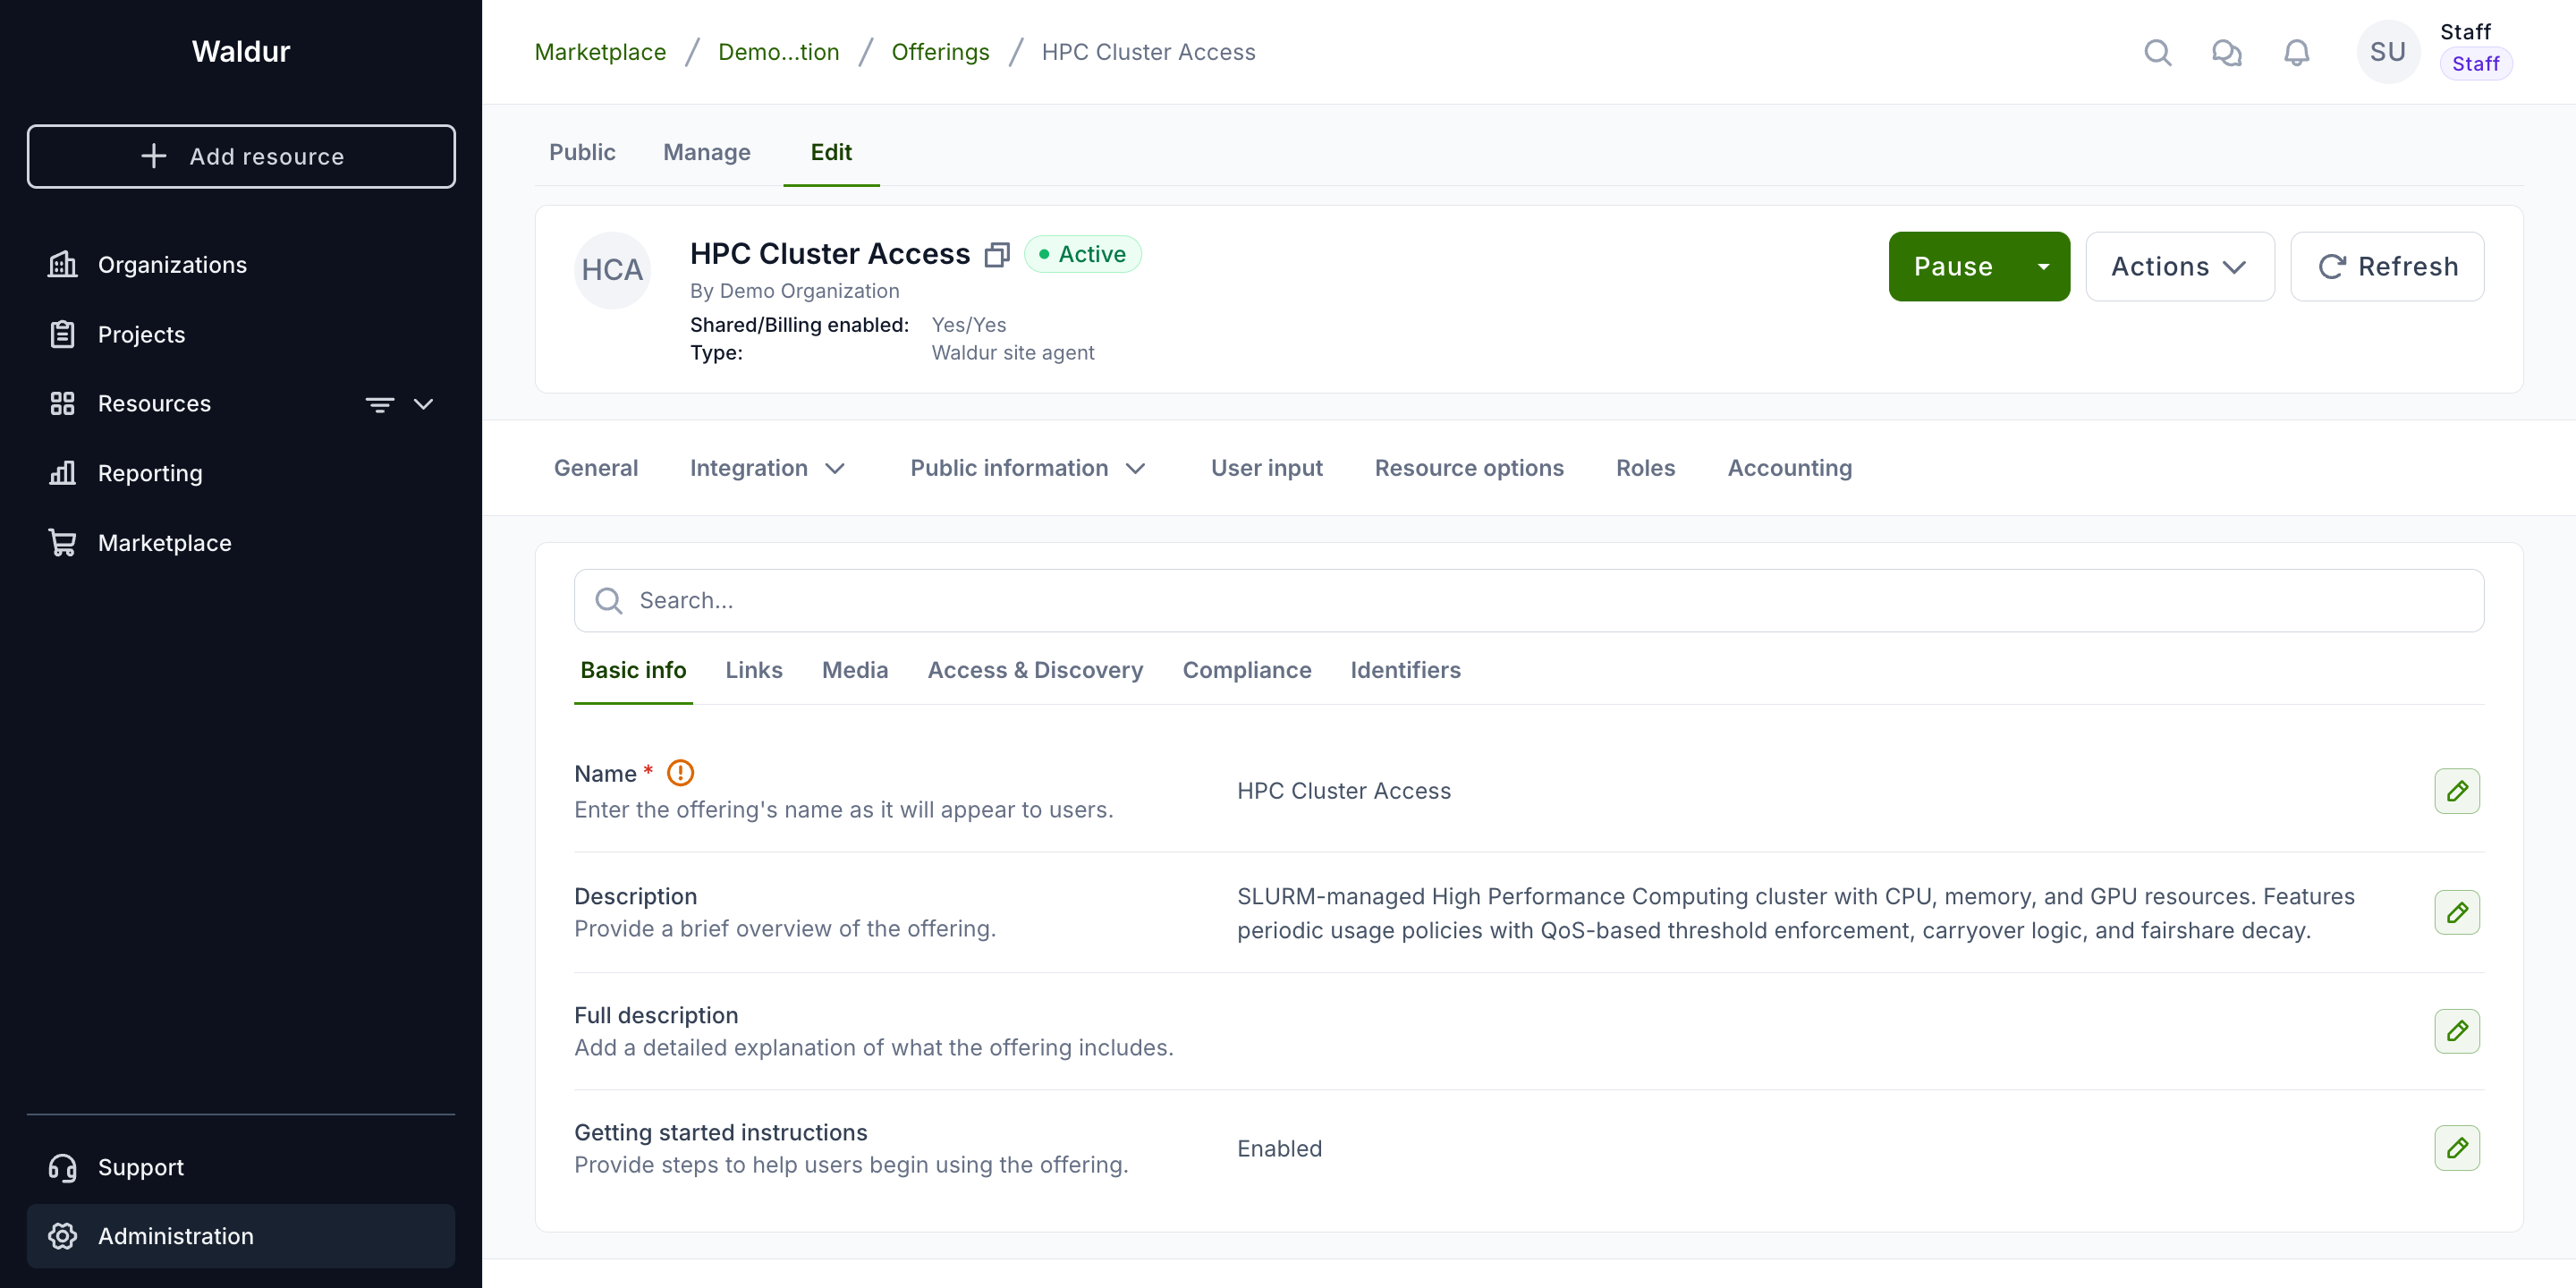
HTML escaping counts toward the limit
Descriptions are sanitised before they are stored, which escapes the characters &, < and > into their HTML entities (& becomes &, five characters instead of one). The escaped text is what has to fit within 4,096 characters.
Text containing many such characters therefore reaches the limit sooner than its visible length suggests — a bibliography full of & can be rejected at around 4,000 characters. When this happens, Waldur says the value is too long after sanitisation, so the message can be told apart from an ordinary over-length description.
Configuring Getting Started Templates
When setting up an offering, you can configure a "Getting Started" guide that will be shown to users after they provision a resource. This guide supports dynamic variables that are automatically replaced with actual resource values.
Available Template Variables
{resource_name}- The name of the resource{resource_username}- The username associated with the resource{backend_id}- The backend identifier (e.g., SLURM account name){backend_metadata_key}- Any metadata fields from the backend (e.g.,{backend_metadata_state}){options_key}- Any custom options set for the resource (e.g.,{options_custom_field})
Example Template
For SLURM allocations, you might want to create a comprehensive guide like this:
1 2 3 4 5 6 7 8 9 10 11 | |
To configure this template:
- Go to your offering's page
- Select "Edit" from the top menu
- Scroll down and find the "Getting started instructions" and click the "Edit" button
- Enter your desired template information using the variables above
- Save the changes
The template will be rendered with retreived values when users access their resources.
Service offering configuration guide
Overview
This guide provides a structured approach for integrators to define an Offering. Offerings represent services, resources, or products made available through the platform.
General information
The General Information section defines the core attributes of an offering, including its identity, accessibility, and governance policies.
Required fields
- Name – The title of the offering, displayed across the platform
- Description – A concise summary outlining the offering's purpose (limited to 4,096 characters — see Description length limit)
- Full description – A detailed explanation, including technical aspects and potential use cases (no length limit)
- Terms of service – Any contractual obligations or usage restrictions
- Privacy policy link – URL linking to the privacy policy
- Terms of service link – URL linking to the terms of service
- Access URL – The main entry point for users to access the offering
- Slug – A unique identifier used in URLs (readonly)
- Location – The geographical or virtual location of the offering
- Access policies – Defines access control rules and user eligibility
- Logo – A graphical representation of the offering
- Getting started instructions – Guidelines on how users can begin using the offering
Public information
The Public Information section ensures visibility and accessibility for end users. It includes Endpoints, Categories, and Images.
Endpoints
Endpoints provide connectivity to the offering's services. Each endpoint requires:
- Name – A human-readable identifier for the endpoint
- URL – The direct link to access the service
Images
Images provide visual representation and marketing appeal. Each image requires:
- Name – A descriptive title
- Description – A brief explanation of the image content
- Attached image file – The image file itself