Service desk configuration
Waldur can either run its own built-in service desk, or integrate with an external one like Atlassian, Zammad, or Smax. Either way you manage tickets directly within Waldur.
For how the service desk is wired into Waldur, and which events open tickets automatically, see Service Desk integrations and Service Desk offerings.
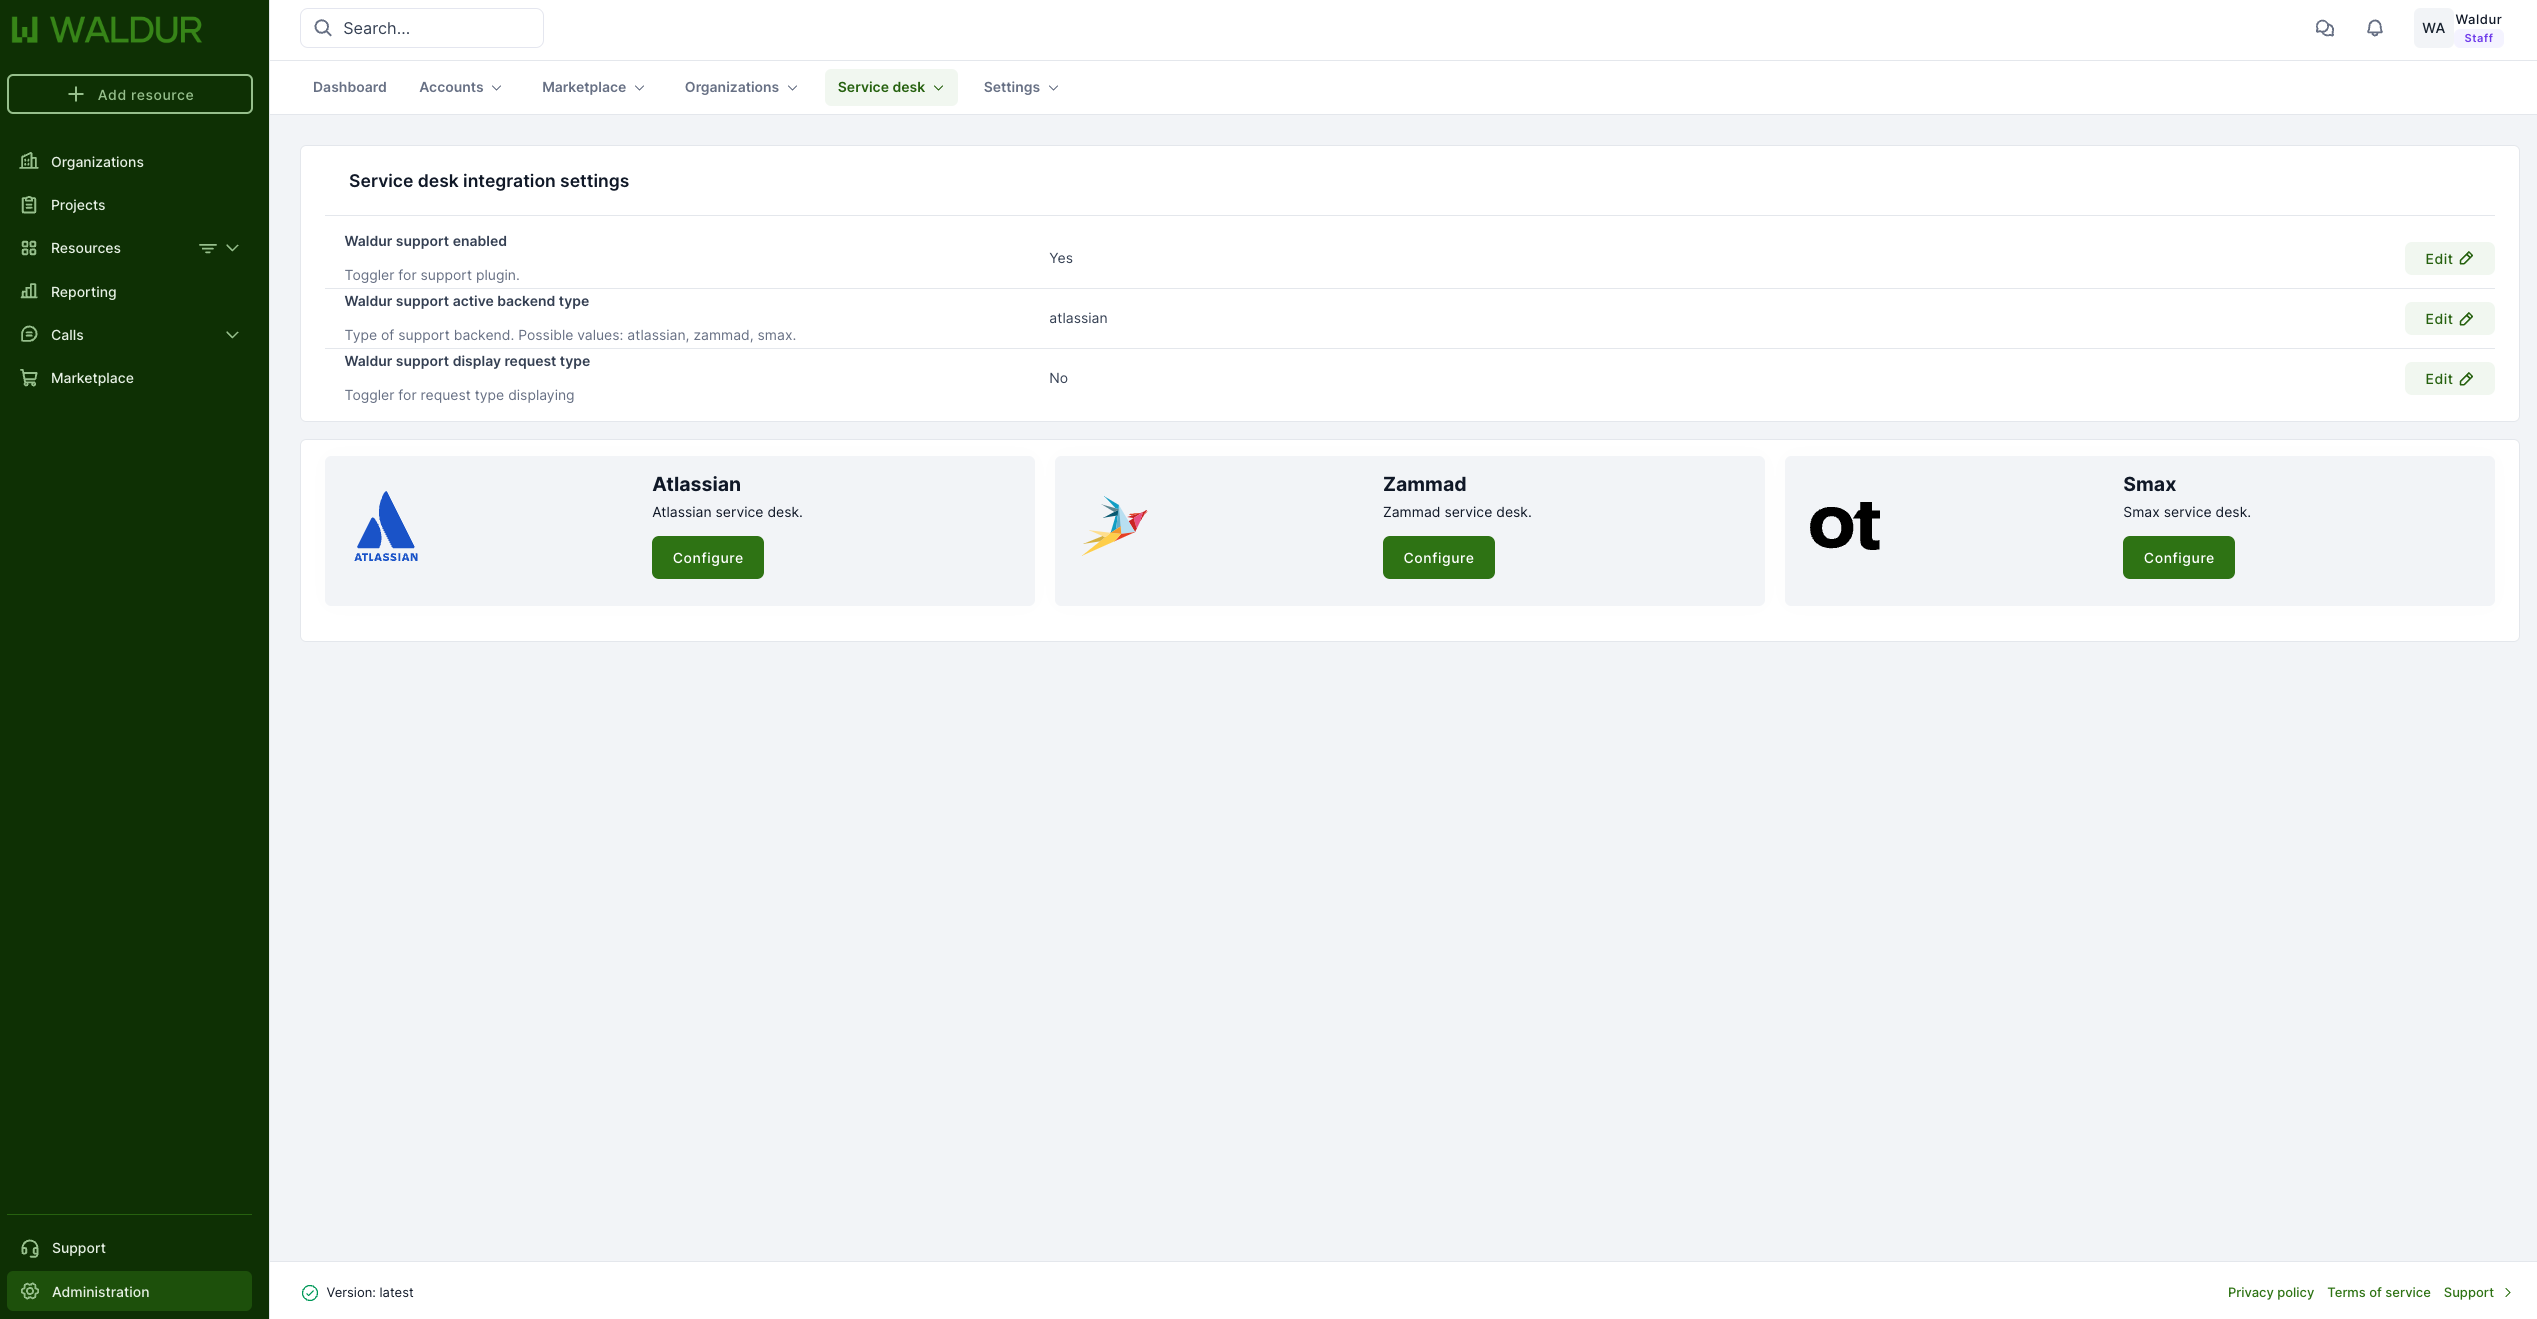
To set up the configuration, navigate to the Service Desk configuration page by going to Administration -> Service Desk.
- Waldur support enabled - Toggle Yes if you want to use support plugin.
- Waldur support active backend type - Select the active configuration.
- Waldur support display request type - Toggle to show the request type.
Choosing a backend
| Backend | Where tickets live | When to use it |
|---|---|---|
| Basic (the default) | In Waldur | You have no external service desk, or you want to keep support inside the portal. |
| Atlassian, Zammad, Smax | In that system | Your team already works in an external service desk and Waldur should mirror it. |
Basic is the backend a deployment starts with. An installation that has always run an external service desk must therefore select it explicitly in Waldur support active backend type; until then tickets stay in Waldur.
The difference matters for who owns a ticket's status. With Basic, Waldur owns the whole lifecycle and your agents change the status in Waldur. With the external backends the remote system is the source of truth: status flows into Waldur through synchronisation and webhooks, so it cannot be edited in the portal.
Built-in service desk (Basic)
Select Basic as the active backend type to run the service desk inside Waldur. No credentials or external system are needed.
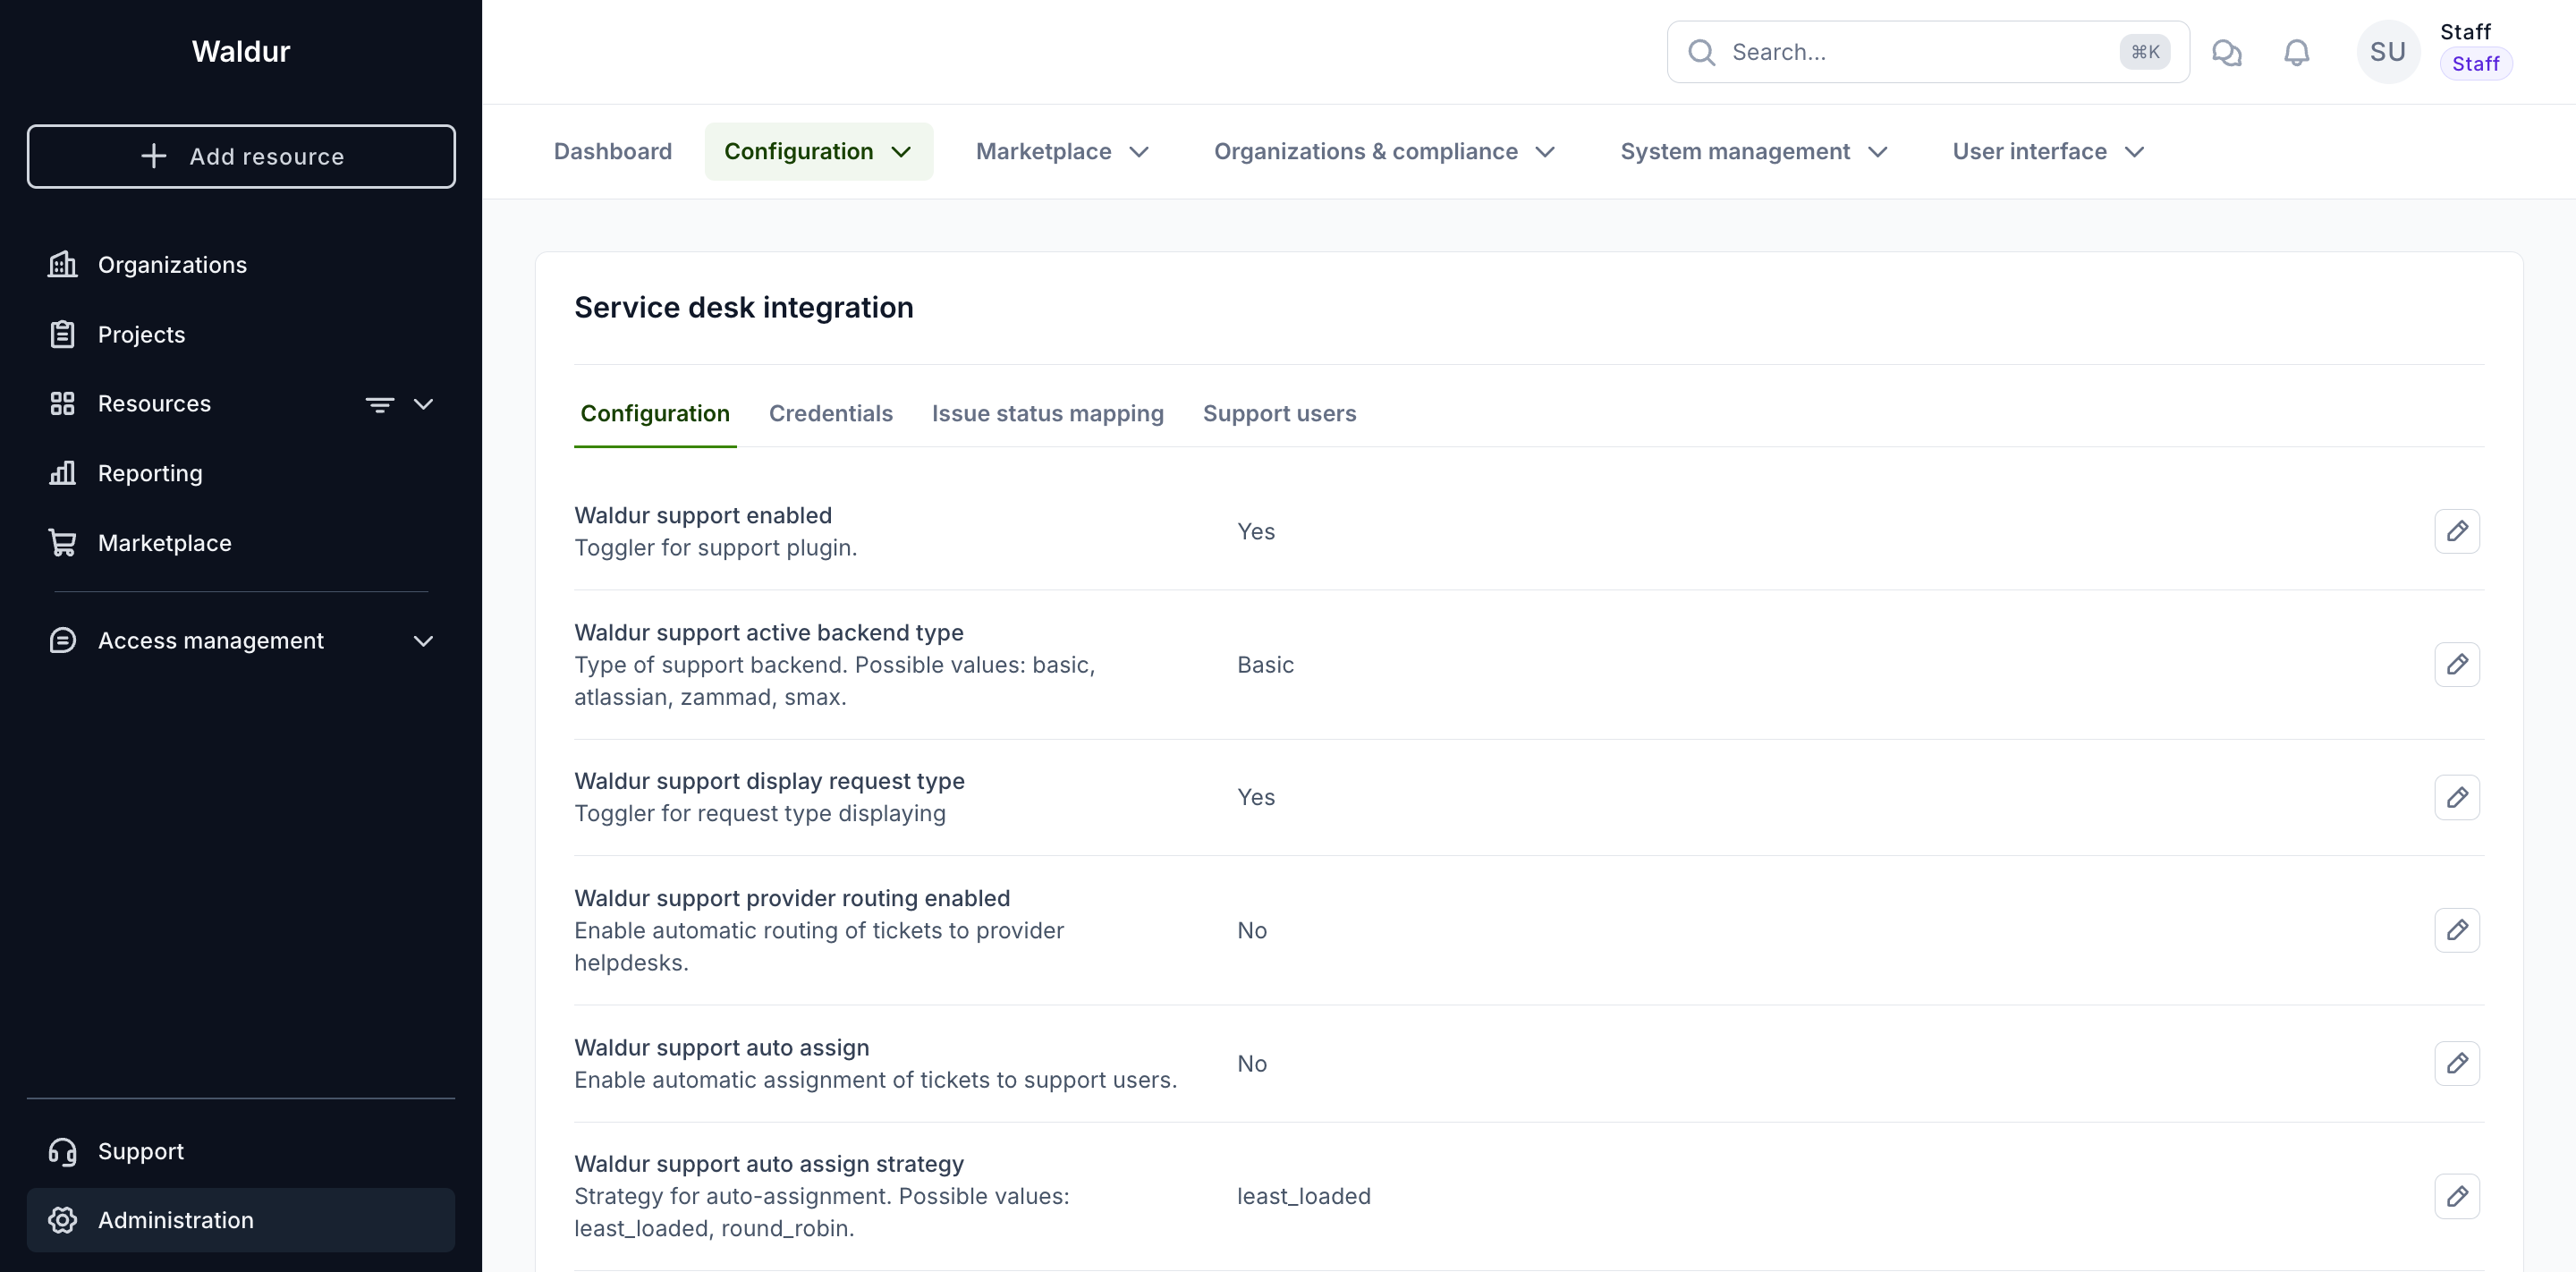
Two further settings on this page apply to the built-in desk:
- Waldur support auto assign - hand each new ticket to a support user automatically, using either the
least_loadedorround_robinstrategy. - Waldur support SLA enabled - track response and resolution deadlines, shown as an SLA badge on every ticket.
Request types
Users pick a request type when they open a ticket. Add the types you want to offer under Administration -> Service Desk -> Request types. Until at least one is active, the create-request form tells users the service desk configuration is incomplete.
Which statuses close a ticket
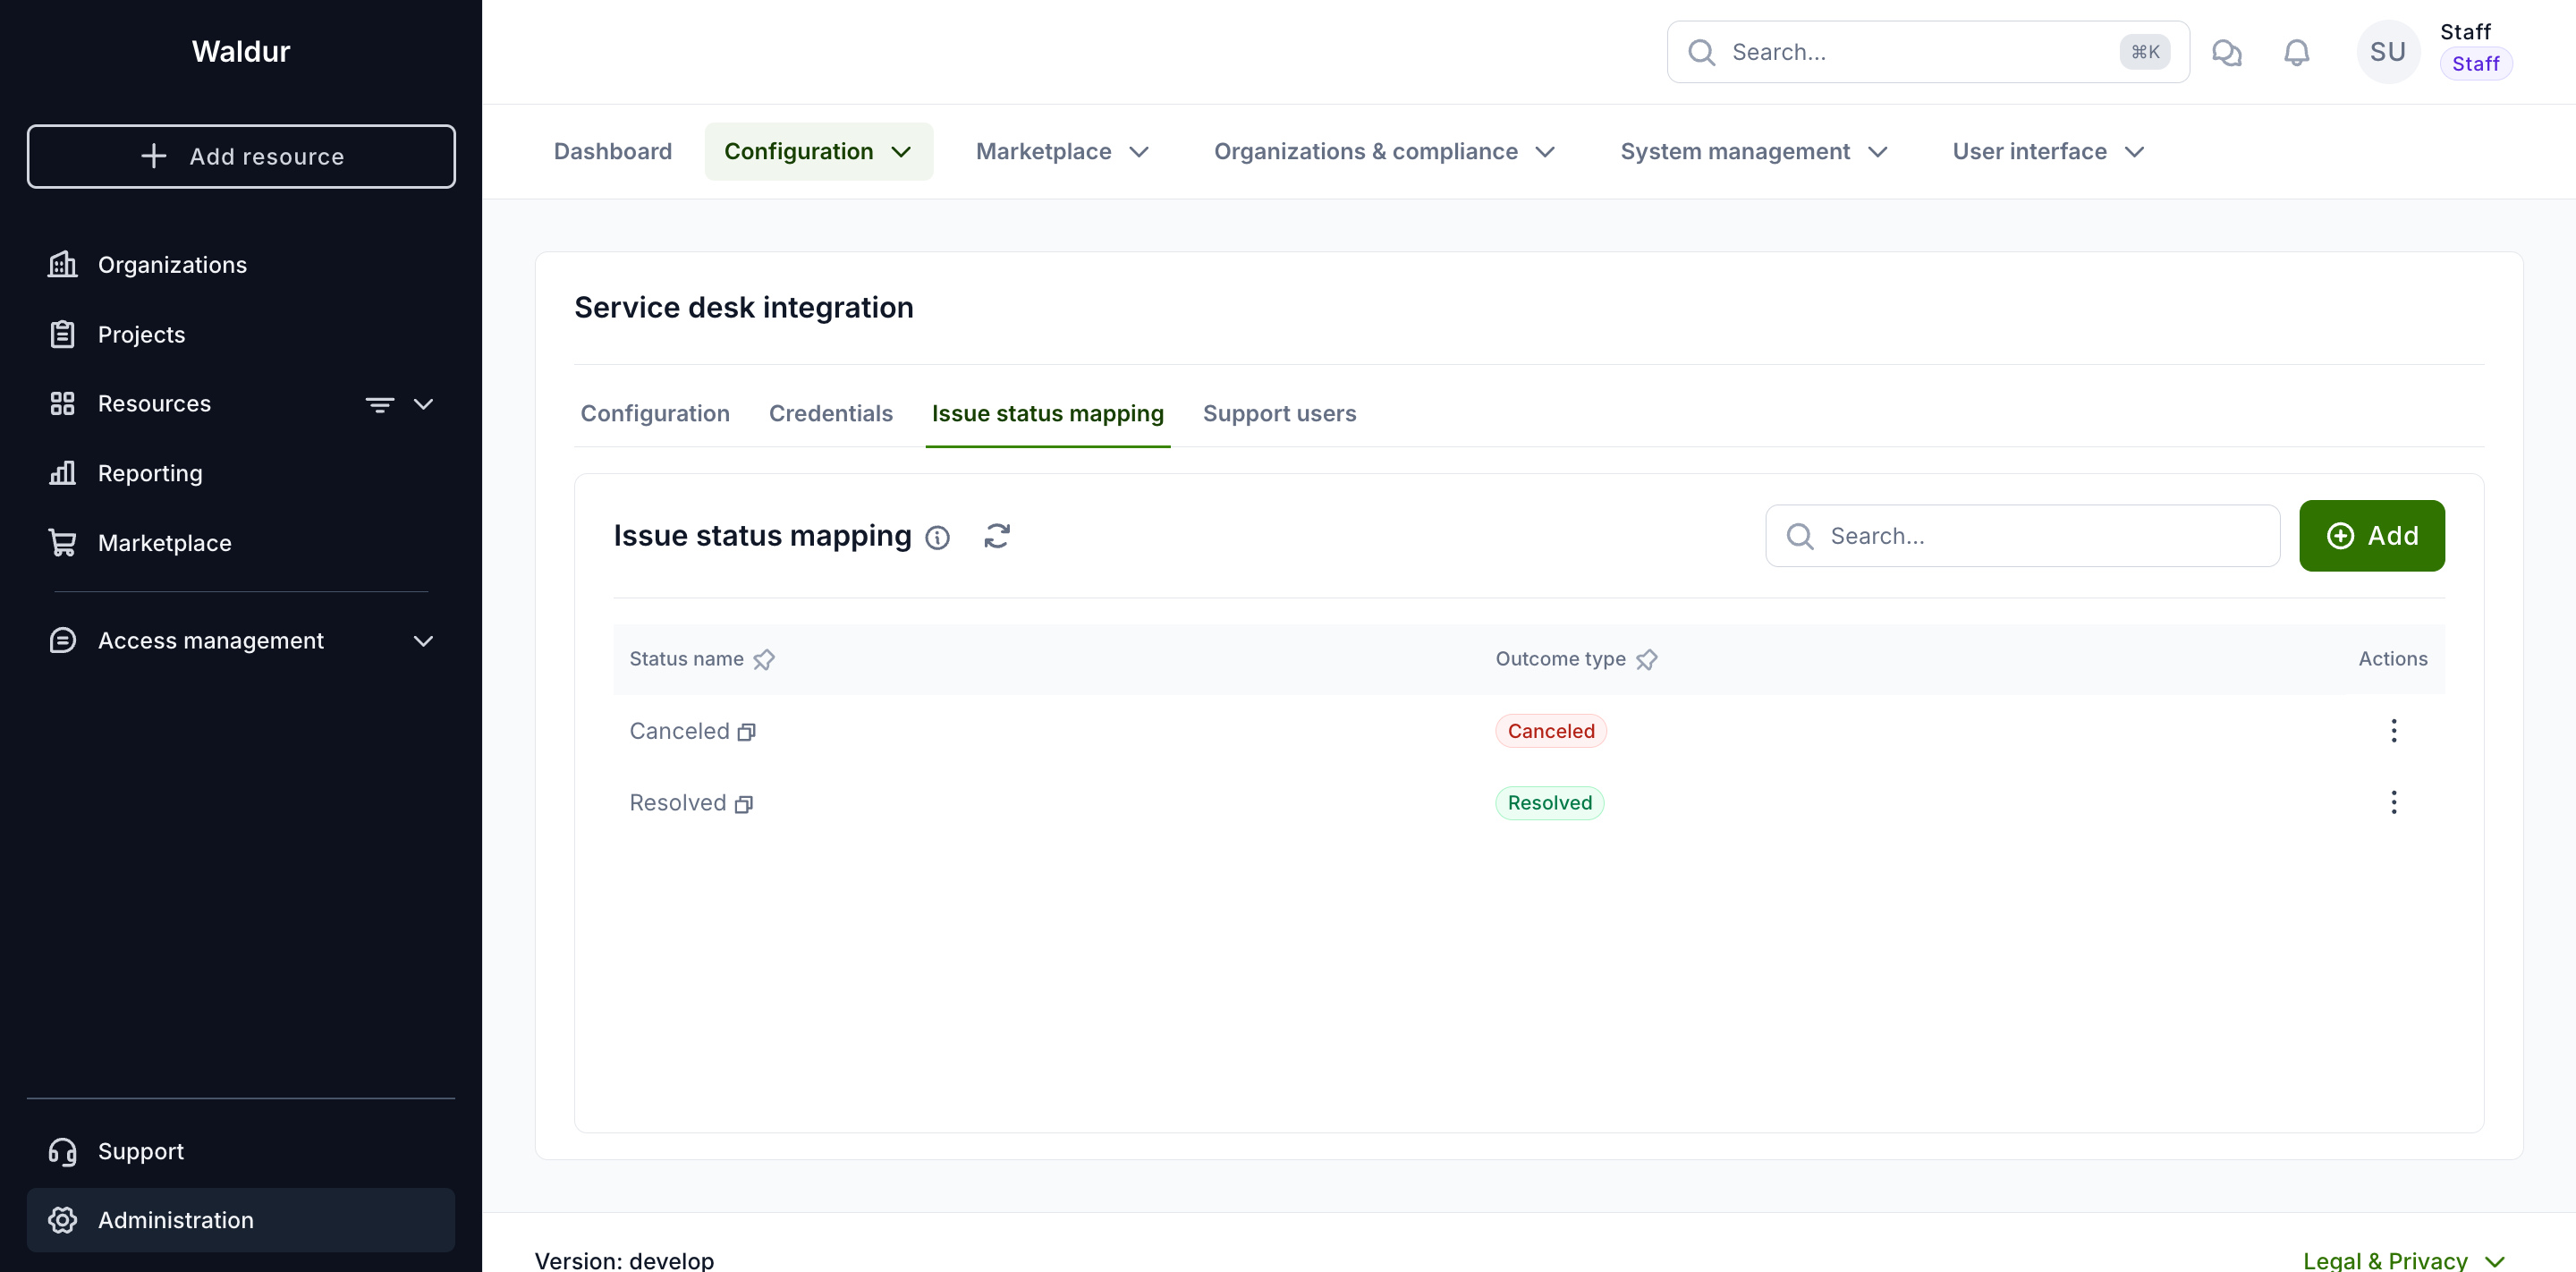
Waldur needs to know which of your status names mean "finished". Map them on the Issue status mapping tab, giving each a Resolved or Canceled outcome.
Warning
Configure this before going live. A status that is not mapped is treated as still open, so those tickets keep counting towards Open issues and never report their SLA as met.
Only closing statuses belong here. The status a ticket opens in is not one of them — the built-in desk opens every ticket as Open.
Restricting how tickets move (optional)
By default an agent may move a ticket from any status to any other. To enforce a workflow, define the permitted transitions in the Django admin under Support -> Issue status transitions, as from / to pairs.
Note
The table is all-or-nothing. While it is empty every transition is allowed; as soon as it holds a single row, only the listed transitions are permitted. Remember to include the ones that reopen a ticket, such as Resolved -> Open, or agents will not be able to undo a mistaken closure.
A worked example
A desk that triages, resolves and can reopen needs four statuses. Two of them are closing ones, so only those two go in the status mapping:
| Status | Outcome type | Meaning |
|---|---|---|
Open |
not mapped | Waiting for an agent. Every new ticket starts here. |
In progress |
not mapped | An agent is working on it. |
Resolved |
Resolved | Done. |
Canceled |
Canceled | Closed without a fix — duplicate, withdrawn, out of scope. |
If you also want to constrain the workflow, these transitions give the flow above, including the two that reopen a closed ticket:
| From | To |
|---|---|
Open |
In progress, Canceled |
In progress |
Resolved, Canceled, Open |
Resolved |
Open |
Canceled |
Open |
An agent then works a ticket like this: open it from Support → Communication → Support requests, reply with a comment, and select Change status → In progress. Once the problem is fixed, Change status → Resolved. The ticket leaves the Open issues count, its SLA badge settles to SLA met, and — if issue feedback is enabled — the person who reported it is emailed a request to rate the support they received.
Leave the transition table empty if you would rather not constrain anything; agents can then move a ticket to any configured status, and the reopen path works without further setup.
Notifications
The service desk can email the person who reported the ticket when it is updated, when a comment is added, and — on resolution — a request to rate the support they received. It can also tell your staff and support users that a new request has arrived, which is the built-in desk's equivalent of the alert an external service desk sends its own agents.
| Notification | Goes to |
|---|---|
support.notification_issue_created |
staff and support users — built-in desk only |
support.notification_issue_updated |
the reporter |
support.notification_comment_added |
the reporter |
support.notification_comment_updated |
the reporter |
support.notification_issue_feedback |
the reporter, after resolution |
Warning
Every notification is disabled by default. The records themselves are created at deployment, so they appear under Administration -> Notifications ready to switch on, but nothing is emailed until you enable them. You can also enable them up front by listing the keys in notifications.json, or in the waldur.notifications map in the Helm chart's values:
1 2 3 4 | |
The new-request notification reaches every active staff and support user who has an email address and has not turned notifications off in their own profile. It is not sent for a ticket routed to a provider helpdesk — that provider is notified separately — and not by the Atlassian, Zammad or Smax backends, which alert their agents themselves.
Tip
Turning on Waldur support auto assign in addition gives every incoming ticket an owner, so it is clear who picked it up.
Atlassian configuration
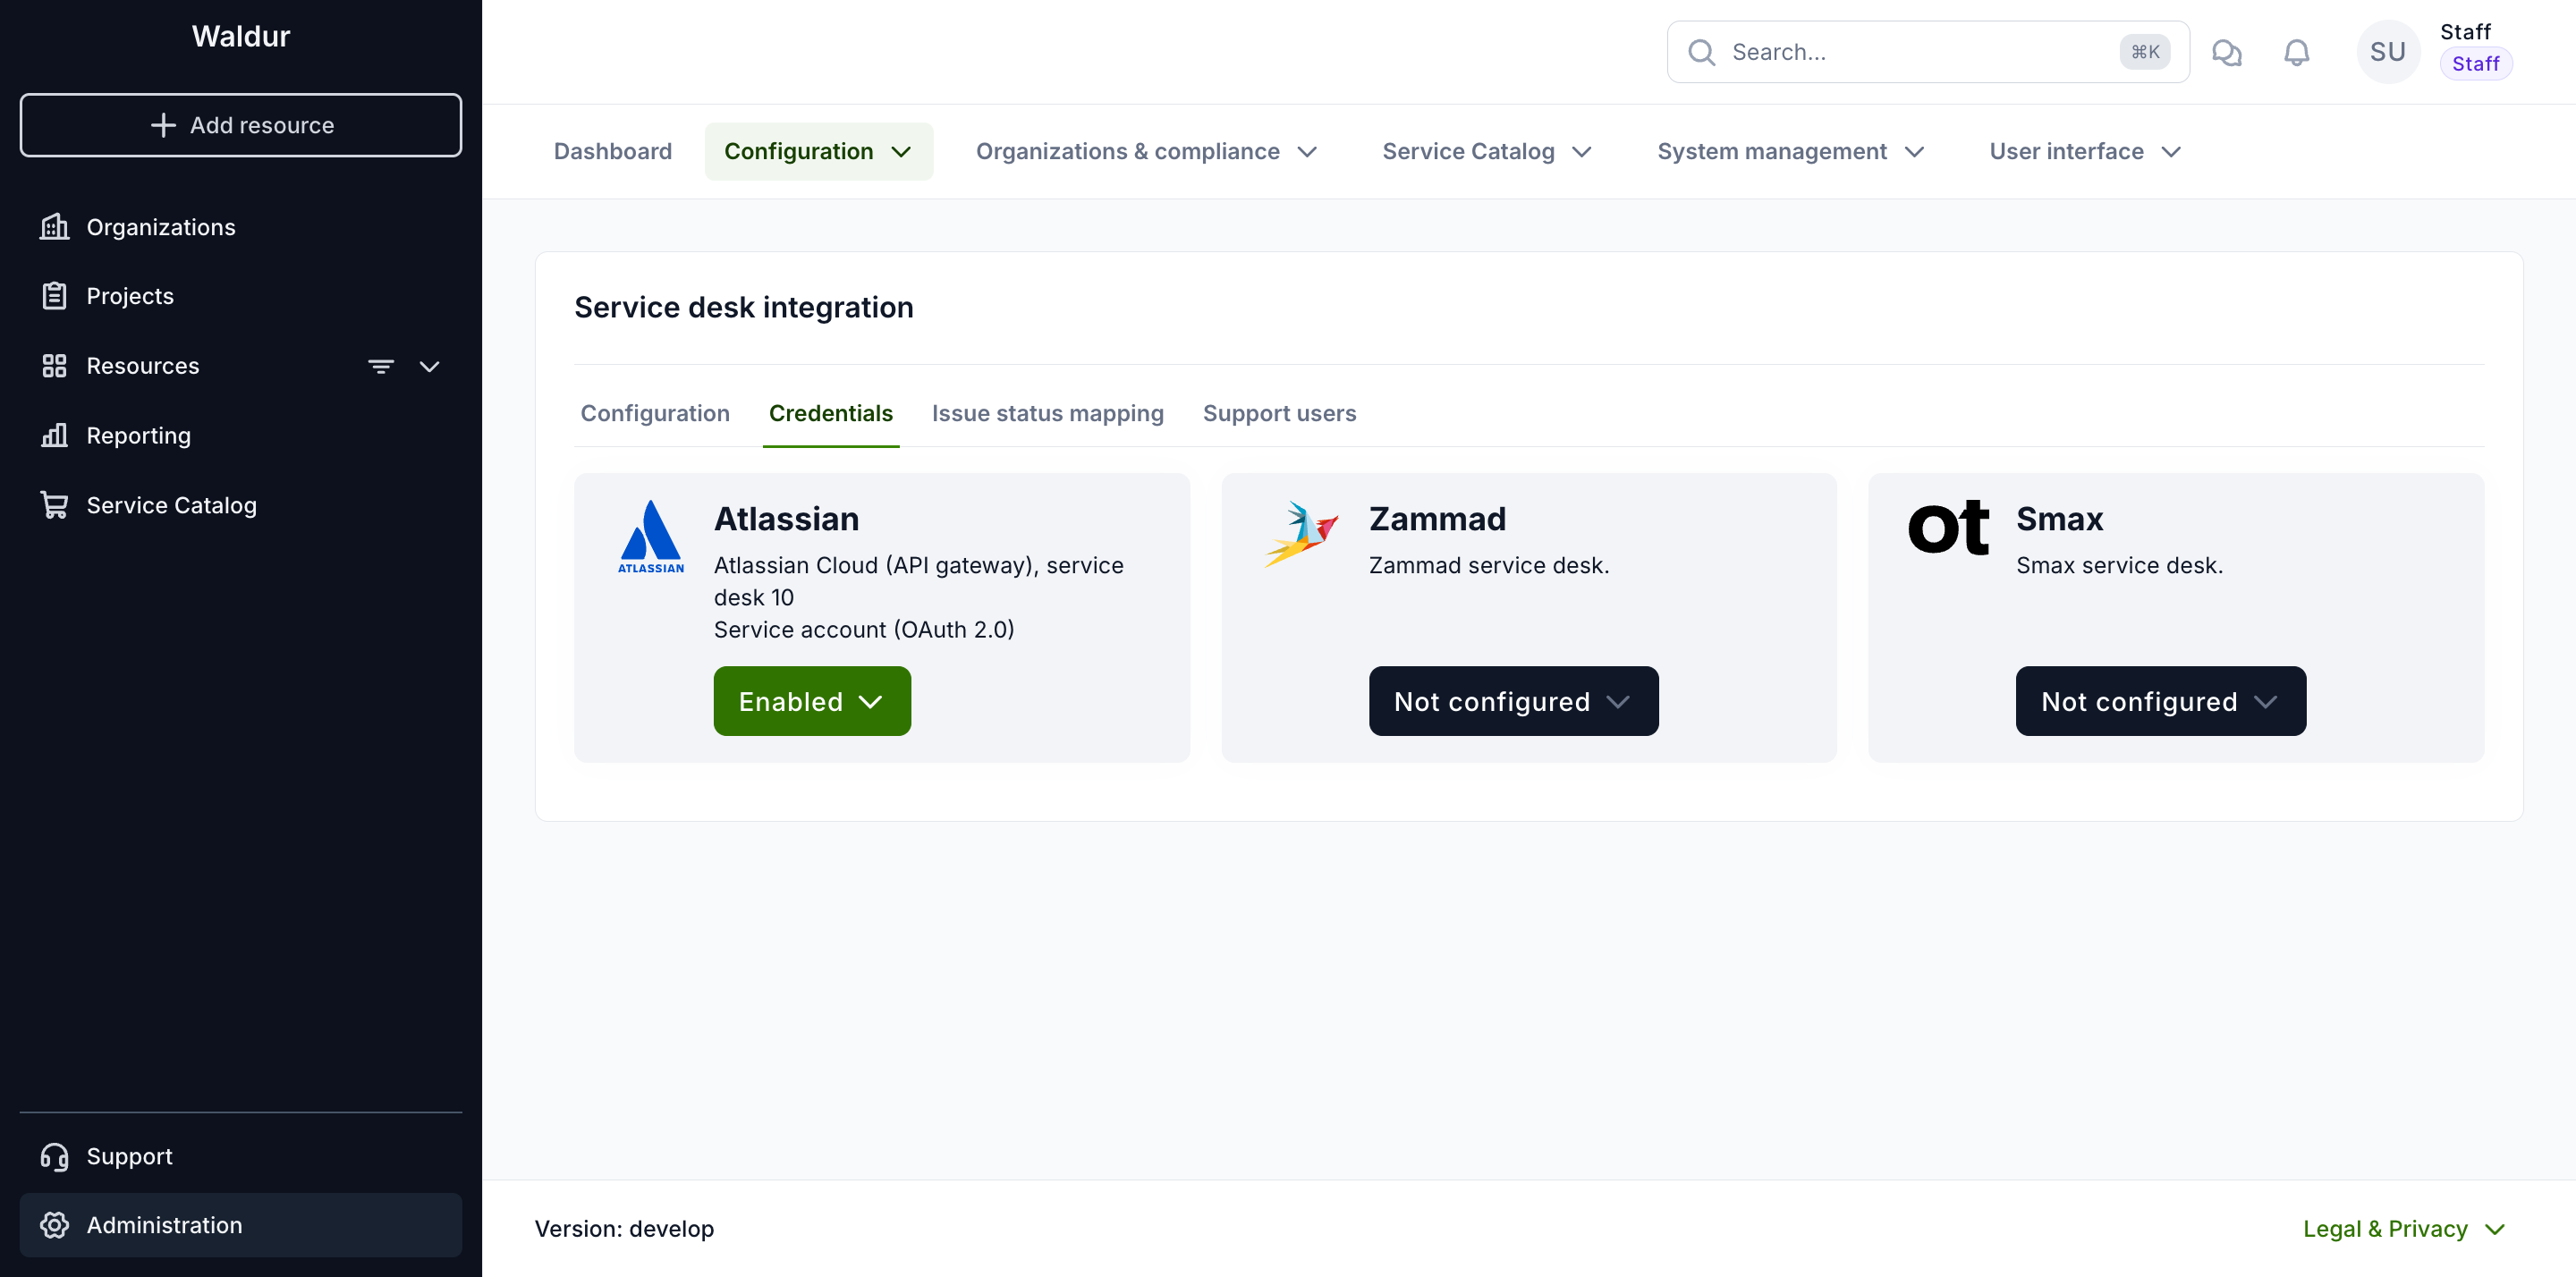
Waldur connects to Jira Service Management from the Credentials tab of the Service Desk configuration page. The Atlassian card shows the site, the service desk and the sign-in method in use. Like the identity provider cards, it has a status button: Enabled when Atlassian is the active service desk, Disabled when it is configured but another service desk is active, and Not configured. The actions are in that button's menu.
Setting up Atlassian
Open the status button on the Atlassian card and select Discovery wizard (Re-discover once Atlassian is configured). When you re-run the wizard, the stored credentials are filled in, so you only change what you need. The wizard has five steps:
- Credentials – choose the sign-in method, then enter the site URL and the credentials. Validate & Continue checks them against Jira before moving on.
- Project – choose the service desk that receives support tickets.
- Request Types – choose the request types users can raise.
- Field Mapping – optionally map Waldur fields, such as reporter, organisation, project and affected resource, to Jira custom fields.
- Preview – review the settings and select Save Settings.
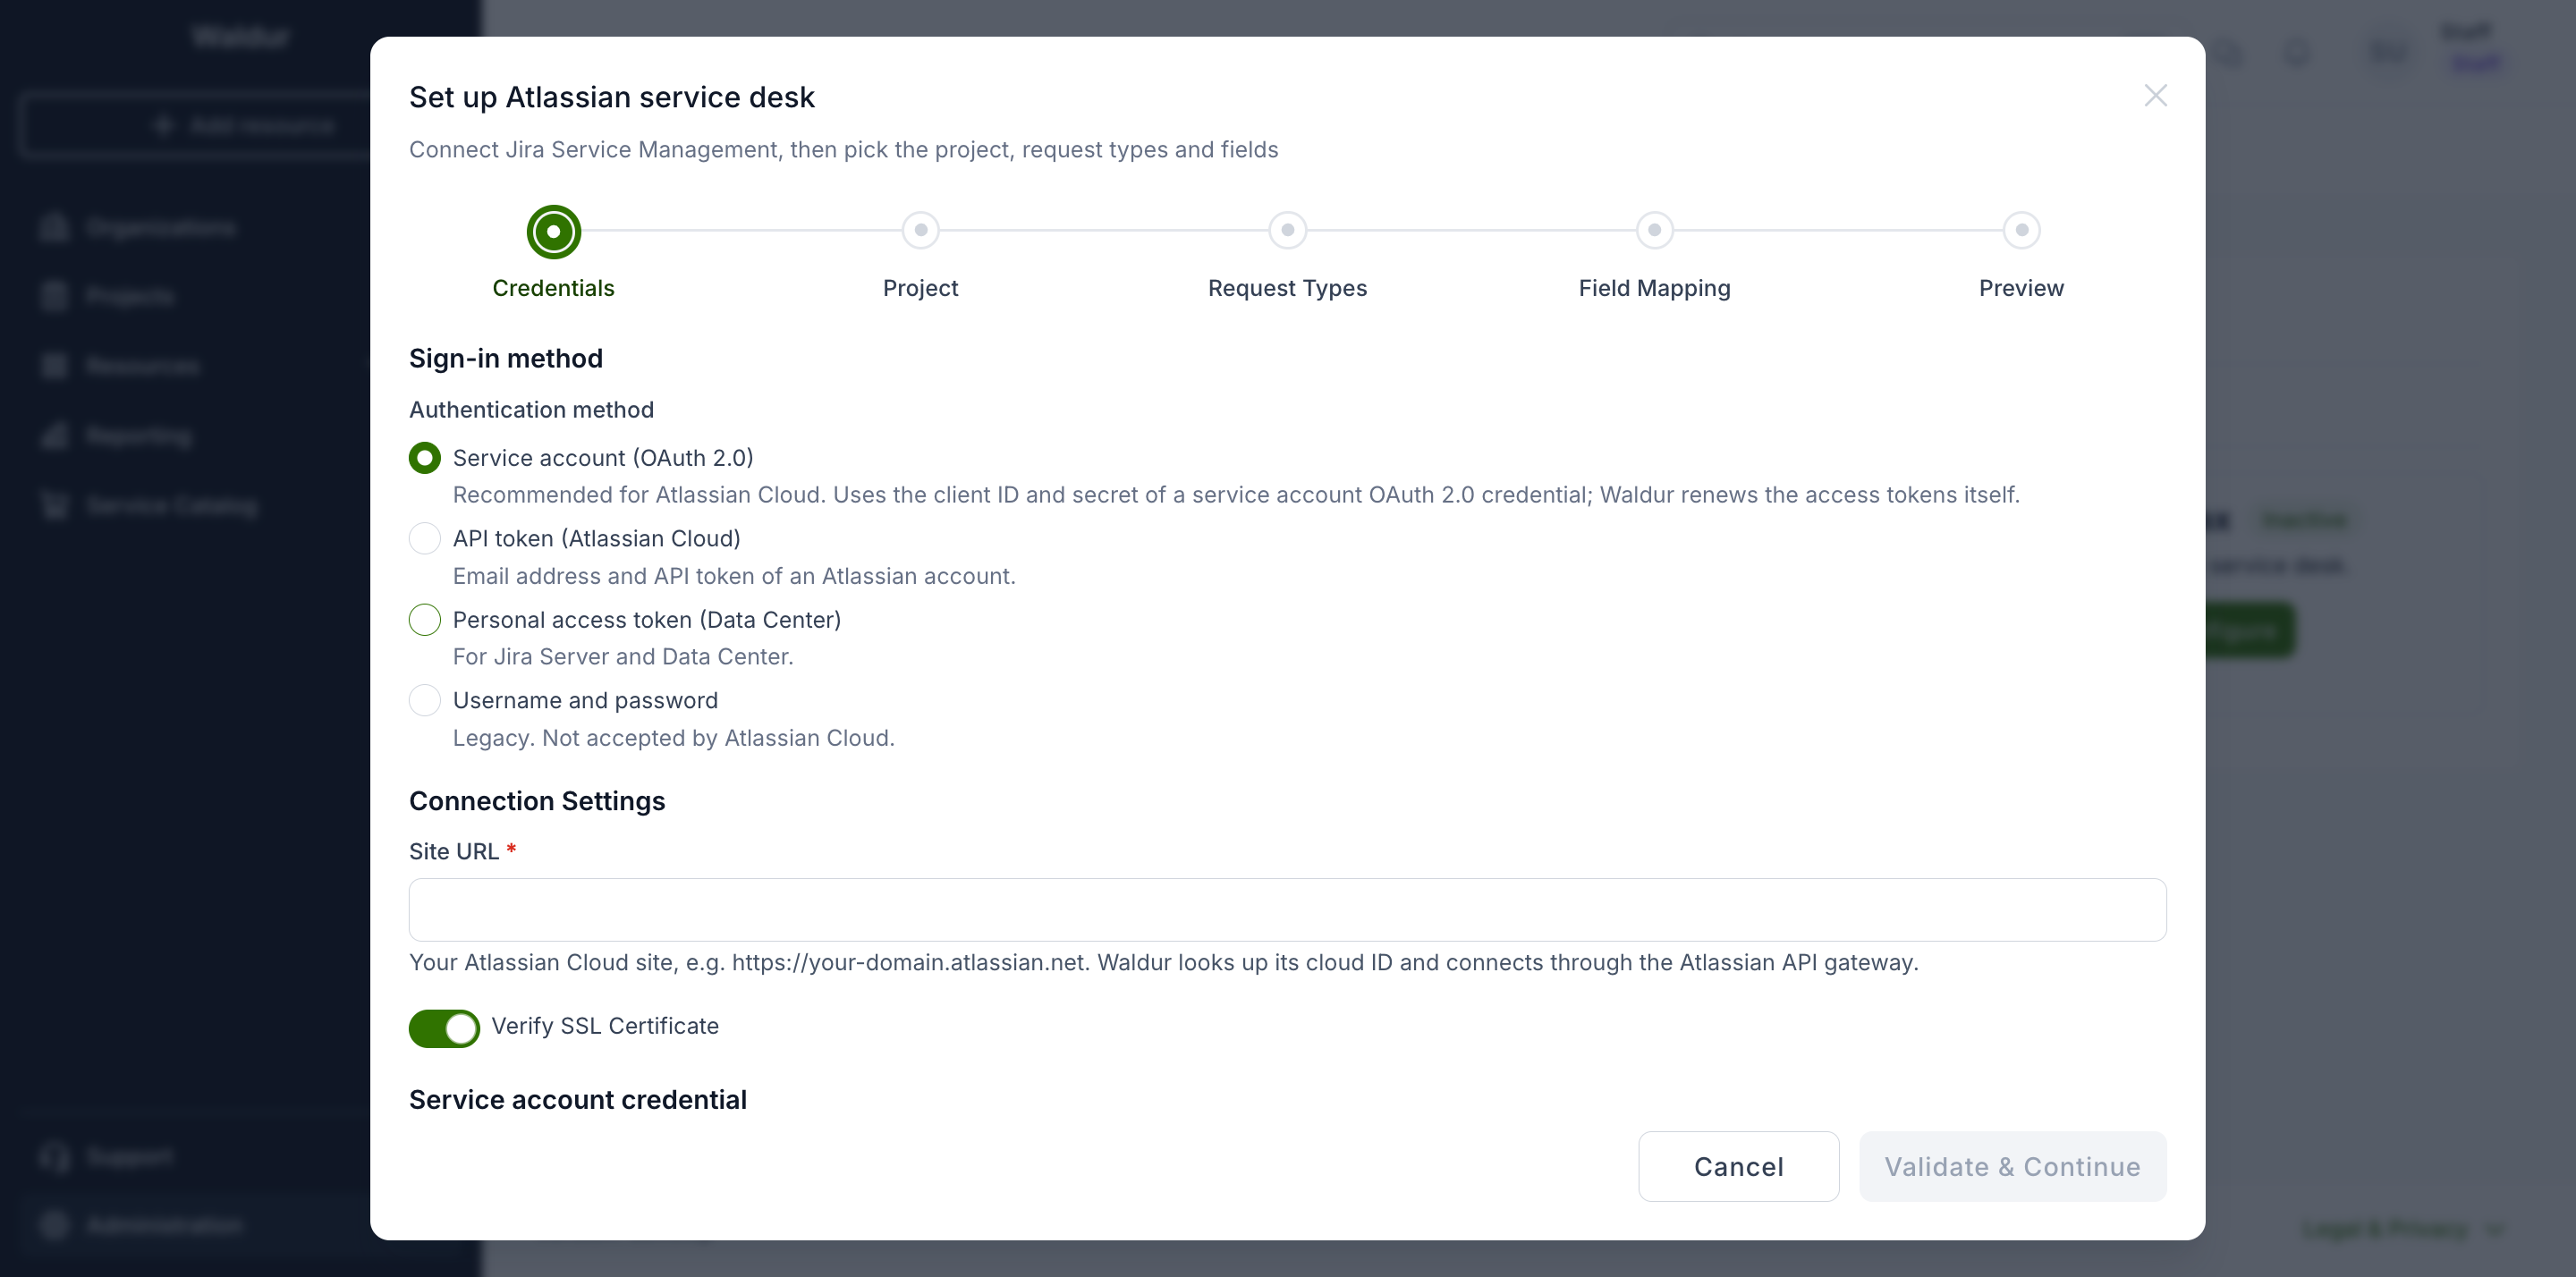
The wizard offers four sign-in methods:
| Method | Use it for | Credentials |
|---|---|---|
| Service account (OAuth 2.0) | Atlassian Cloud (recommended) | Client ID and client secret of a service account's OAuth 2.0 credential |
| API token (Atlassian Cloud) | Atlassian Cloud | Email address and API token of an Atlassian account |
| Personal access token (Data Center) | Jira Server and Data Center | Personal access token |
| Username and password | Legacy installations | Username and password; Atlassian Cloud does not accept them |
Saving one method clears the credentials of the others.
Using an Atlassian service account
A service account is an Atlassian identity that belongs to your organisation rather than to a person, which makes it the recommended way to connect Waldur to Atlassian Cloud.
- In Atlassian Administration, open Directory → Service accounts and create a service account. Give it access to Jira Service Management as an agent, and add it to the Service Desk Team role of the service desk project. Waldur raises requests on behalf of the users who report them, which needs this role.
- Create an OAuth 2.0 credential for the service account with these scopes:
read:servicedesk-request,write:servicedesk-request,manage:servicedesk-customer,read:jira-work,write:jira-workandread:jira-user. - In the wizard, choose Service account (OAuth 2.0) and enter the site URL (for example
https://your-domain.atlassian.net), the client ID and the client secret.
Waldur looks up the site's cloud ID, connects through the Atlassian API gateway (https://api.atlassian.com/ex/jira/<cloud ID>) and renews the hourly access tokens by itself.
Tip
If you choose API token (Atlassian Cloud) for a service account instead, create a scoped API token with the same scopes and use https://api.atlassian.com/ex/jira/<cloud ID> as the site URL. The cloud ID is shown at https://your-domain.atlassian.net/_edge/tenant_info.
Advanced settings
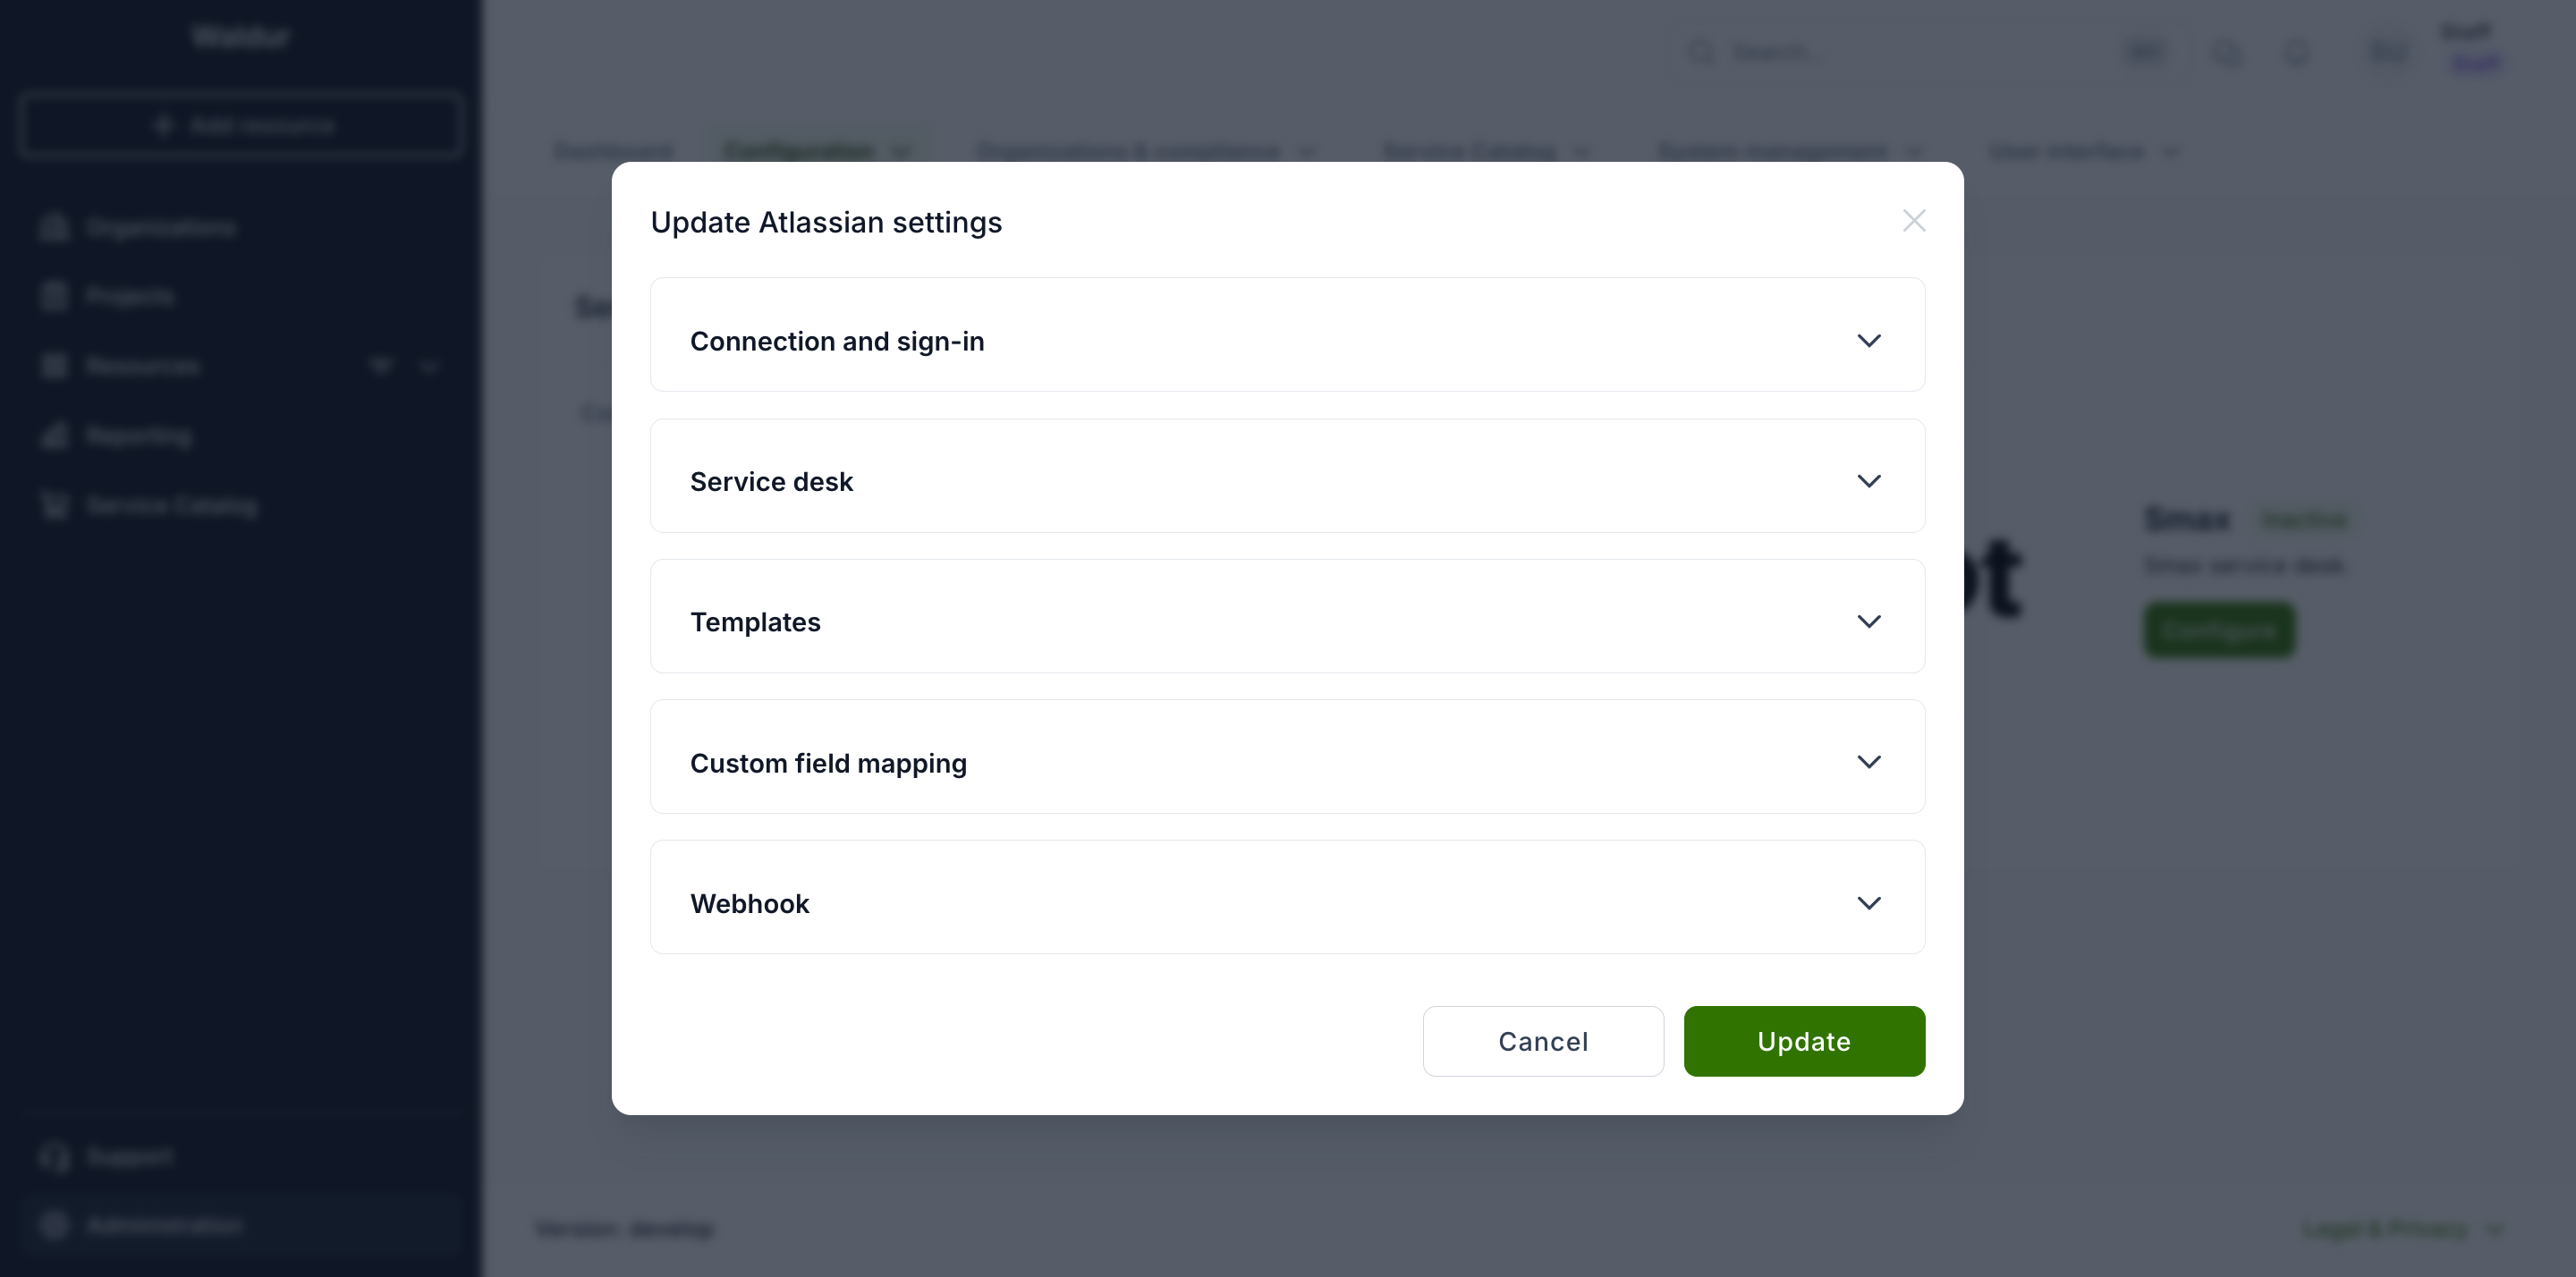
Edit in the same menu opens every Atlassian setting, grouped into sections:
- Connection and sign-in – the API URL, the sign-in method with only that method's credentials, and SSL certificate verification.
- Service desk – the service desk ID or key, the issue type used for request-based orders, the file types not allowed as attachments, the shared username, mapping Waldur users to service desk agents, and the legacy API.
- Templates – the templates for issue summaries and descriptions.
- Custom field mapping – whether Waldur fills in custom fields, and the names of the Jira fields for the reporter, caller, impact, organisation, project, affected resource, template, Waldur backend ID, SLA, resolution SLA, customer satisfaction, request feedback and linked issue type.
- Webhook – the shared secret for webhook calls from Jira.
Zammad configuration
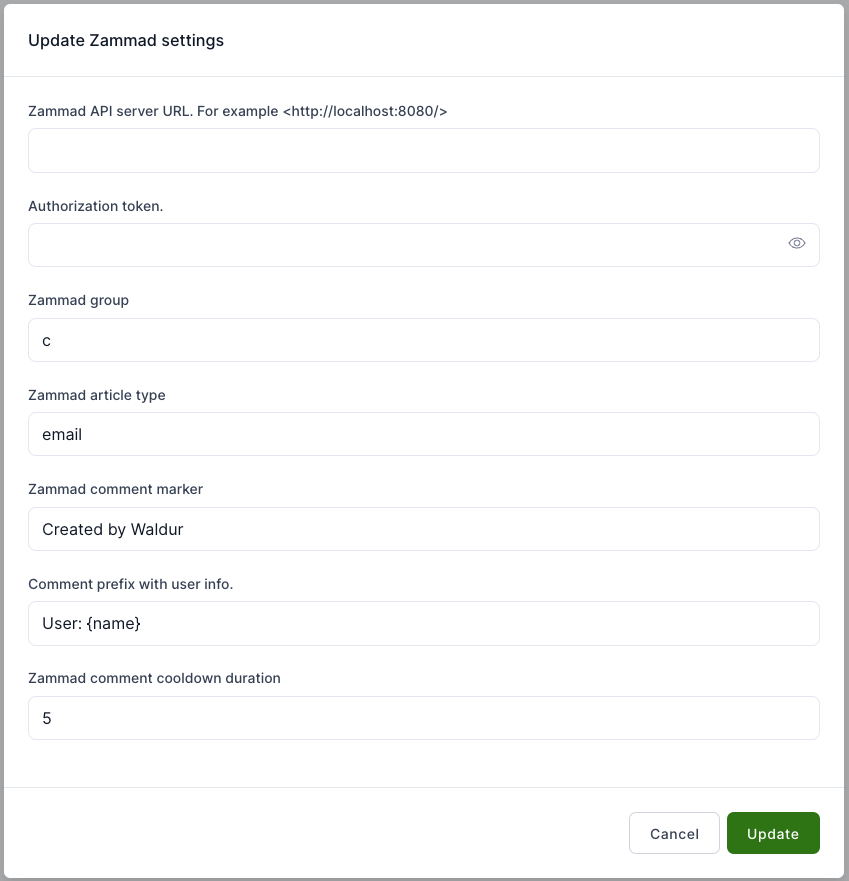
To configure Zammad for Waldur, open the Service Desk configuration page and select Configure from the Zammad box.
A popup will appear. Fill in the required fields and click Update.
- Zammad API server URL - Zammad instance API URL.
- Authorization token - Zammad instance API token.
- Zammad group - Zammad instance group under which the tickets are created.
- Zammad article type - Zammad instance article type. Usually "email".
- Zammad comment maker - Additional comment line in Zammad, if the ticket is created in Waldur.
- Comment prefix with user info - Additional comment line in Zammad with user name, who created the ticket.
- Zammad comment cooldown duration - Time (in seconds) to remove the comment until it is saved in the system.
Smax configuration
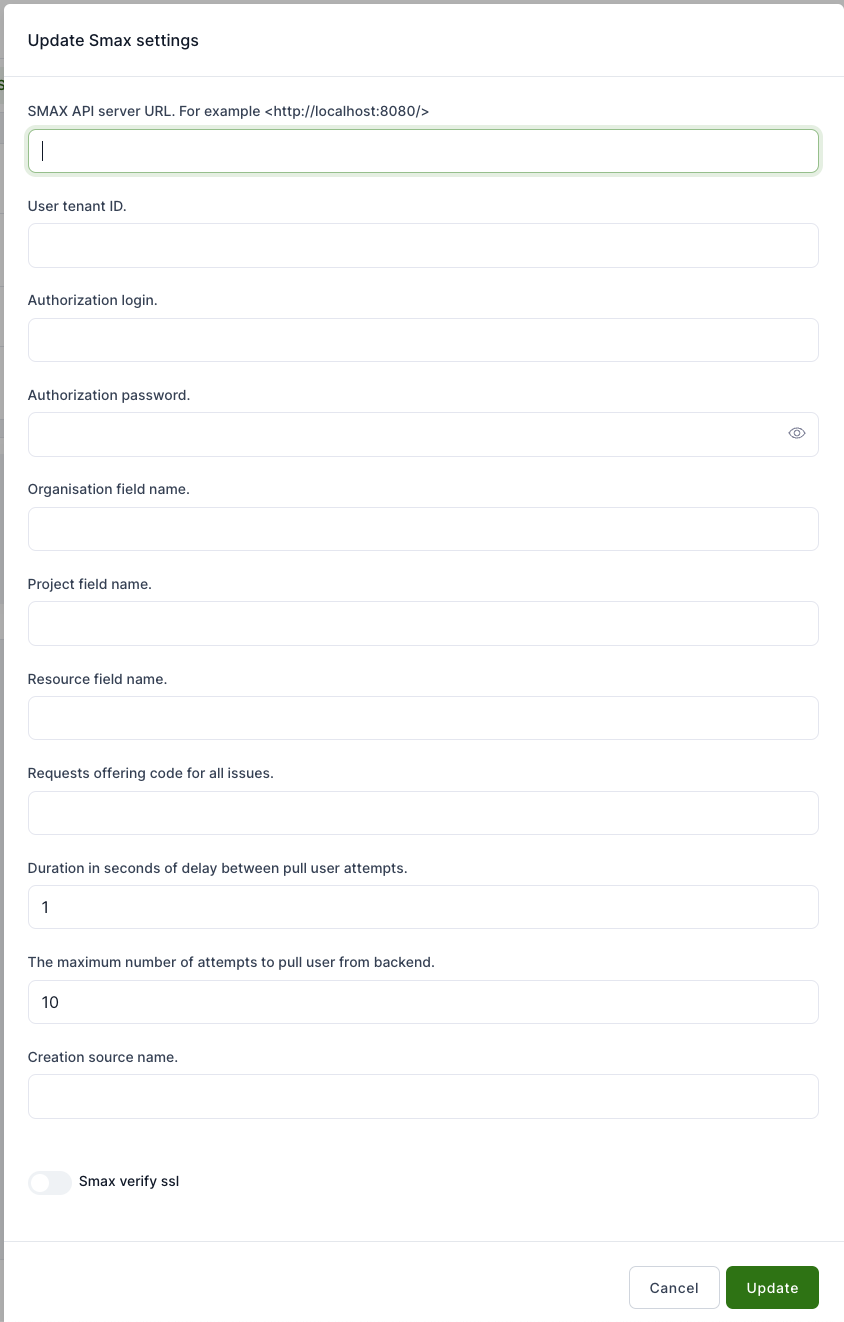
To configure Smax for Waldur, open the Service Desk configuration page and select Configure from the Smax box.
A popup will appear. Fill in the required fields and click Update.
- SMAX API server URL - Enter the URL of the SMAX API server to enable communication between Waldur and SMAX.
- User tenant ID - Provide the unique tenant ID associated with your SMAX user account.
- Authorization login - Enter the login credentials used to authenticate with the SMAX service.
- Authorization password - Enter the password associated with the authorization login.
- Organisation field name - Specify the field name that identifies the organization in SMAX.
- Project field name - Specify the field name used to identify the project in SMAX.
- Resource field name - Provide the field name used for identifying resources in SMAX.
- Requests offering code for all issues - Provide the offering code that corresponds to the issues in SMAX.
- Duration in seconds of delay between pull user attempts - Set the duration (in seconds) between attempts to pull user data from the backend.
- The maximum number of attempts to pull user from backend - Set the maximum number of attempts to pull user data from the backend before the process is stopped.
- Creation source name - Specify the source name used when creating tickets or records in SMAX.
- Smax verify ssl - Toggle this setting to enable or disable SSL verification when communicating with the SMAX server.
- Smax certificate - Optionally provide a custom CA certificate (PEM format) used to validate the TLS connection to the SMAX server. When set, it overrides the default CA bundle. This is useful when SMAX is hosted internally with a corporate or self-signed CA. The certificate is ignored if SSL verification is disabled.
- Smax webhook shared secret - Shared secret expected in the
X-Webhook-Secretheader of inbound SMAX webhook deliveries. If left empty, webhook authentication is not enforced.
Synchronising changes back to Waldur (webhooks)
The configuration above lets Waldur push tickets to the service desk and poll for updates. To make changes that happen inside the service desk (status transitions, new agent comments, resolution) appear in Waldur in near real time, configure an outbound webhook in the service desk system that calls back to Waldur whenever a ticket changes.
Without a webhook, Waldur only learns about changes during the periodic background synchronisation, so updates made in the service desk can be delayed.
How it works
Each backend exposes a dedicated, unauthenticated receiver endpoint on the Waldur API. When the service desk fires a webhook, Waldur looks up the local issue by the backend ticket ID carried in the payload and re-synchronises that single issue — pulling the latest status and comments, and updating the linked order's output where applicable.
| Backend | Webhook endpoint (relative to the Waldur API host) | Ticket identifier expected in the payload |
|---|---|---|
| Zammad | /api/support-zammad-webhook/ |
ticket.id (Zammad ticket ID) |
| Atlassian | /api/support-jira-webhook/ |
issue.key (Jira issue key) |
| SMAX | /api/support-smax-webhook/ |
id (SMAX request/entity ID) |
So, for an instance served at https://waldur.example.com, the Zammad callback URL is https://waldur.example.com/api/support-zammad-webhook/.
Securing the webhook
The receiver endpoints are not protected by the normal Waldur authentication, so anyone who knows the URL could post to them. To prevent this, set a webhook shared secret in the corresponding service desk configuration (for example Zammad webhook shared secret). Waldur then expects the same value in an X-Webhook-Secret HTTP header on every inbound delivery:
- If the shared secret is empty, Waldur accepts unauthenticated requests (legacy behaviour).
- If the shared secret is set, Waldur rejects any request that does not carry a matching
X-Webhook-Secretheader with403 Forbidden.
Warning
Because the endpoints are unauthenticated by default, securing them is strongly recommended for any production deployment. Treat the secret like a password and serve Waldur over HTTPS so the header is not exposed in transit.
Zammad configuration
Zammad sends webhooks via a webhook definition that is invoked by a trigger (or scheduler). The steps below follow the Zammad webhook documentation.
-
Create the webhook in Zammad. Open the Zammad admin panel and go to Manage → Webhook → New Webhook. Configure:
- Name — for example
Waldur sync. - Endpoint —
https://<your-waldur-host>/api/support-zammad-webhook/. - Request method —
POST. - SSL verification — keep enabled (disable only for self-signed certificates in test setups).
Leave the Custom Payload toggle off. Zammad's default payload already includes the
ticketobject with itsid, which is the only field Waldur needs to identify the issue. - Name — for example
-
Invoke the webhook from a trigger. A webhook does nothing on its own — go to Manage → Trigger → New Trigger, set the conditions that should propagate to Waldur (for example Action is updated on tickets in the group used for Waldur), and under Perform Changes add a Webhook action pointing at the webhook created above.
-
Match the issue. Waldur reads
ticket.idfrom the payload and looks up the local issue whose backend ID equals that value, then re-synchronises its status and comments.
Warning
Zammad's webhook configuration does not support arbitrary custom HTTP headers — it only offers HTTP Basic authentication, a Bearer token, or an HMAC-SHA1 signature, none of which set the X-Webhook-Secret header that Waldur checks. To enforce the Zammad webhook shared secret, inject the X-Webhook-Secret header in a reverse proxy in front of Waldur (e.g. Nginx proxy_set_header X-Webhook-Secret <secret>; on the webhook location). If you cannot inject the header, leave the shared secret empty and restrict access to the endpoint by network controls instead.
Atlassian configuration
- In Waldur, set a value in the JIRA webhook shared secret field of the Atlassian configuration and save.
- In Jira / Jira Service Management, create a webhook (or an automation rule with a Send web request action) that fires on issue and comment events.
- Point it at
https://<your-waldur-host>/api/support-jira-webhook/using thePOSTmethod, sending the standard Jira webhook JSON payload (it already includeswebhookEventand theissueobject with itskey). - Add an
X-Webhook-Secretheader matching the configured shared secret.
SMAX configuration
- In Waldur, set a value in the Smax webhook shared secret field of the SMAX configuration and save.
- In SMAX, create an outbound webhook / notification rule that triggers when a request relevant to Waldur changes (for example on status change or new comment).
- Point the webhook at
https://<your-waldur-host>/api/support-smax-webhook/using thePOSTmethod, with a JSON body carrying the request's identifier in theidfield (matching the SMAX entity ID Waldur stored when it created the ticket). - Add an
X-Webhook-Secretheader matching the configured shared secret.