Resource management
VPC management
Info
There are several Virtual Private Cloud providers available on the ´Marketplace´. You need to provision at least one VPC package from a suitable provider in order to be able to create virtual machines.
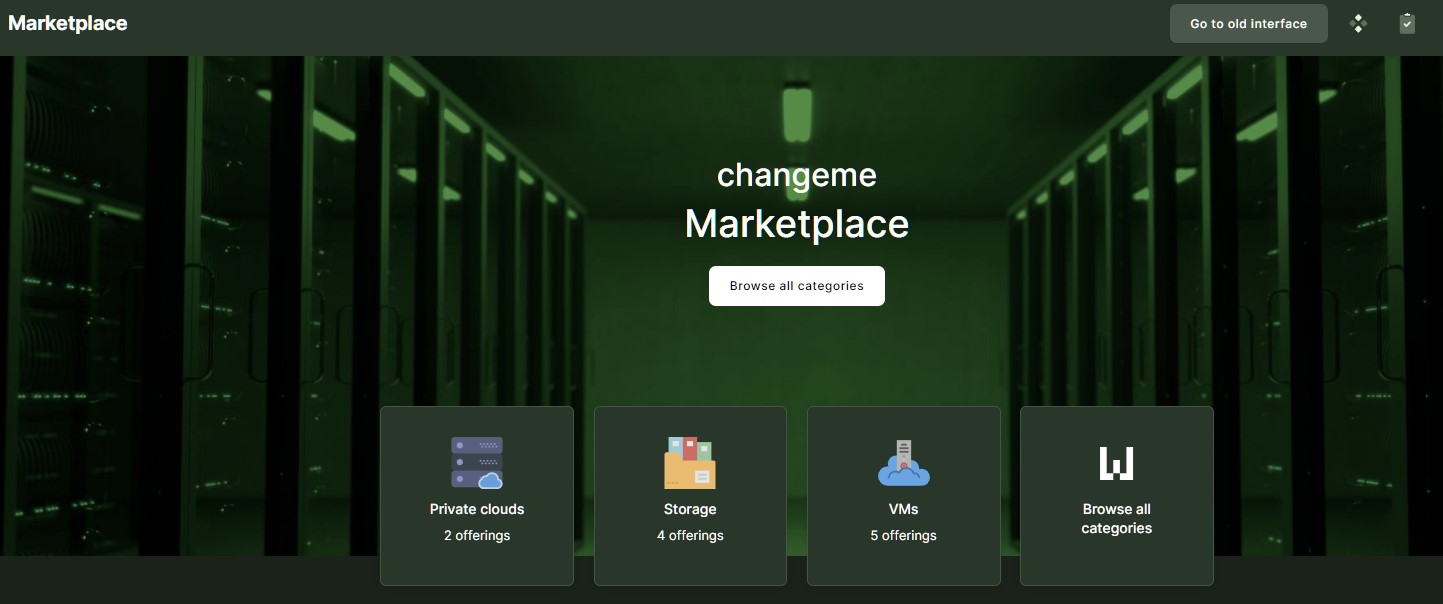
- Virtual Private Cloud (VPC) resource package can be added by clicking to ´Marketplace´ and selecting ´Private Clouds´ from the menu to go to the list of VPC.
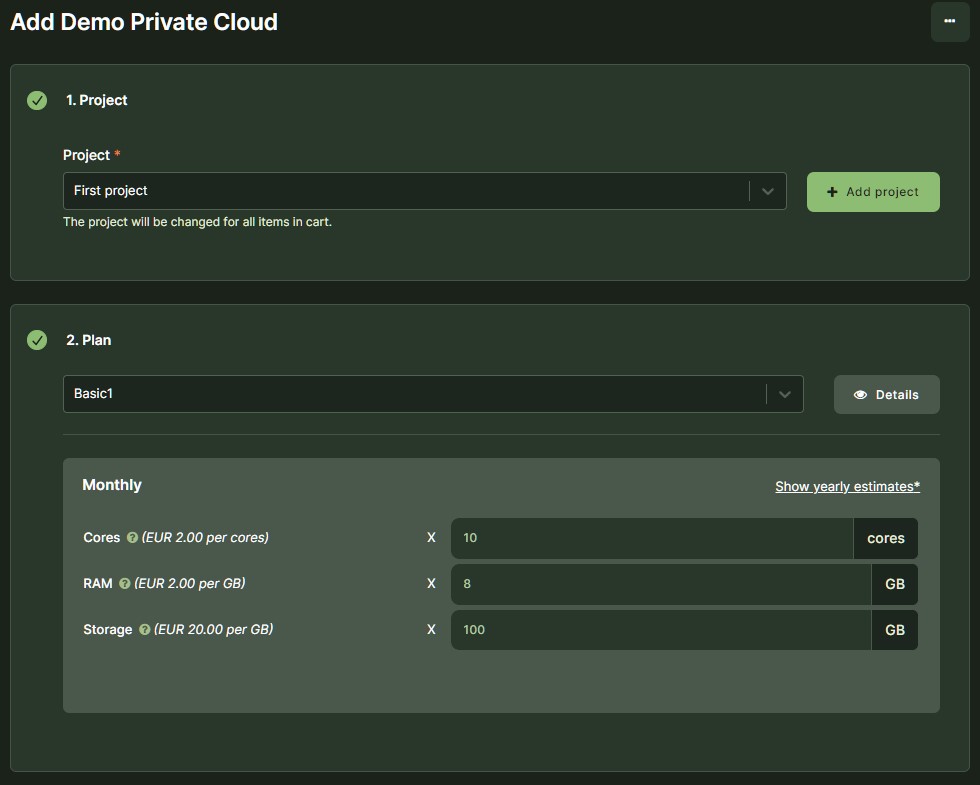
- Currently, there are three VPC component names listed: ´Cores´, ´Ram´, and ´Storage´. For configuration of a VPC resource please fill in a suitable quantity for each component and click on the ´Add to cart´ button. Here by changing the quantities of components, you can see Prices accordingly per day, per 30 days, per 365 days, and finally the total price of the VPC.
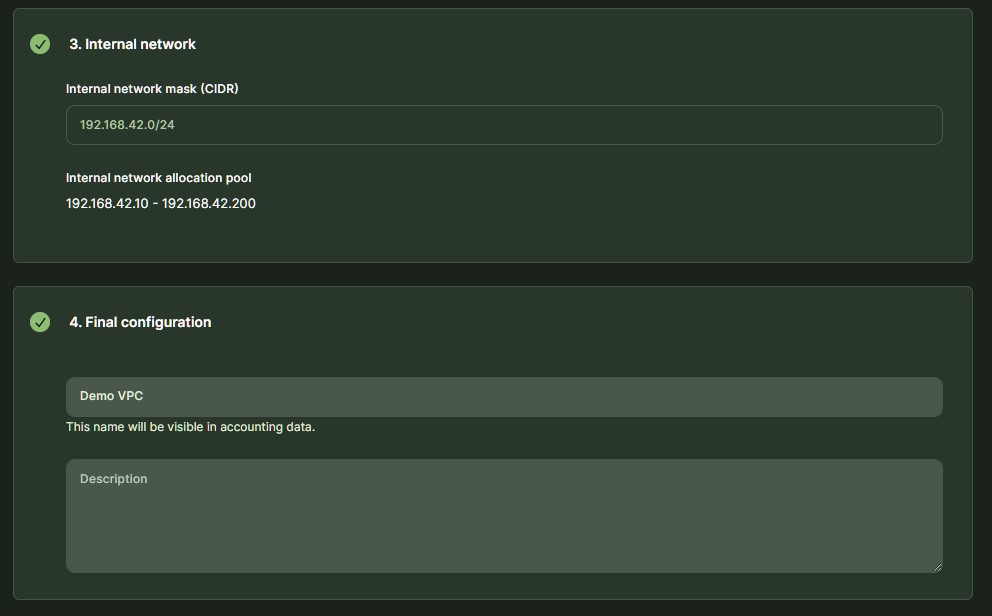
- It is mandatory to input ´Tenant name´ to order a VPC.
- We also strongly suggest filling the ´Tenant description´ field.
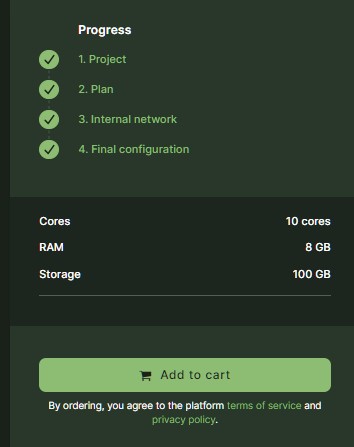
- Finally click on Add to cart and Request on the next page.
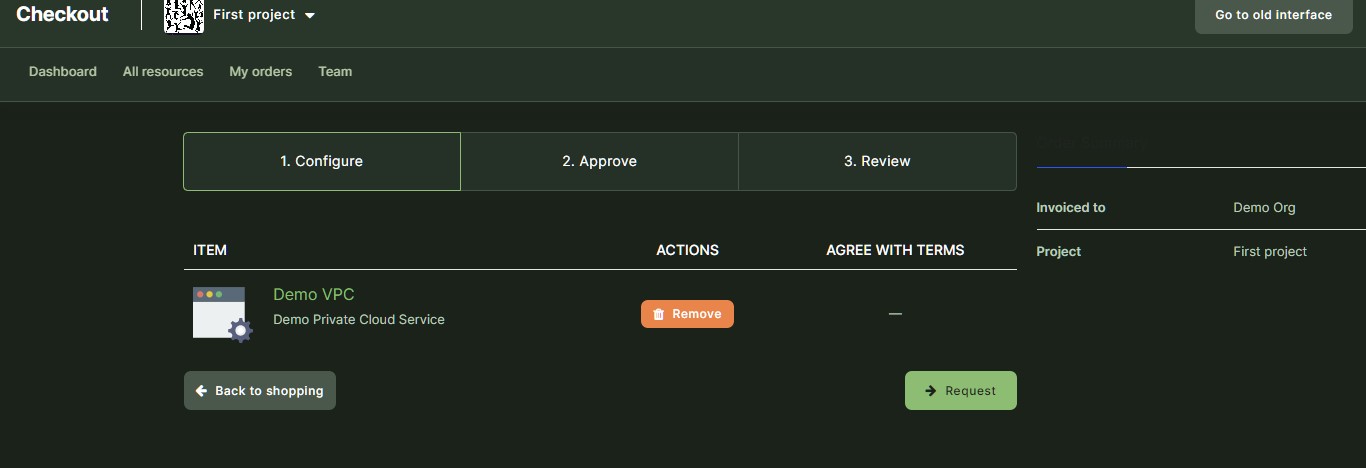
Request approval
a) If your role in the Project is ´Project Manager´ or ´System Administrator´, please ask your Organization Owner to approve the order.
b) If your role is ´Organization Owner´ you are able to complete the purchase to final approval (click the ´Purchase´ button). Hereafter the system will need a couple of minutes to execute the order. Once the system changes the state to ´Done´, your VPC is ready to use.
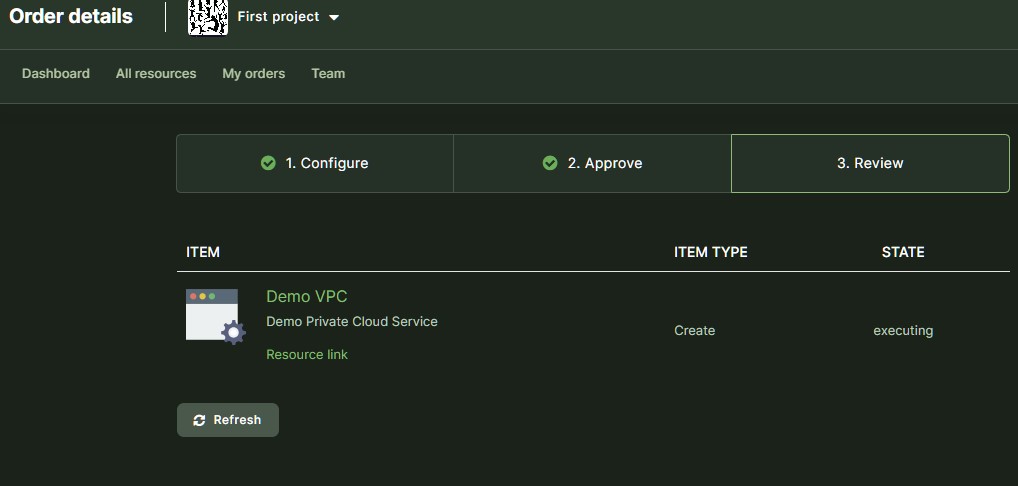
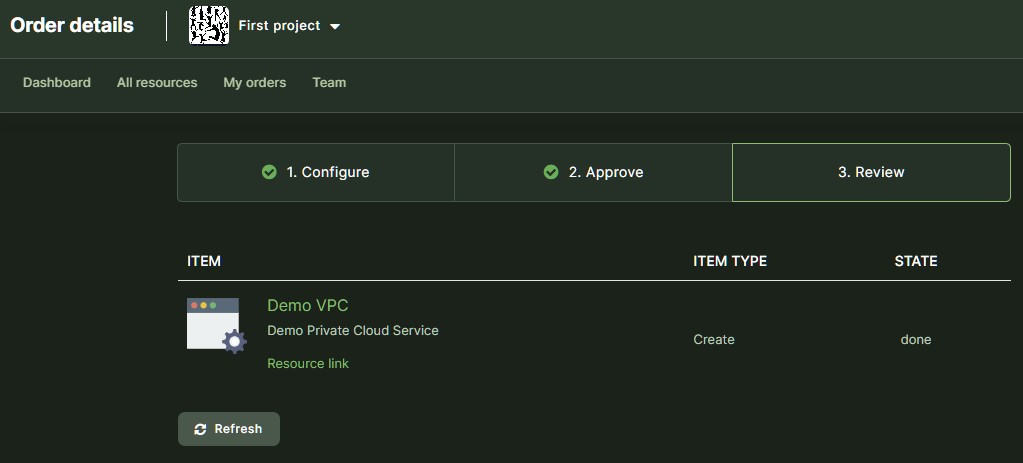
Info
Provisioned VPC resource package will be automatically enabled for the project as a VM provider. For other projects it can be enabled by the organization owner under Provider management within organization workspace.
VM management
Info
Projects need to have at least one VPC resource package enabled before any virtual machines can be created. You can follow this guide to add a new VPC.
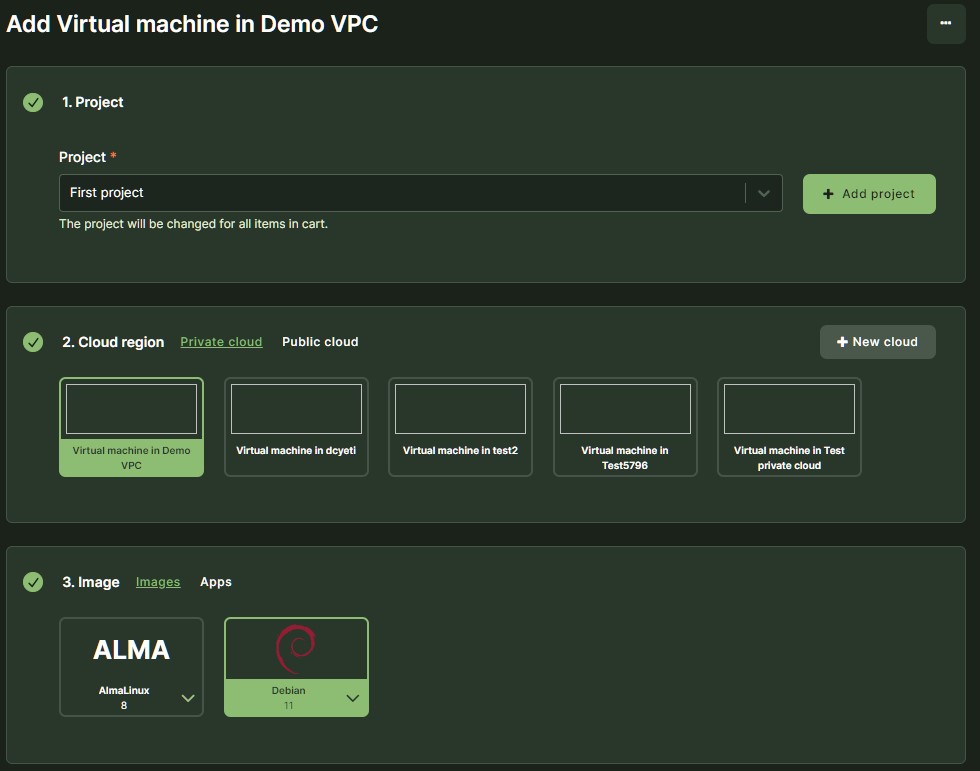
- VMs can be added by clicking to ’Marketplace’ and selecting ’Virtual machines’ from the menu to go to the list of Virtual Machines.
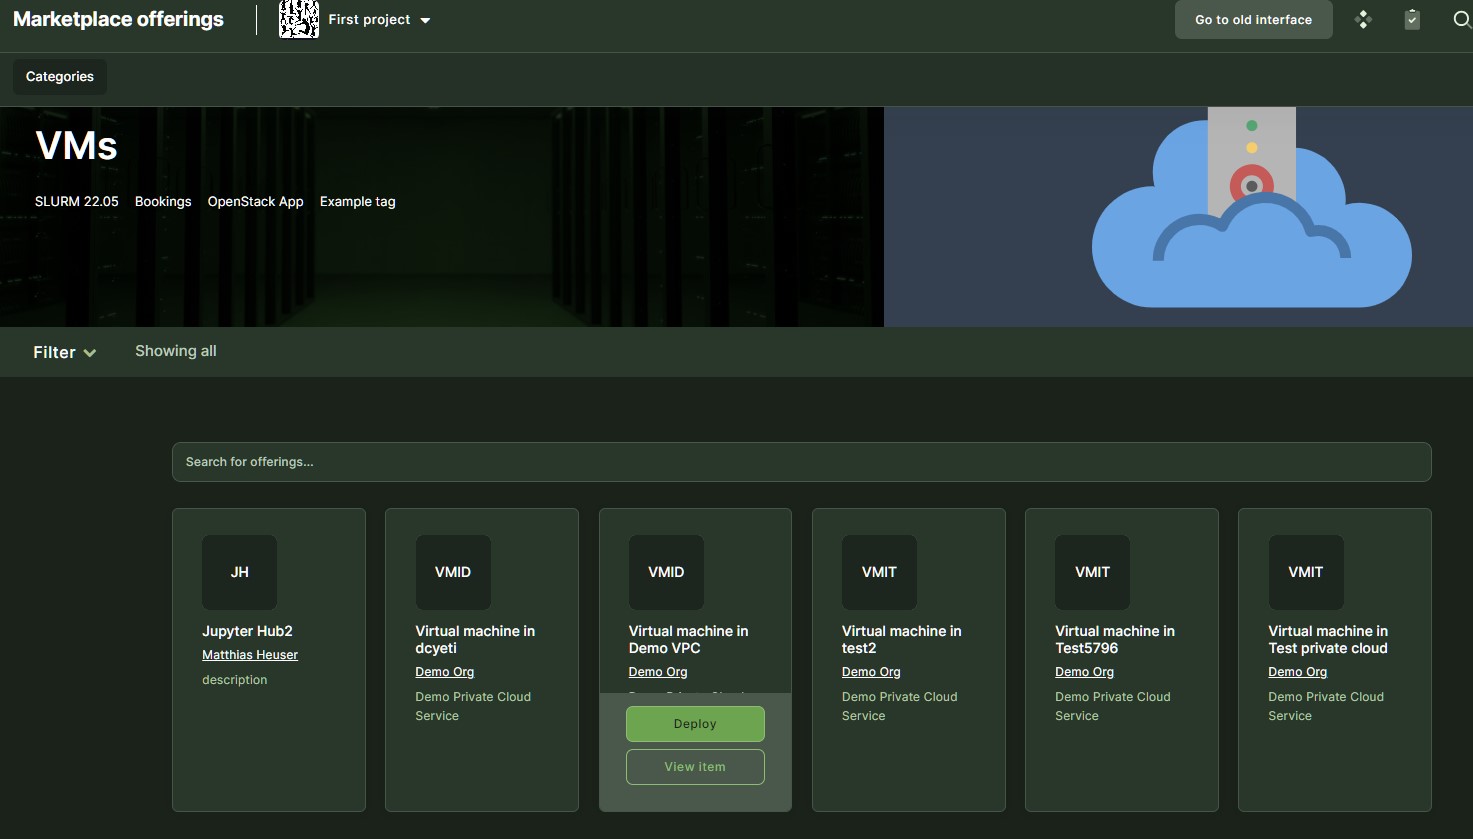
- Ordering a ’Virtual Machine’ requires a VM name and selection of a VM image.
- Please select the ’Image’ for a VM and click on the ’Select’ button, returning to the form.
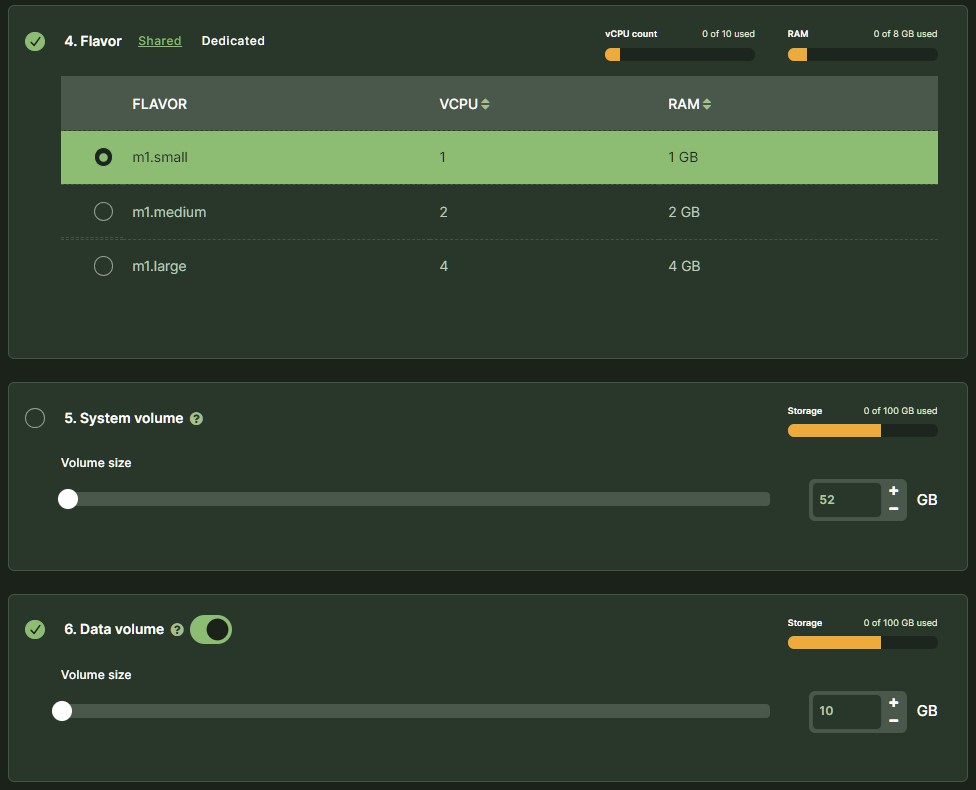
- Selecting the initial VM resource profile, the flavor, by clicking on the ’Flavor: Show choices’ selector is mandatory.
- The flavor will set the initial resource profile for a VM - how much RAM, vCPU cores, and storage it will have.
Warning
VM images contain their minimum requirements information, and non-matching VM flavors are disabled automatically.
- Selecting VM flavor will also update ’System volume size’ with the option to override it manually (to a higher custom value). The size of ’Data Volume’ can be customized and incremented in 1 GB steps. ’System volume’ must be at least 10 GB, and together the two volumes must fit the VPC’s remaining storage quota — see System and data volumes.
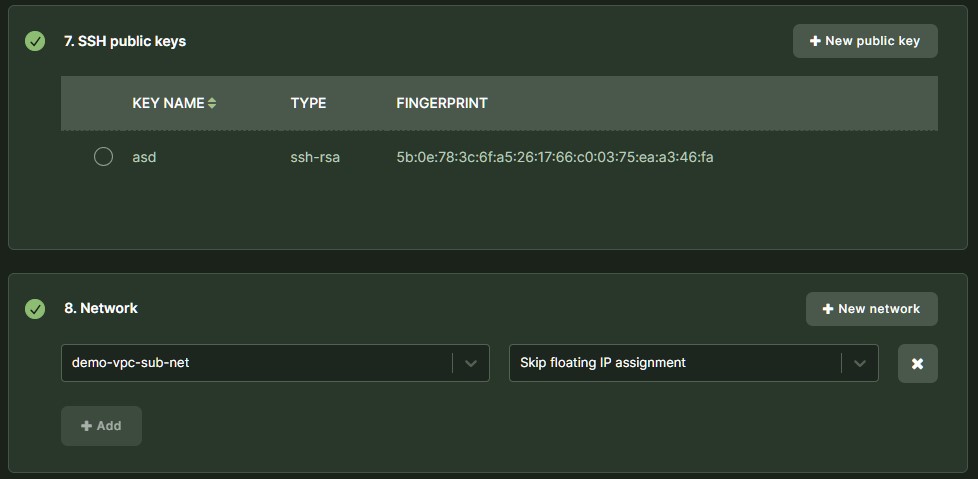
- By default, provisioned virtual machines expect users to log in using SSH keys. The initial SSH key for login should be selected by clicking on the ’SSH public key: Show choices’ selector.
Warning
There has to be at least one SSH public key added to the user profile for it to appear in the SSH key selector list.
Info
In order to log in to your newly created VM over SSH, you need to use a username depending on your choice of VM Image type and your SSH-RSA key-pair. By default password authentication is disabled.
- Default usernames for login are as follows:
- CentOS images: CentOS
- Ubuntu images: Ubuntu
- Debian images: Debian
- FreeBSD images: FreeBSD
- By default, no incoming connections will be allowed for a VM. Predefined Security Groups (firewall rules) must be linked to a VM in order to open up access (like ssh, HTTP, etc.). By clicking the ’Details’ button, you can see the details about the available ’Security Groups’. ’Security Groups’ can be added while ordering the VM or afterward by editing.
Info
VM create form will automatically include a ’default’ security group that enables egress (outgoing) traffic for a VM and which is required in order to reply to any of the incoming packets.
- VM needs to be connected to at least one of the VPC (internal) networks and an external network via floating IP - if external/public access to VM is required.
Info
Floating IP is technically realized as 1:1 NAT between VM internal IP and public network IP.
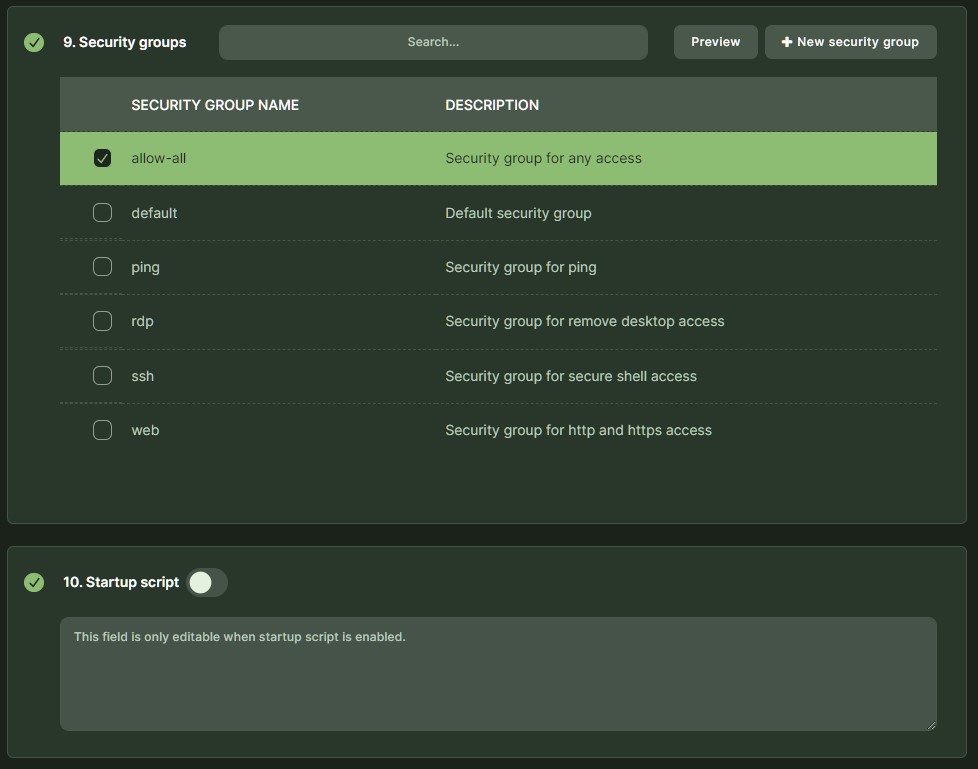
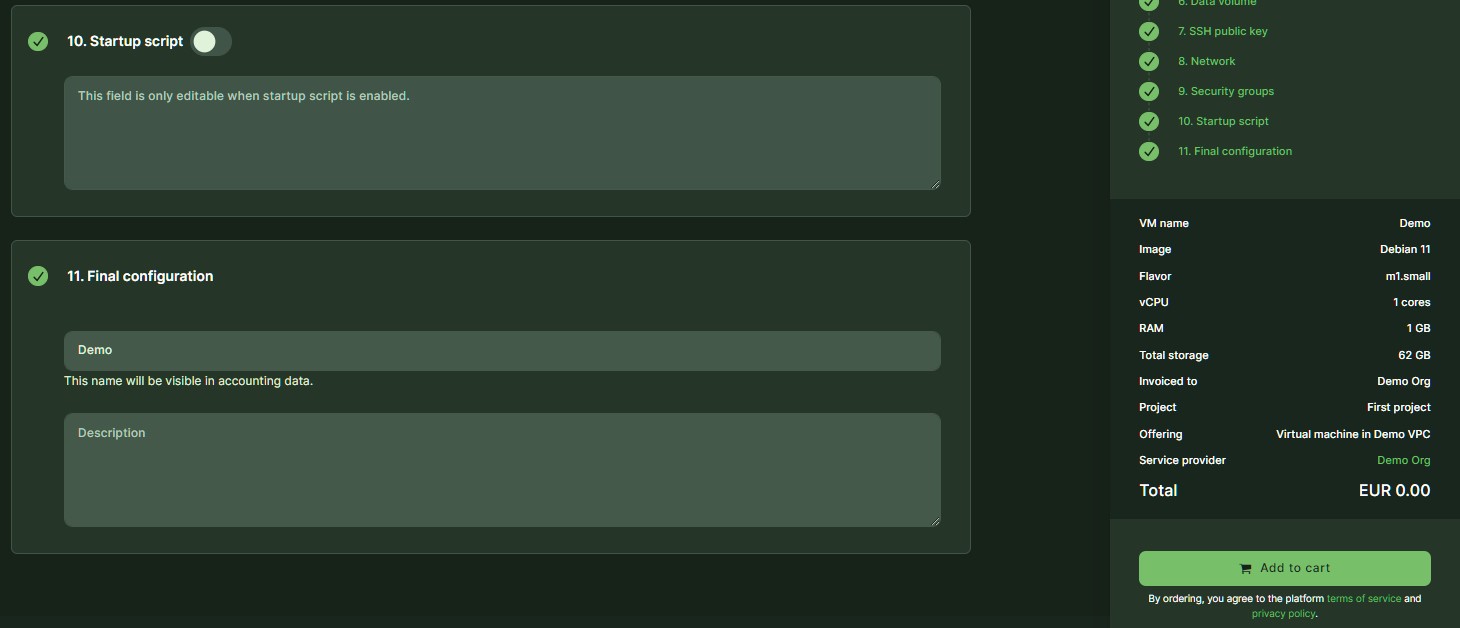
- We strongly suggest also adding ’VM description’. In order to provision the VM, please click on the “Add to cart” button.
Info
On the right pane, there will be a ’Checkout summary’ with the purchase overview and indicative VM cost (as part of the VPC package cost).
System and data volumes
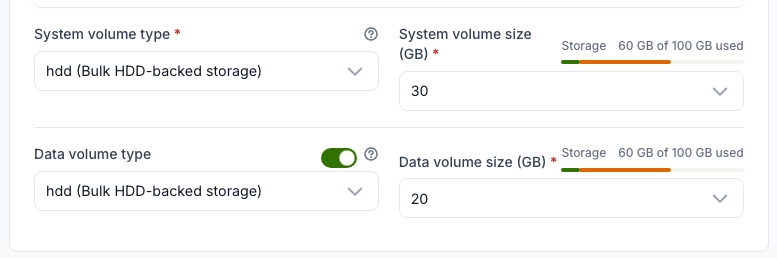
The Hardware configuration step has a system volume (the boot disk, always created) and an optional data volume. For each one, pick a volume type and a size. Next to each size, a bar shows the quota the volume draws from and how much of it this order would use.
Which quota the bar shows depends on how the VPC tracks storage:
- A single storage quota — the bar reads Storage and stays in place whatever volume type you pick, because every type draws from it.
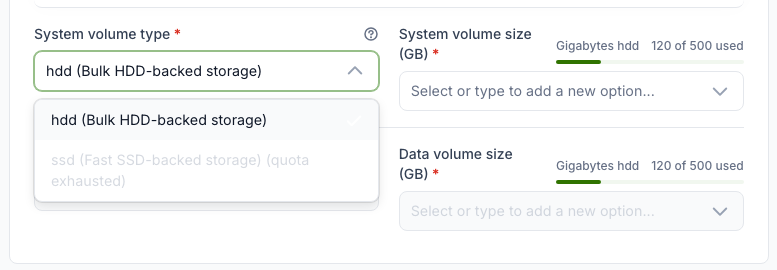
- A quota per volume type — the bar reads Gigabytes <type> (for example Gigabytes ssd) and follows the selected type.
Sizes are checked together
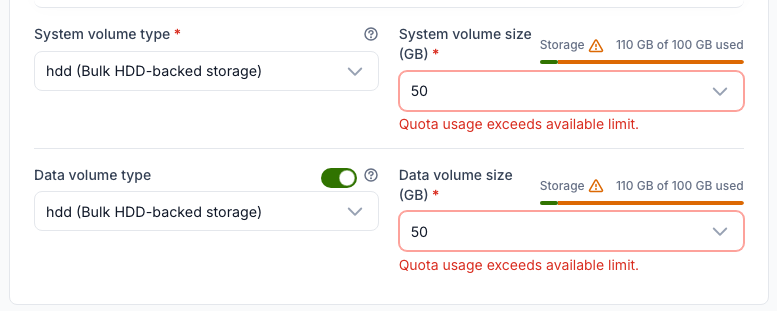
Both volumes of the order count against the VPC's storage quota at the same time, and volumes of the same type also count against that type's quota. Each size may fit on its own while the two together do not; both size fields then show Quota usage exceeds available limit. Reduce either size, or choose a type with room left, to continue.
Optional data volume
The data volume is switched off by default. Use the toggle next to Data volume type to add one. Switching it off again clears its size, so the data volume is no longer part of the order.
Volume types with no quota left
When a volume type has its own quota and that quota is used up, the type stays in the list but is greyed out and marked (quota exhausted). It cannot be selected, and the form preselects the first type that still has room.
Tip
If every volume type is used up, no type is preselected and the order cannot be submitted. Ask the VPC's service provider to raise the quota — see OpenStack tenant quotas.
The same quota display and checks apply when ordering a standalone volume.
Config drive
The Automation step has an Enable config drive toggle next to the start script field. A config drive is a small read-only disk attached to the instance at boot. Cloud-init reads metadata, the SSH key and the start script from it without going through the OpenStack metadata service on the network (http://169.254.169.254).
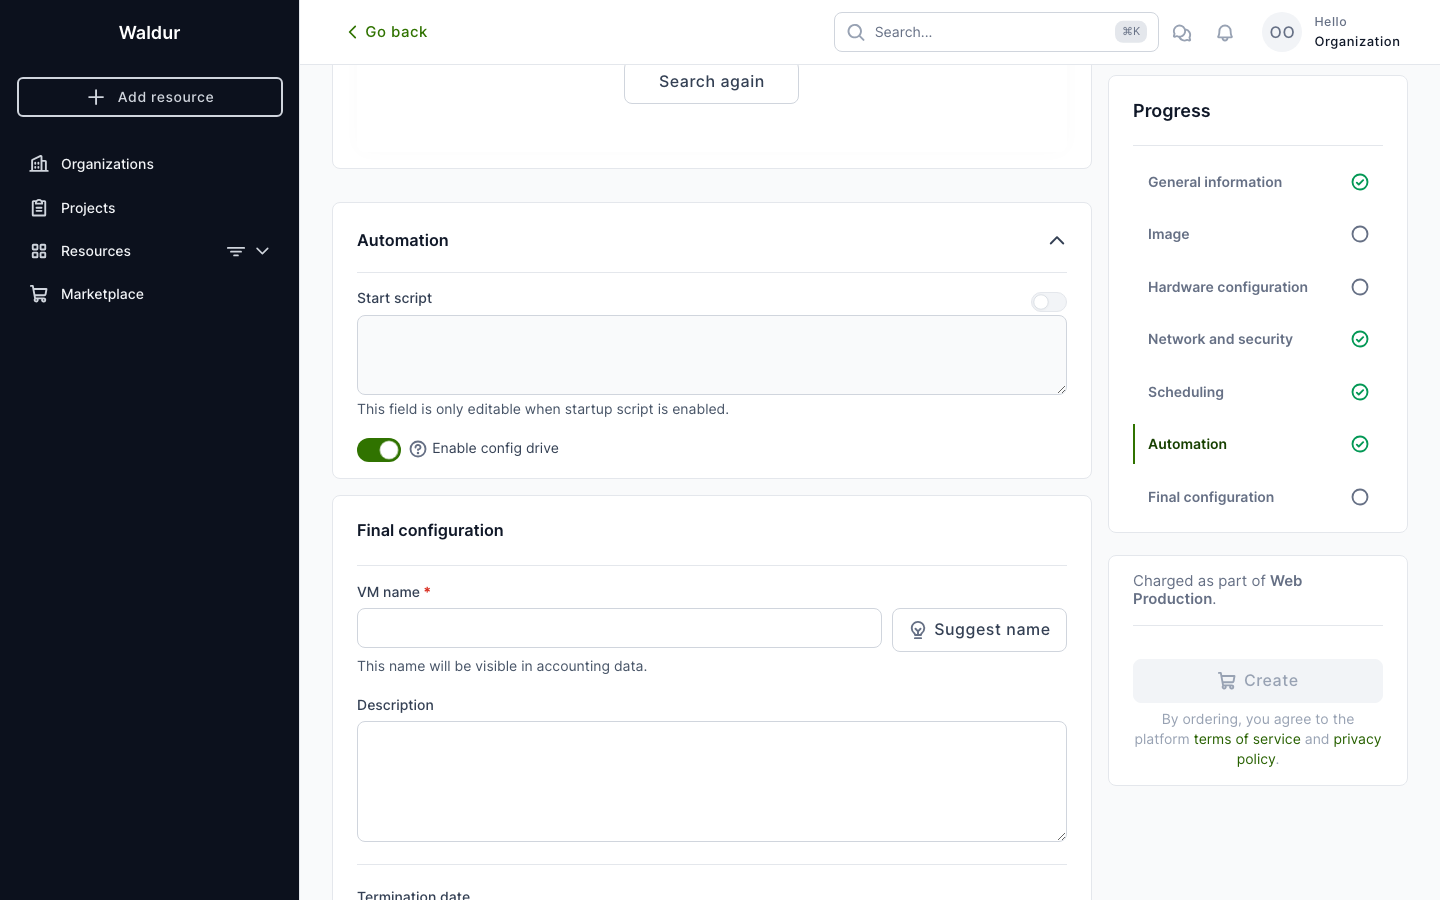
The toggle is pre-filled from the provider default. Enable it for instances that:
- have no DHCP on their tenant network,
- sit on an isolated network that cannot reach the metadata service, or
- must read user data before networking is up.
Leave it off for normal cases where the metadata service is reachable.
Tip
Hover the question mark next to the field for a full explanation in the UI.
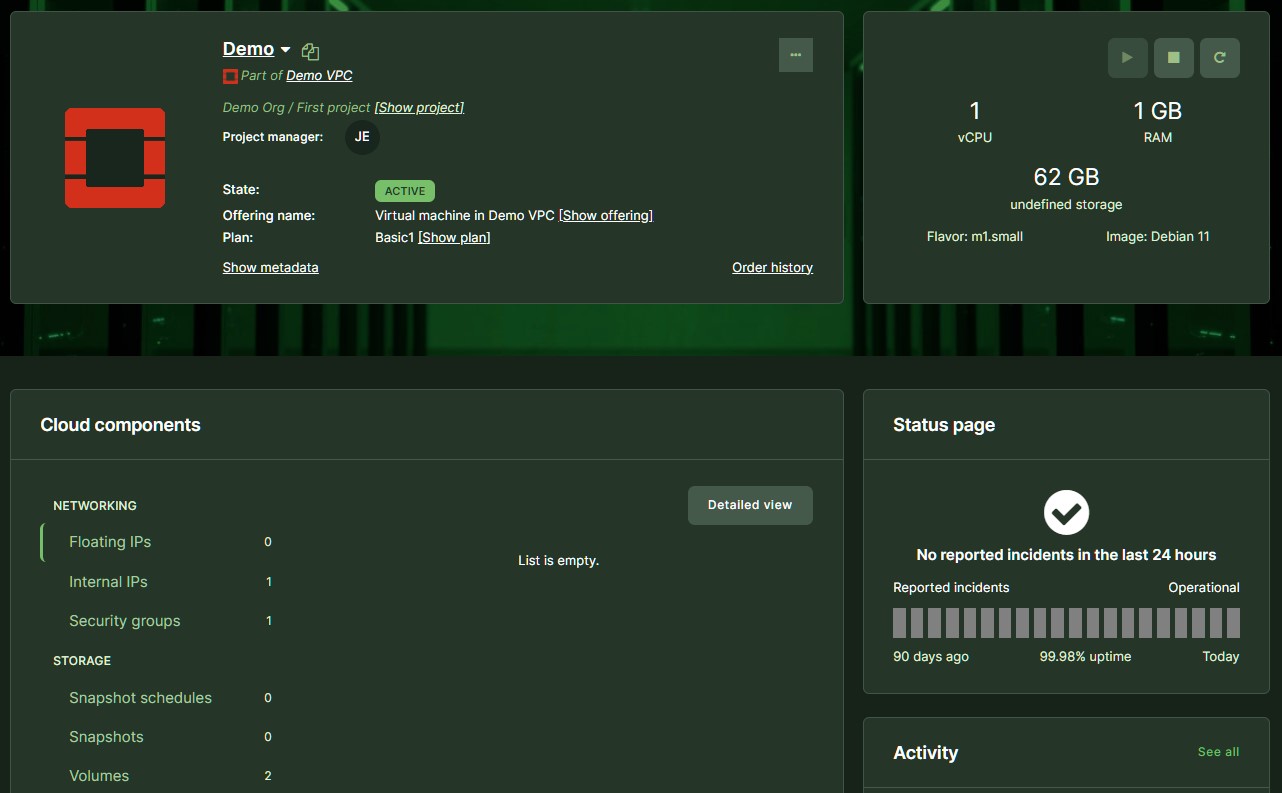
- VM should reach into “Active” status when successfully provisioned. The “Access” field will show the IP address to access VM over SSH (Linux) or over RDP (Windows).
Info
VM access over SSH or RDP should be permitted by ’Security Groups’ linked to VM.
HPC resource management
- HPC resources can be added by clicking to ´Marketplace´.
- Select organization and project (if not filled in yet) from the upper right corner.
- selecting ´HPC´ category or some other option which represent HPC resources.
- Select desired resource and click 'Deploy'.
- Fill in request form fields and click 'Create' on the right.
Resource components update
If it turns out that initial limits for the resource are too low or higher than expected, then it is possible to change the limits after the resource creation. This can be done by opening the resource management section. Again, like in the resource creation phase, same approval flow applies.
Users who may not change the limits themselves can ask for new ones on offerings that enable it — see Requesting resource limit changes.
Changing a calculated size
Some offerings calculate several limits from one value you enter when ordering, such as the net storage of a database, from which the provider derives replica, log and backup space. If the provider lets you change that value later, it appears on the resource's Options tab:
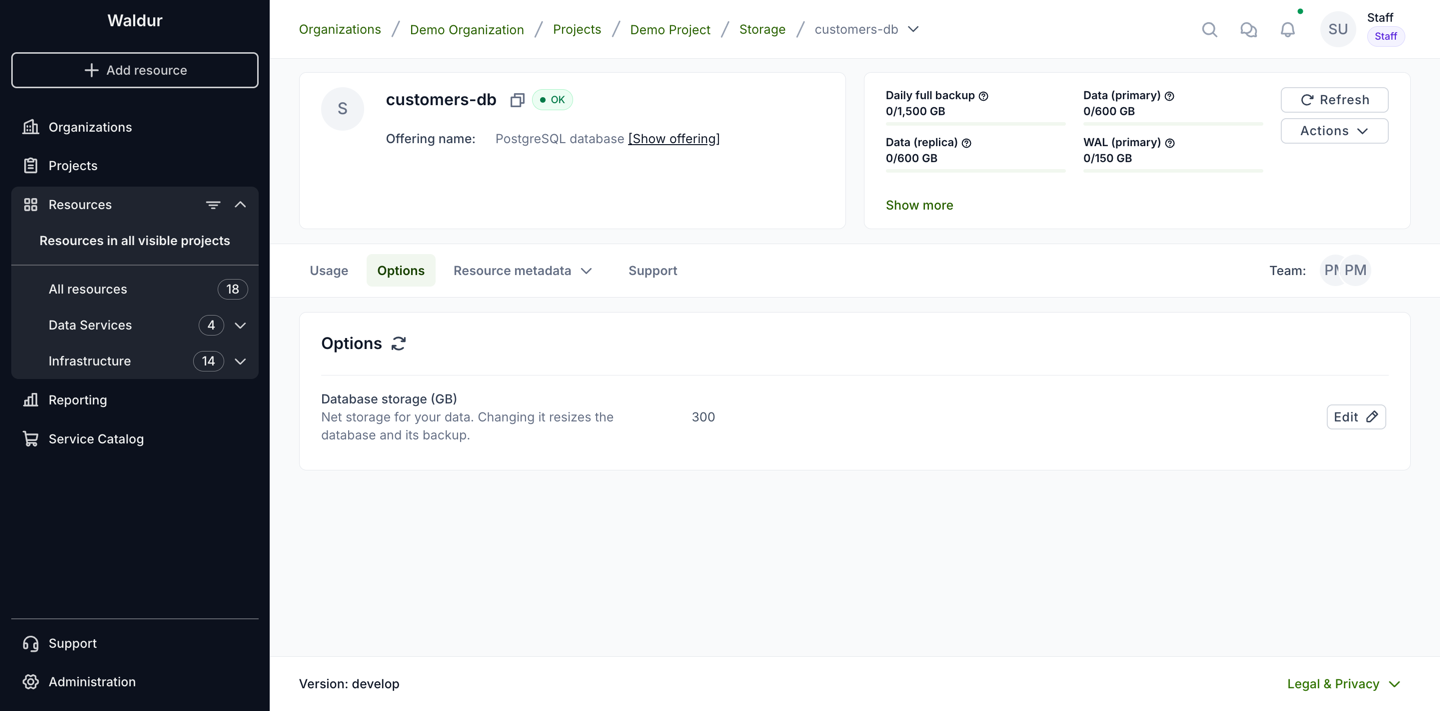
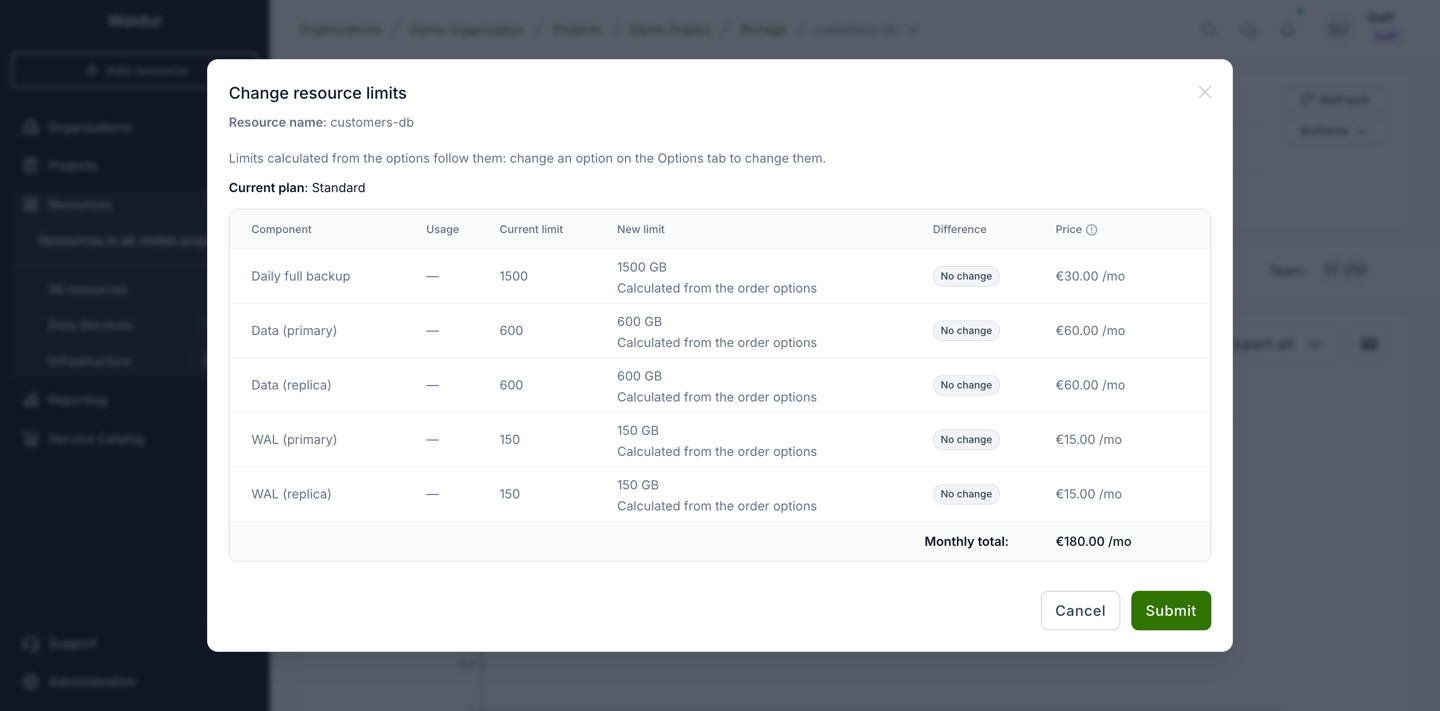
Click Edit next to it and enter the new value. The dialog shows the limits calculated from it, the difference from the current ones and the new monthly price before you submit:
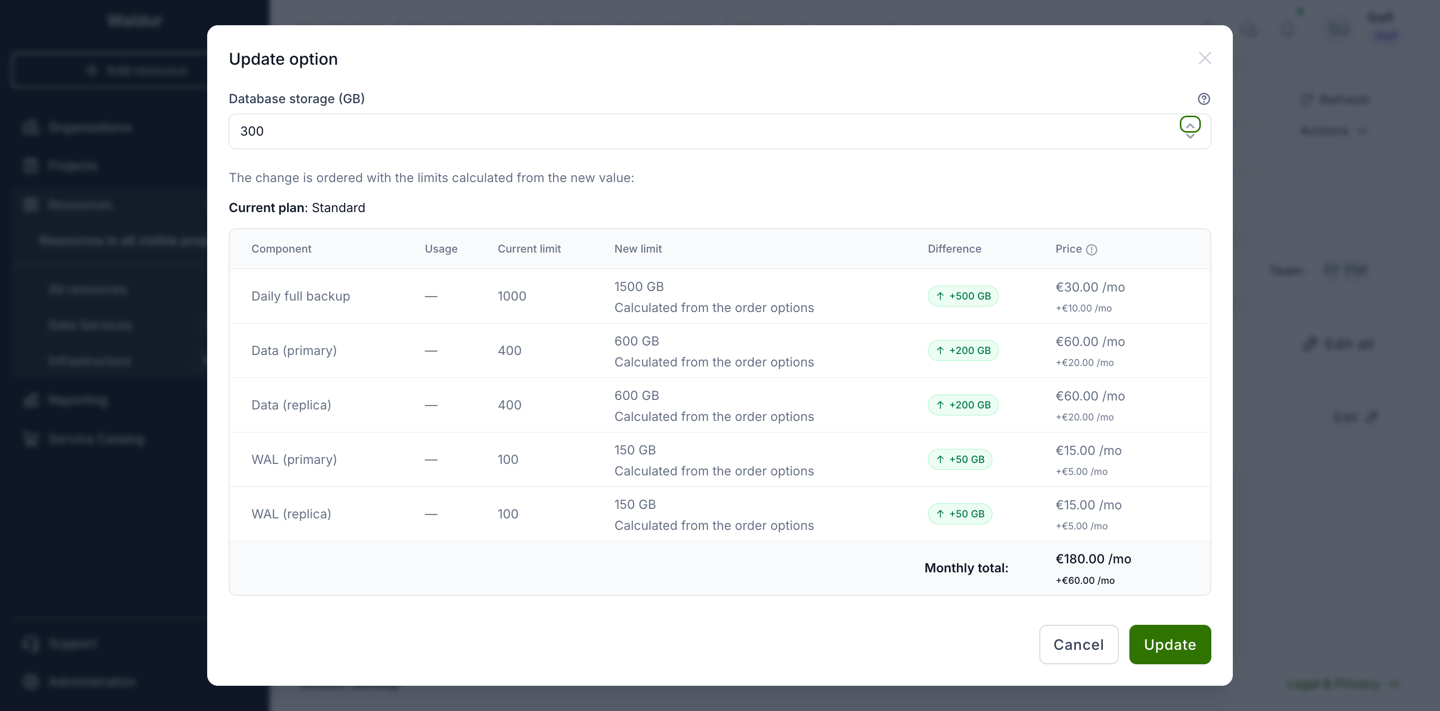
Update submits an order with the new value and the recalculated limits. It follows the same approval flow as other changes, and its details show both the limit change with its price impact and the changed value:
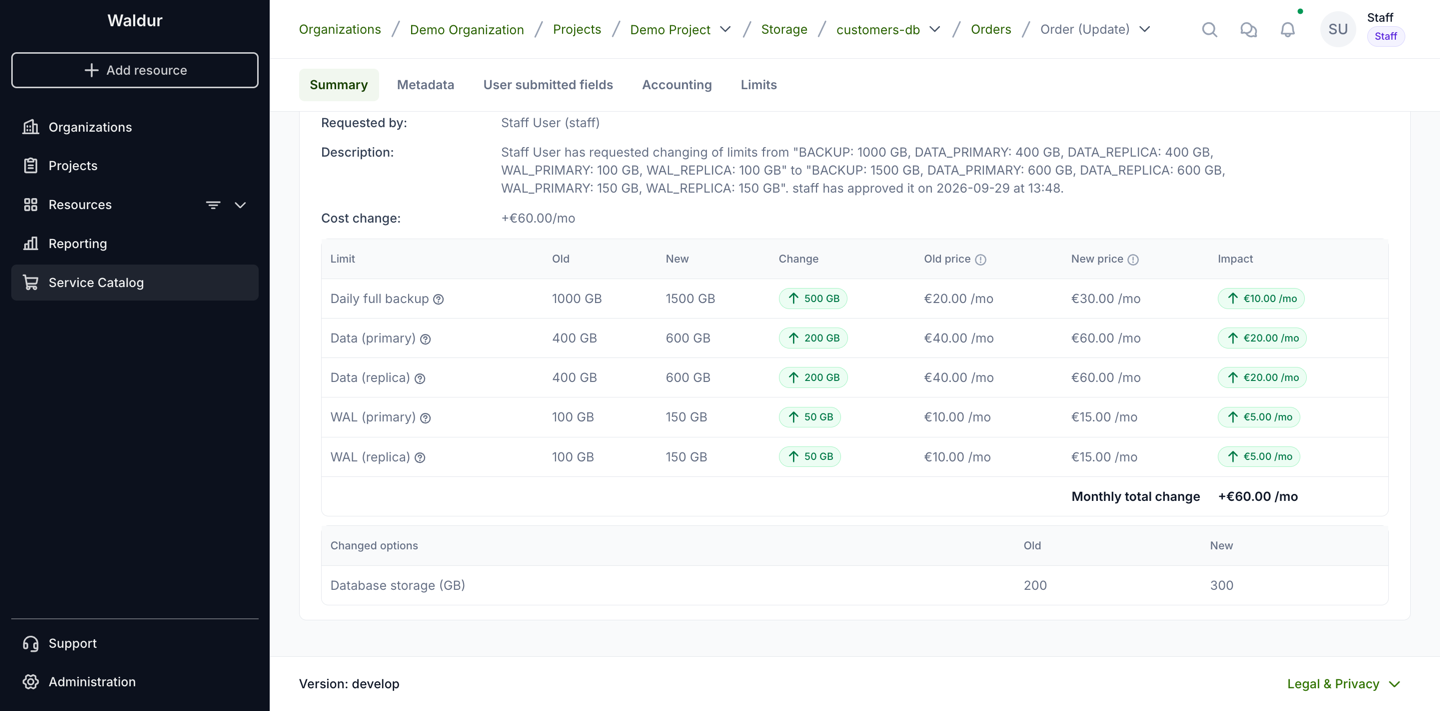
When the order is done, the resource has the new value and limits, and billing follows them from that day.
The calculated limits cannot be changed on their own. Change limits shows them without an input, and they follow the value on the Options tab:
Changing the plan of a resource
If the offering has several plans, Change plan in the resource actions moves the resource to another plan. The dialog lists each plan with its billing (limit-based, usage-based, prepaid) and price; plans with a different billing period cannot be selected. When the new plan bills differently from the current one, the dialog explains what changes:
- Moving from a limit-based plan to a usage-based plan charges the limit fee for the plan's current billing period (the whole month for a monthly plan, the days used for a daily plan). From then on you are billed for actual consumption; your quotas stay unchanged and cap usage instead of being billed.
- Moving from a usage-based plan to a limit-based plan invoices the usage accrued before the switch at the old rates, then bills your current quotas as limits for the new plan's billing period. The dialog shows the limits that will be billed. If the resource has no quotas yet, ask the service provider to set them first.
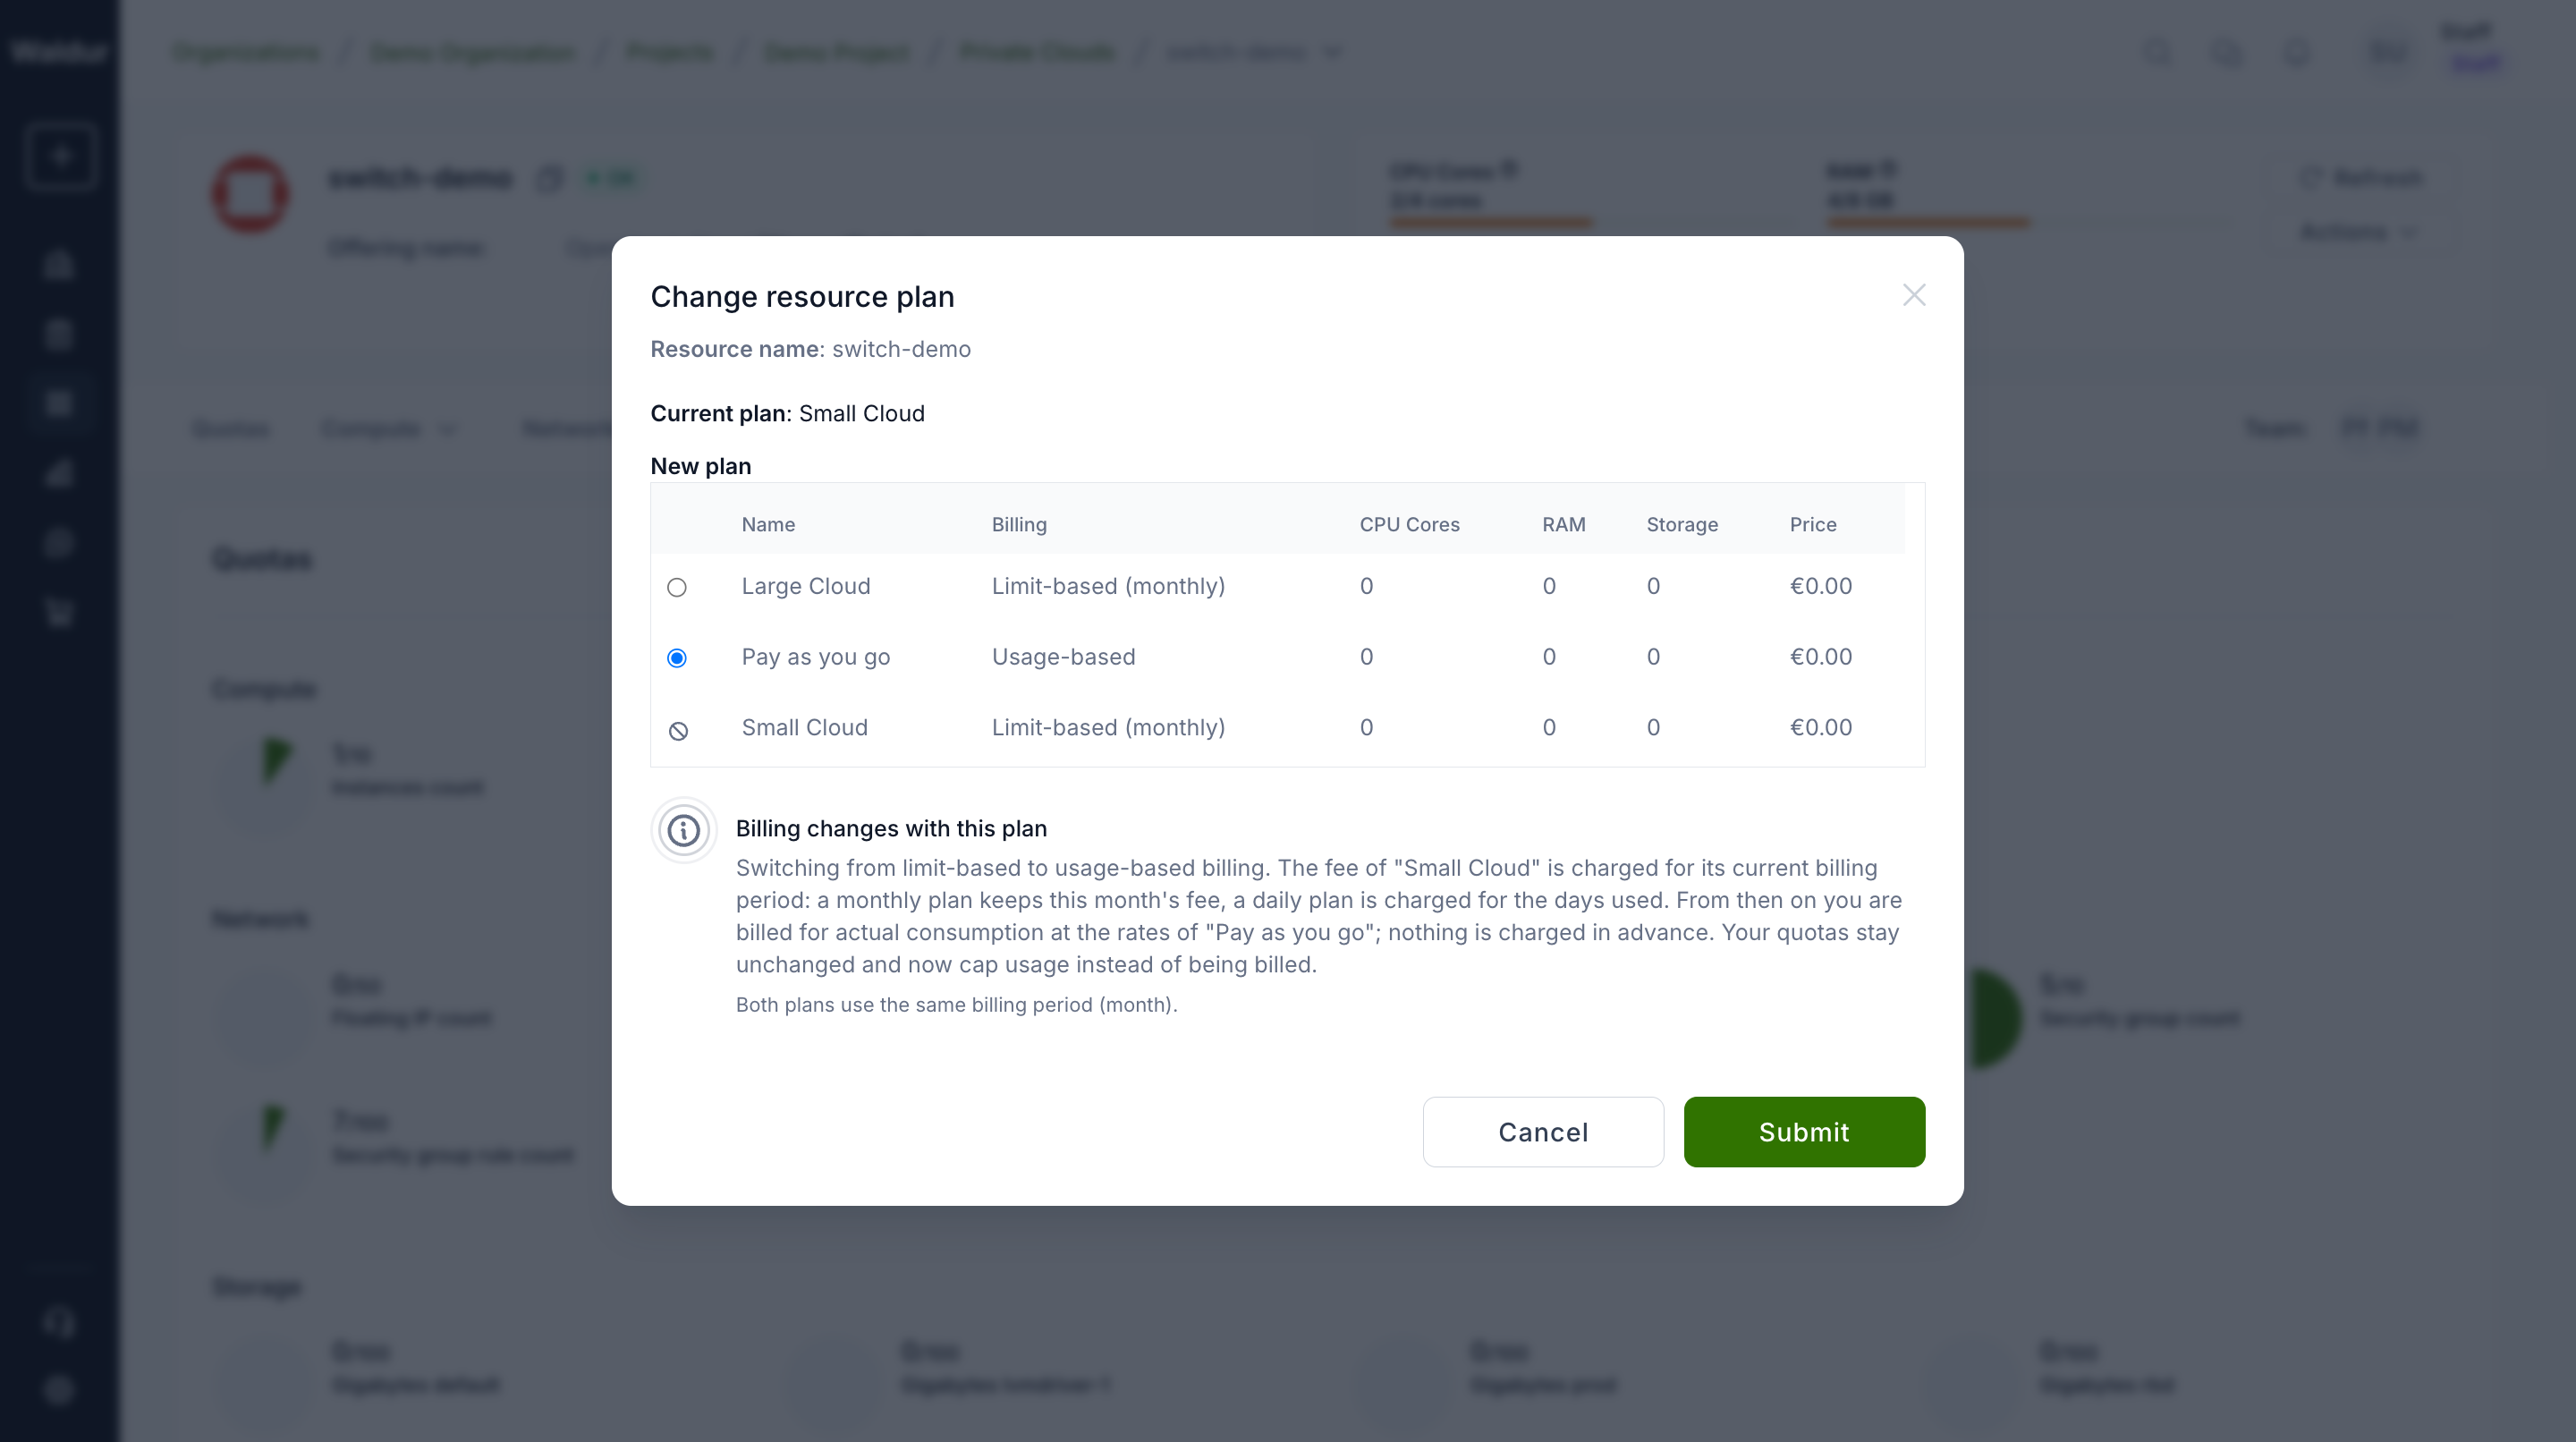
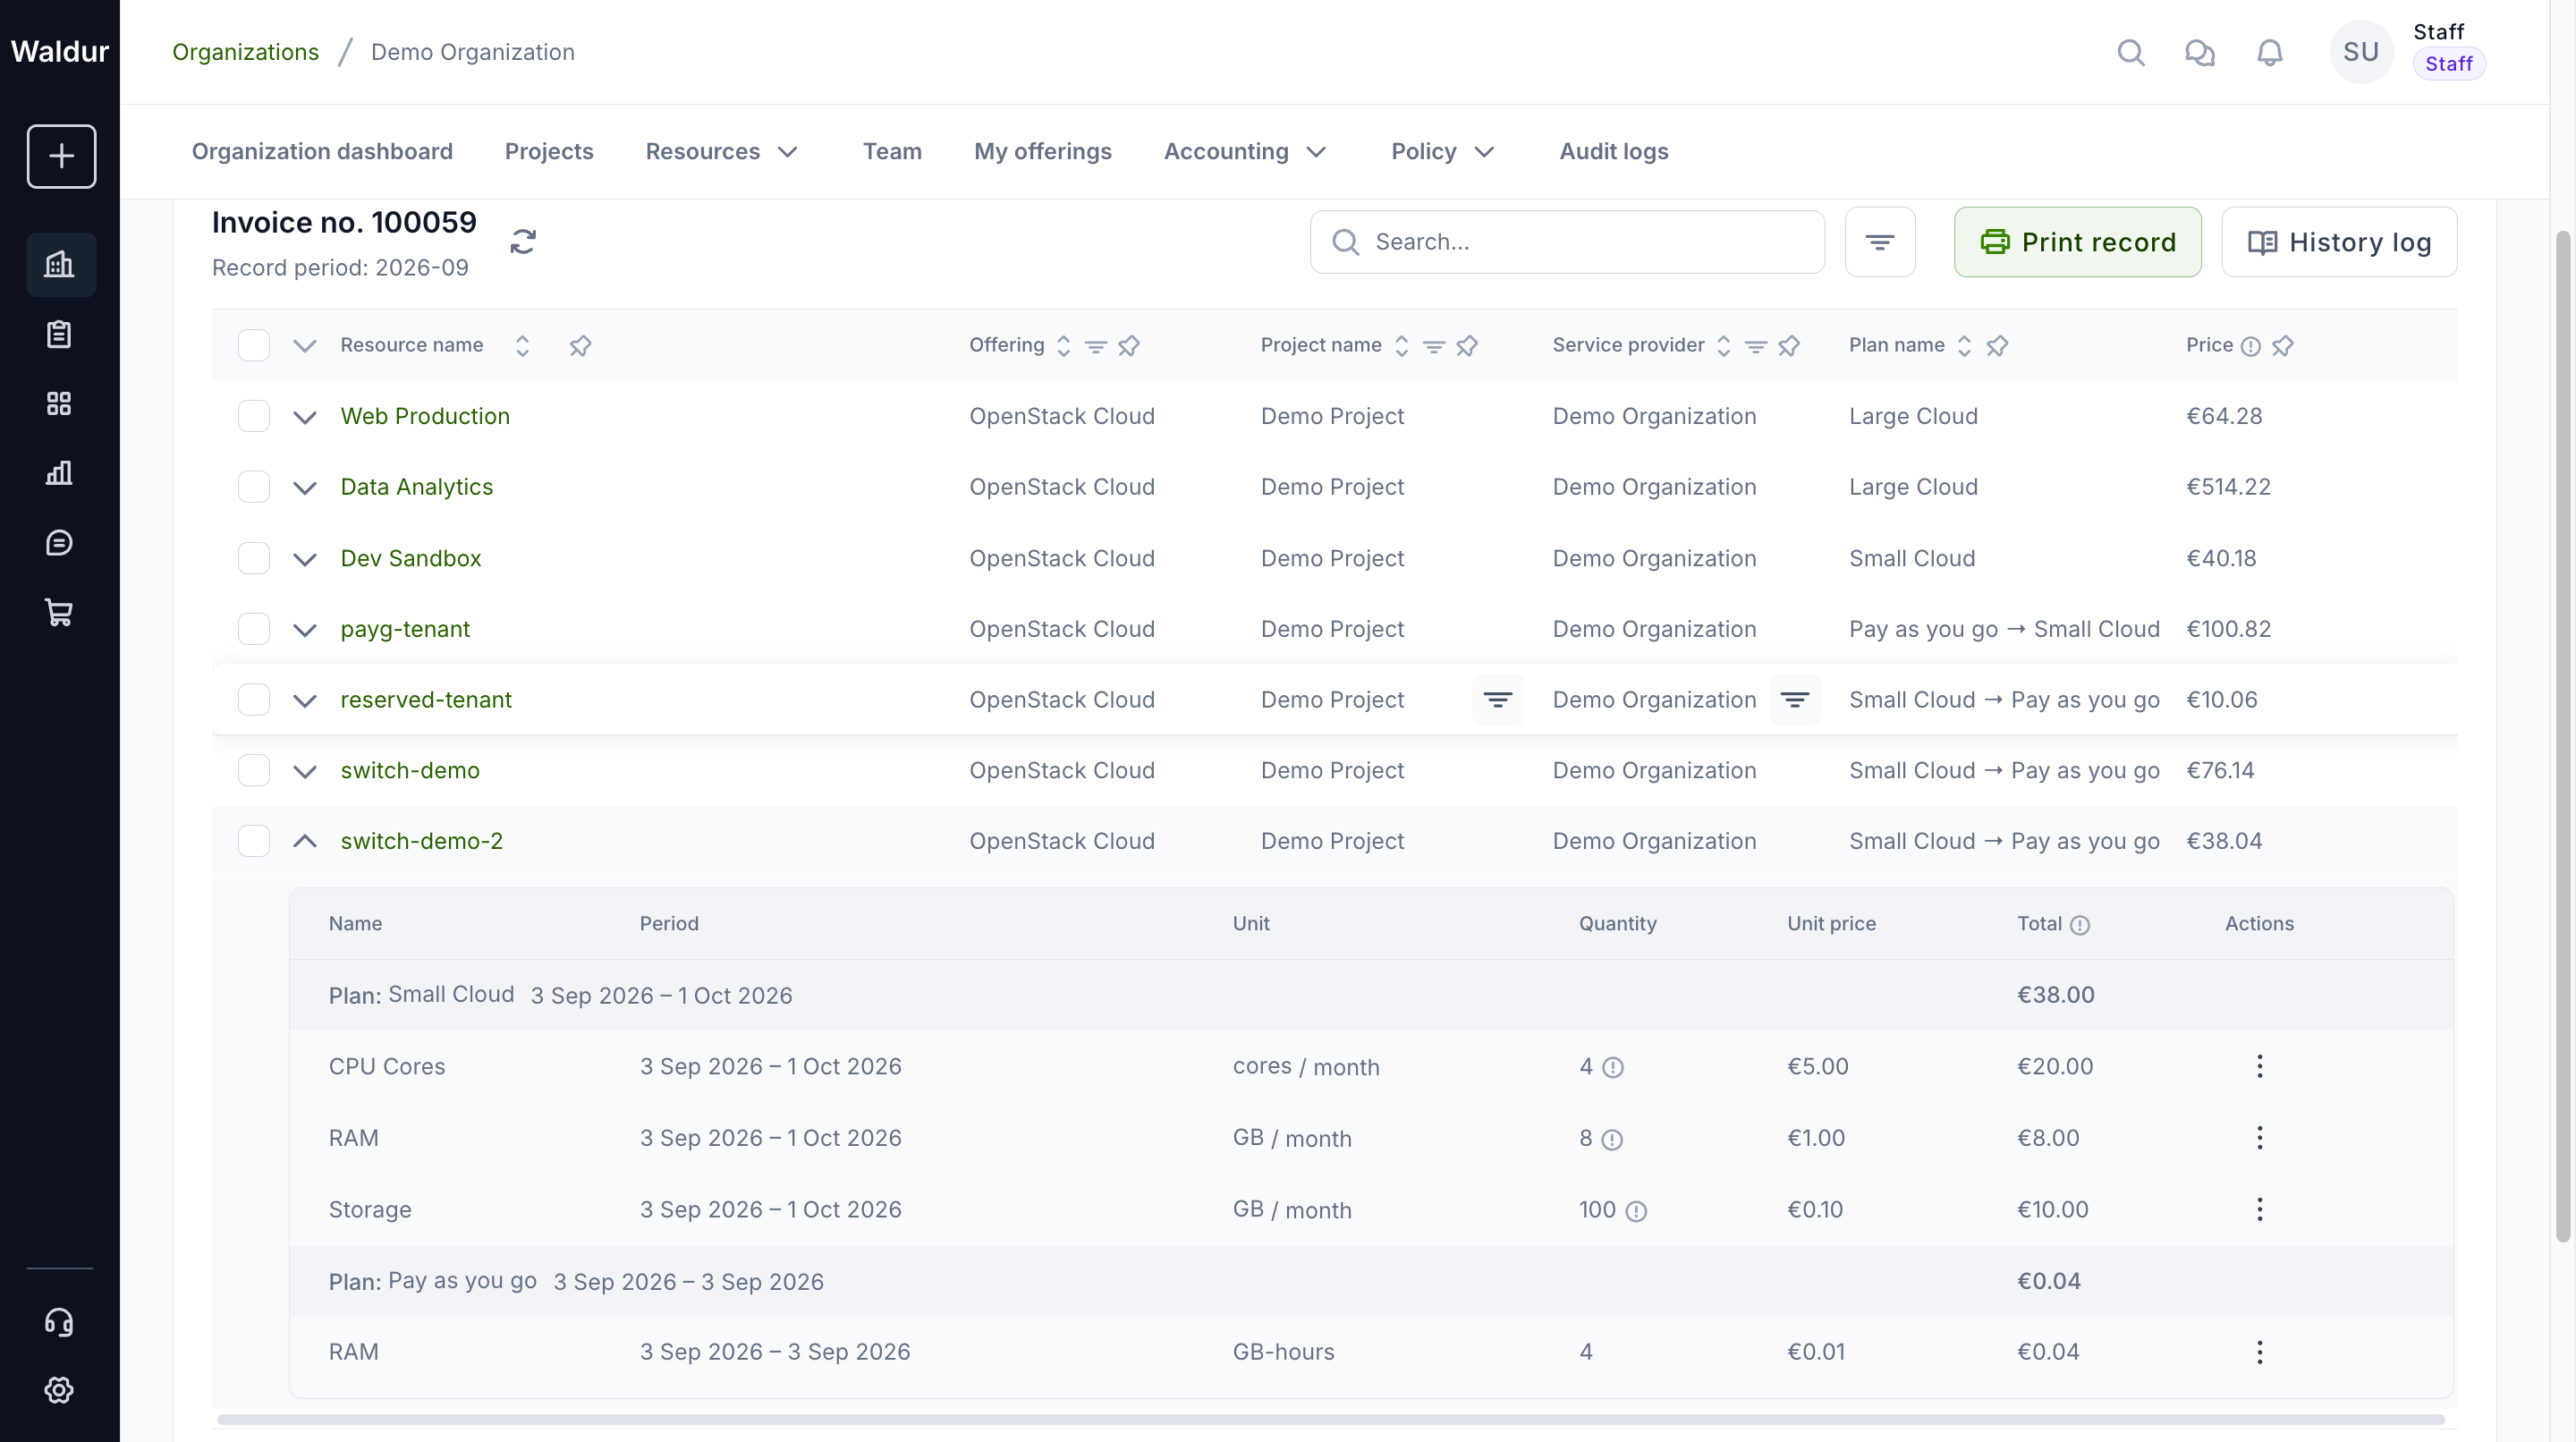
Like any change, the request follows the approval flow; the order shows both plans with their billing modes. On the invoice, the resource's lines for the month are grouped by plan, each group with its period and subtotal.
Resource end date update
The termination date can be changed the same way on offerings that enable it — see Changing a resource end date.
Volume discounts
Some offerings have volume discounts configured on their components by the service provider. A discount reduces the price of a component once your usage reaches a threshold.
In the order form, a discount is shown live — a green − X % volume discount next to the component and a reduced total — only when it can be computed up front. That is the case when the discount applies per resource and the quantity is fixed at order time (limit-based, prepaid one-time or fixed-price components).
For everything else the exact saving cannot be known until the invoice is finalized — usage-based components (metered later), or discounts calculated on your total usage of a component across the whole organization (which depends on your other resources). In those cases the order form shows a "Volume discount applied on your invoice" note instead of a price.
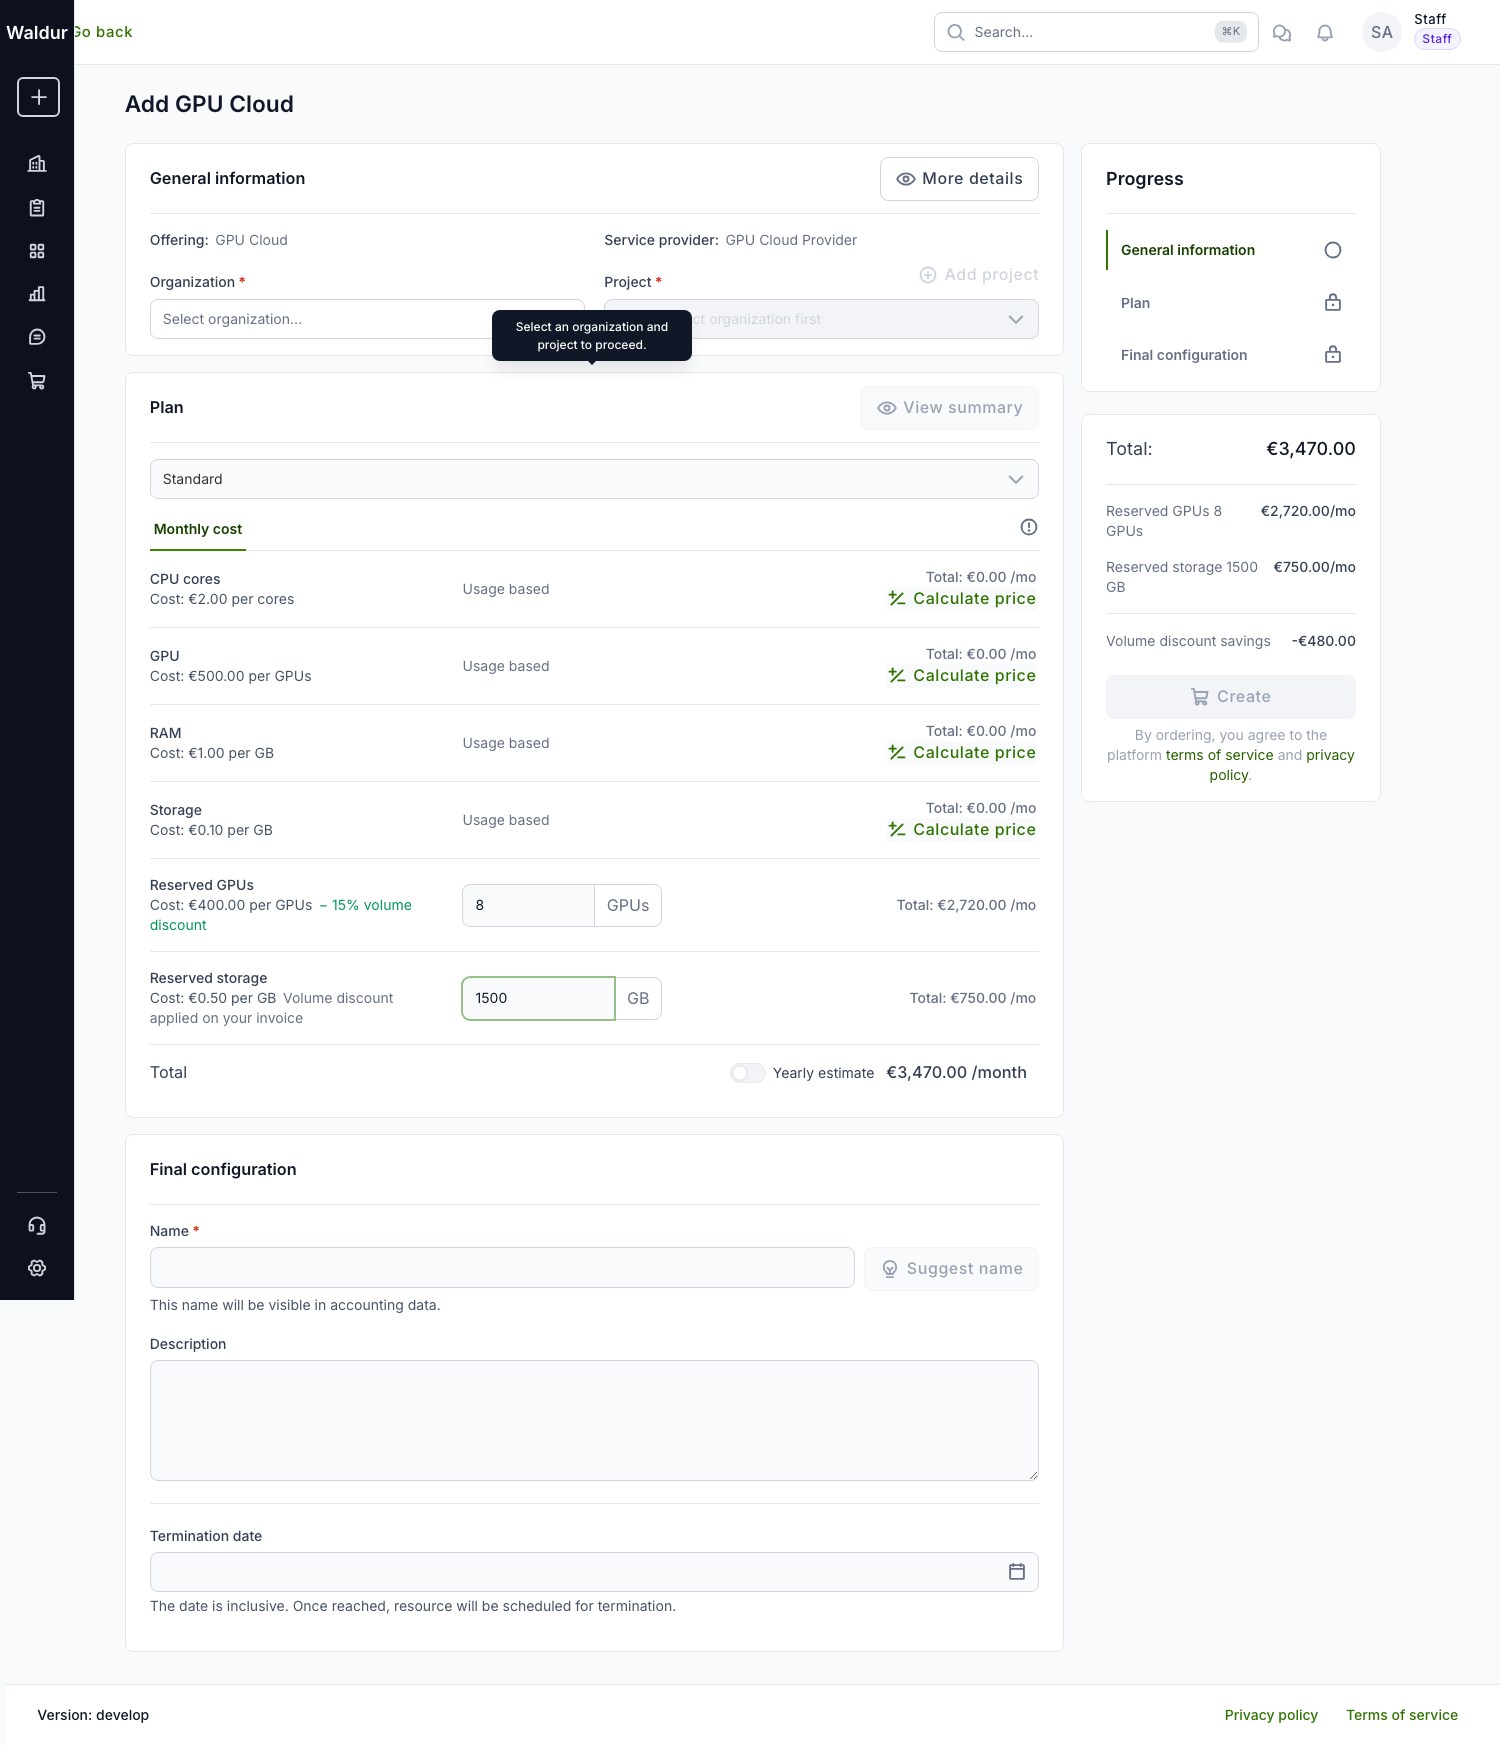
In the example above, Reserved GPUs is discounted per resource, so the 15 % tier is applied live and reflected in both the component total and the Volume discount savings summary. Reserved storage is discounted on the organization-wide total, so it shows the deferred note instead — its saving is calculated when the invoice is finalized.
Either way, the discount appears as a separate line on your invoice, paired with each discounted component. See volume discounts on invoices for how to read the breakdown.