OpenStack tenant quotas
As a service provider you can raise or lower the OpenStack-enforced resource limits on a provisioned tenant without creating a new order. This is done through the Change quotas action, which is separate from the Change limits action — see the note below.
Who can change quotas
Change quotas is available to:
- Platform staff
- Service provider organization owners and managers
Project members, project managers, and consumer organization owners have read-only visibility of quota values but cannot change them. The action is hidden entirely for users without provider-level access.
Changing quotas
- Open the resource detail page for the OpenStack tenant you want to adjust.
-
Click the three-dots Actions menu and, under the Provider actions group, select Change quotas.
Note
The action is disabled when the tenant is not in the OK state.
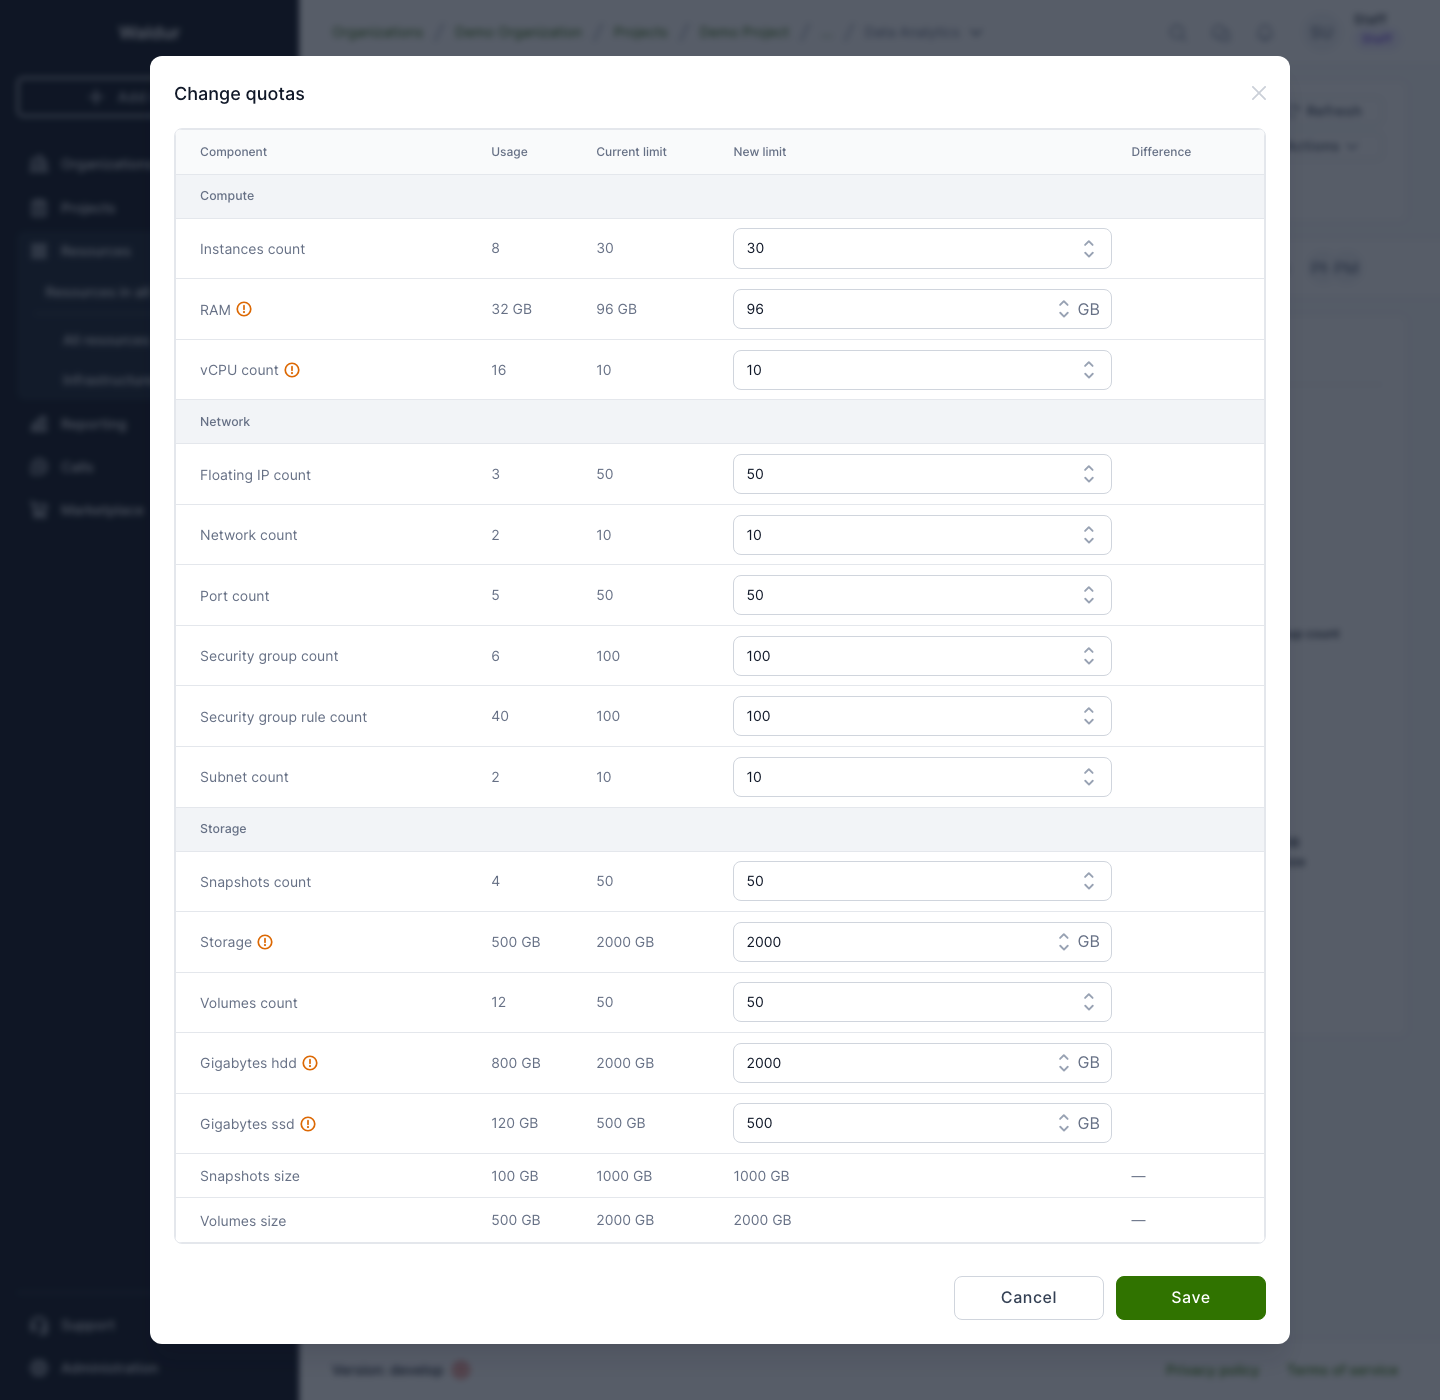
-
The Change quotas dialog opens as a table with columns Component, Usage, Current limit, New limit, and Difference — the same layout as the Change limits dialog. Rows are grouped into Compute, Network, and Storage sections.
All quotas reported by OpenStack are displayed so you can see the full picture. Editable quotas show a number input in the New limit column; read-only quotas display their current limit as static text.
Editable quotas
Section Quota Unit Compute Instances count count Compute RAM GB Compute vCPU count count Network Floating IP count count Network Network count count Network Port count count Network Security group count count Network Security group rule count count Network Subnet count count Storage Snapshots count count Storage Storage GB Storage Volumes count count Storage Gigabytes <type> (one row per volume type, e.g. Gigabytes hdd, Gigabytes ssd) GB Note
RAM, Storage, and per-volume-type gigabyte quotas are entered and displayed in GB. All other quotas are plain integers.
Warning
vCPU count, RAM, Storage, and per-volume-type gigabyte quotas are also governed by the marketplace plan limits. Raising the OpenStack quota here without updating the plan limits (via Change limits) may cause billing and usage reports to drift from the actual infrastructure allocation. Use Change limits when you intend to change what is billed.
Read-only rows
Volumes size and Snapshots size are shown for context but are not separately settable — they are derived from the Storage quota.
The Difference column updates live as you type, showing a green badge for increases and a red badge for decreases — use it to confirm the size of the change before saving.
-
Click Save to apply.
A "Quota update has been scheduled." toast confirms the request was accepted.
What happens after saving
The change is scheduled immediately — no approval workflow is involved. Waldur sends the new limits to OpenStack and the tenant briefly enters the Updating state. Once OpenStack confirms the change, the tenant returns to OK.
Warning
Do not trigger further quota or limit changes while the tenant is in the Updating state. Wait until it returns to OK.
Re-syncing quota values
The tenant Synchronise action re-reads all tenant state from OpenStack, including current quota limits and usage. Use it when the displayed numbers look stale — for example, after adjusting limits directly in the OpenStack dashboard outside of Waldur.
Change quotas vs Change limits
| Action | What it changes | Who sees the effect |
|---|---|---|
| Change quotas (Provider actions) | OpenStack-enforced resource caps on the tenant | Infrastructure — controls what OpenStack actually allows |
| Change limits (resource order) | Marketplace plan limits used for billing and reporting | Customer-facing — controls what is billed and reported in Waldur |
When a customer's project needs more resources, you typically do both: raise the OpenStack quota so the infrastructure allows it, and raise the plan limits so accounting reflects the new allocation.