Call manager workflow
This guide follows the call manager end to end: from setting up a call and its evaluation workflow, through building a reviewer pool and managing conflicts of interest, to driving individual proposals through each workflow step and recording the final allocation decision.
It focuses on the multi-step evaluation workflow — the configurable sequence of steps (administrative check, technical assessment, expert review, panel review, allocation decision) that every proposal travels through. For the higher-level call lifecycle (organisation setup, rounds, offerings, role mapping) see Call management.
Note
Screenshots in this guide use the 2025 Spring HPC Allocation Call demo call, which has the full six-step workflow enabled. Your calls will show different names, offerings and reviewers, and which steps you see depends on how the call is configured.
The evaluation workflow
Each call defines an ordered list of workflow steps. Every step has a responsible role, an optional deadline, a transition mode, and can carry an evaluation checklist and review criteria.
| Step | Responsible role | Purpose |
|---|---|---|
| Administrative check | Call manager | Eligibility and completeness screening before evaluation |
| Technical assessment | Offering manager | Service provider confirms technical feasibility |
| Expert review | Reviewer | Independent peer review with scoring |
| Panel review | Panel member | Collective panel evaluation consolidating expert reviews |
| Allocation decision | Call manager | Final approve/reject decision and resource allocation |
Steps can be enabled or disabled per call, so a lightweight call might use only an administrative check and an allocation decision, while a competitive programme uses the full sequence.
Landing in call management
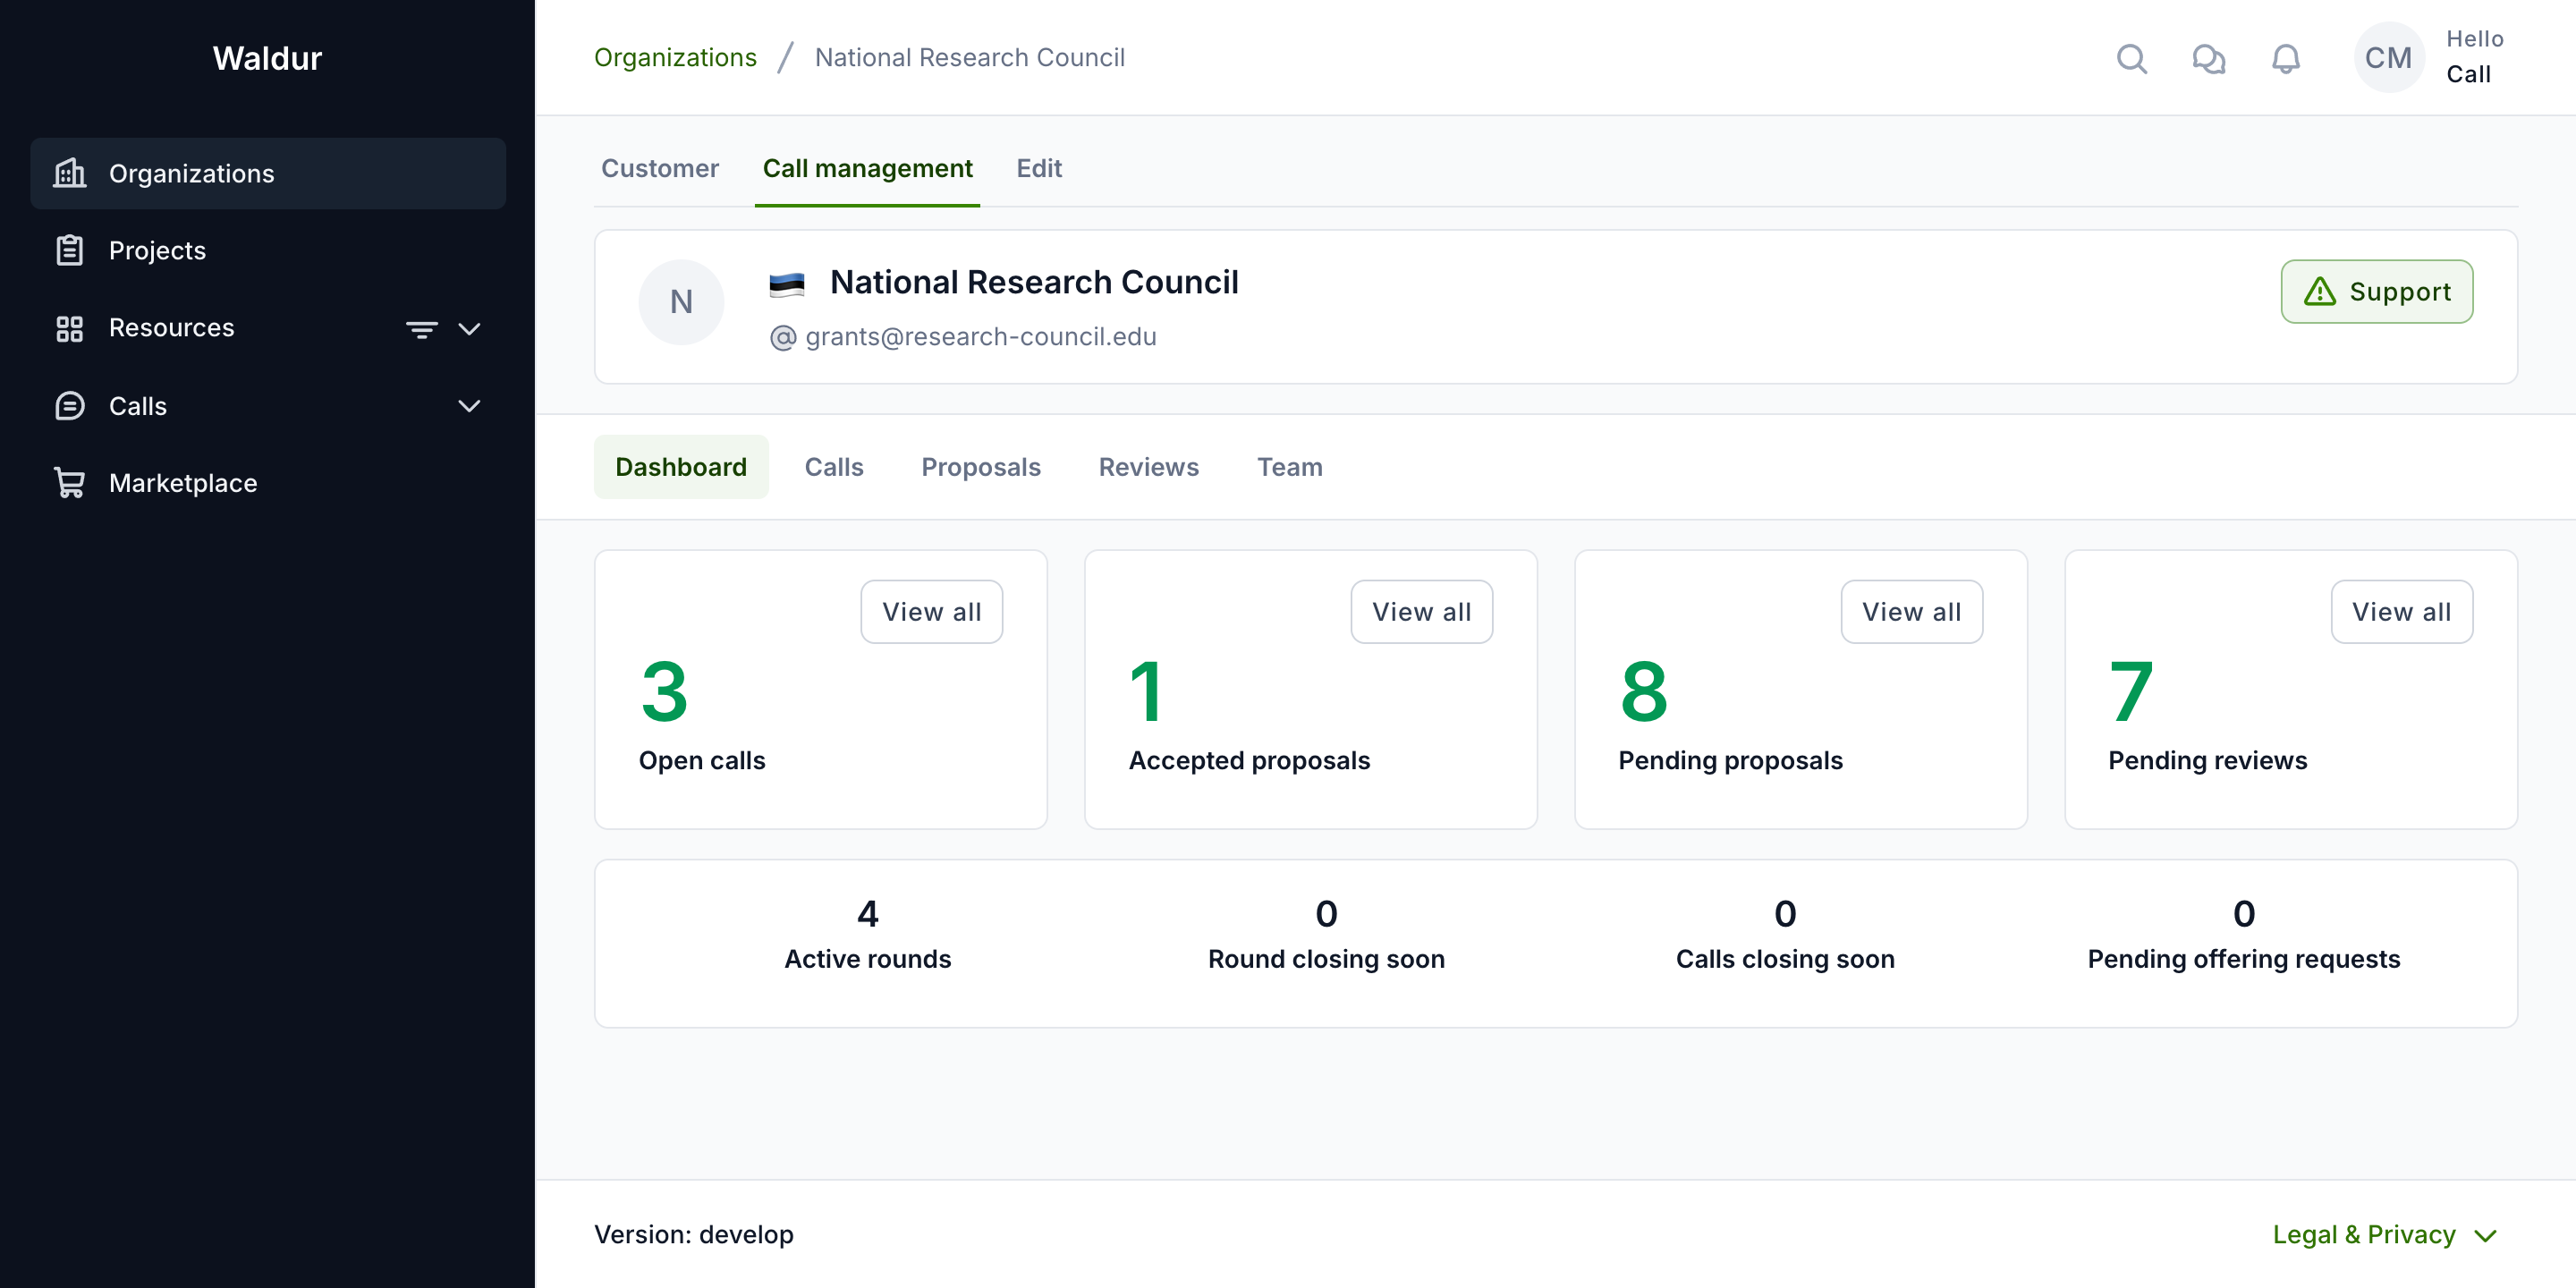
After signing in, open your call-managing organisation and switch to the Call management tab. Its Dashboard counts open calls, accepted proposals, pending proposals and pending reviews — each with a View all shortcut into the matching list — above a second row tracking active rounds, rounds and calls closing soon, and pending offering requests.
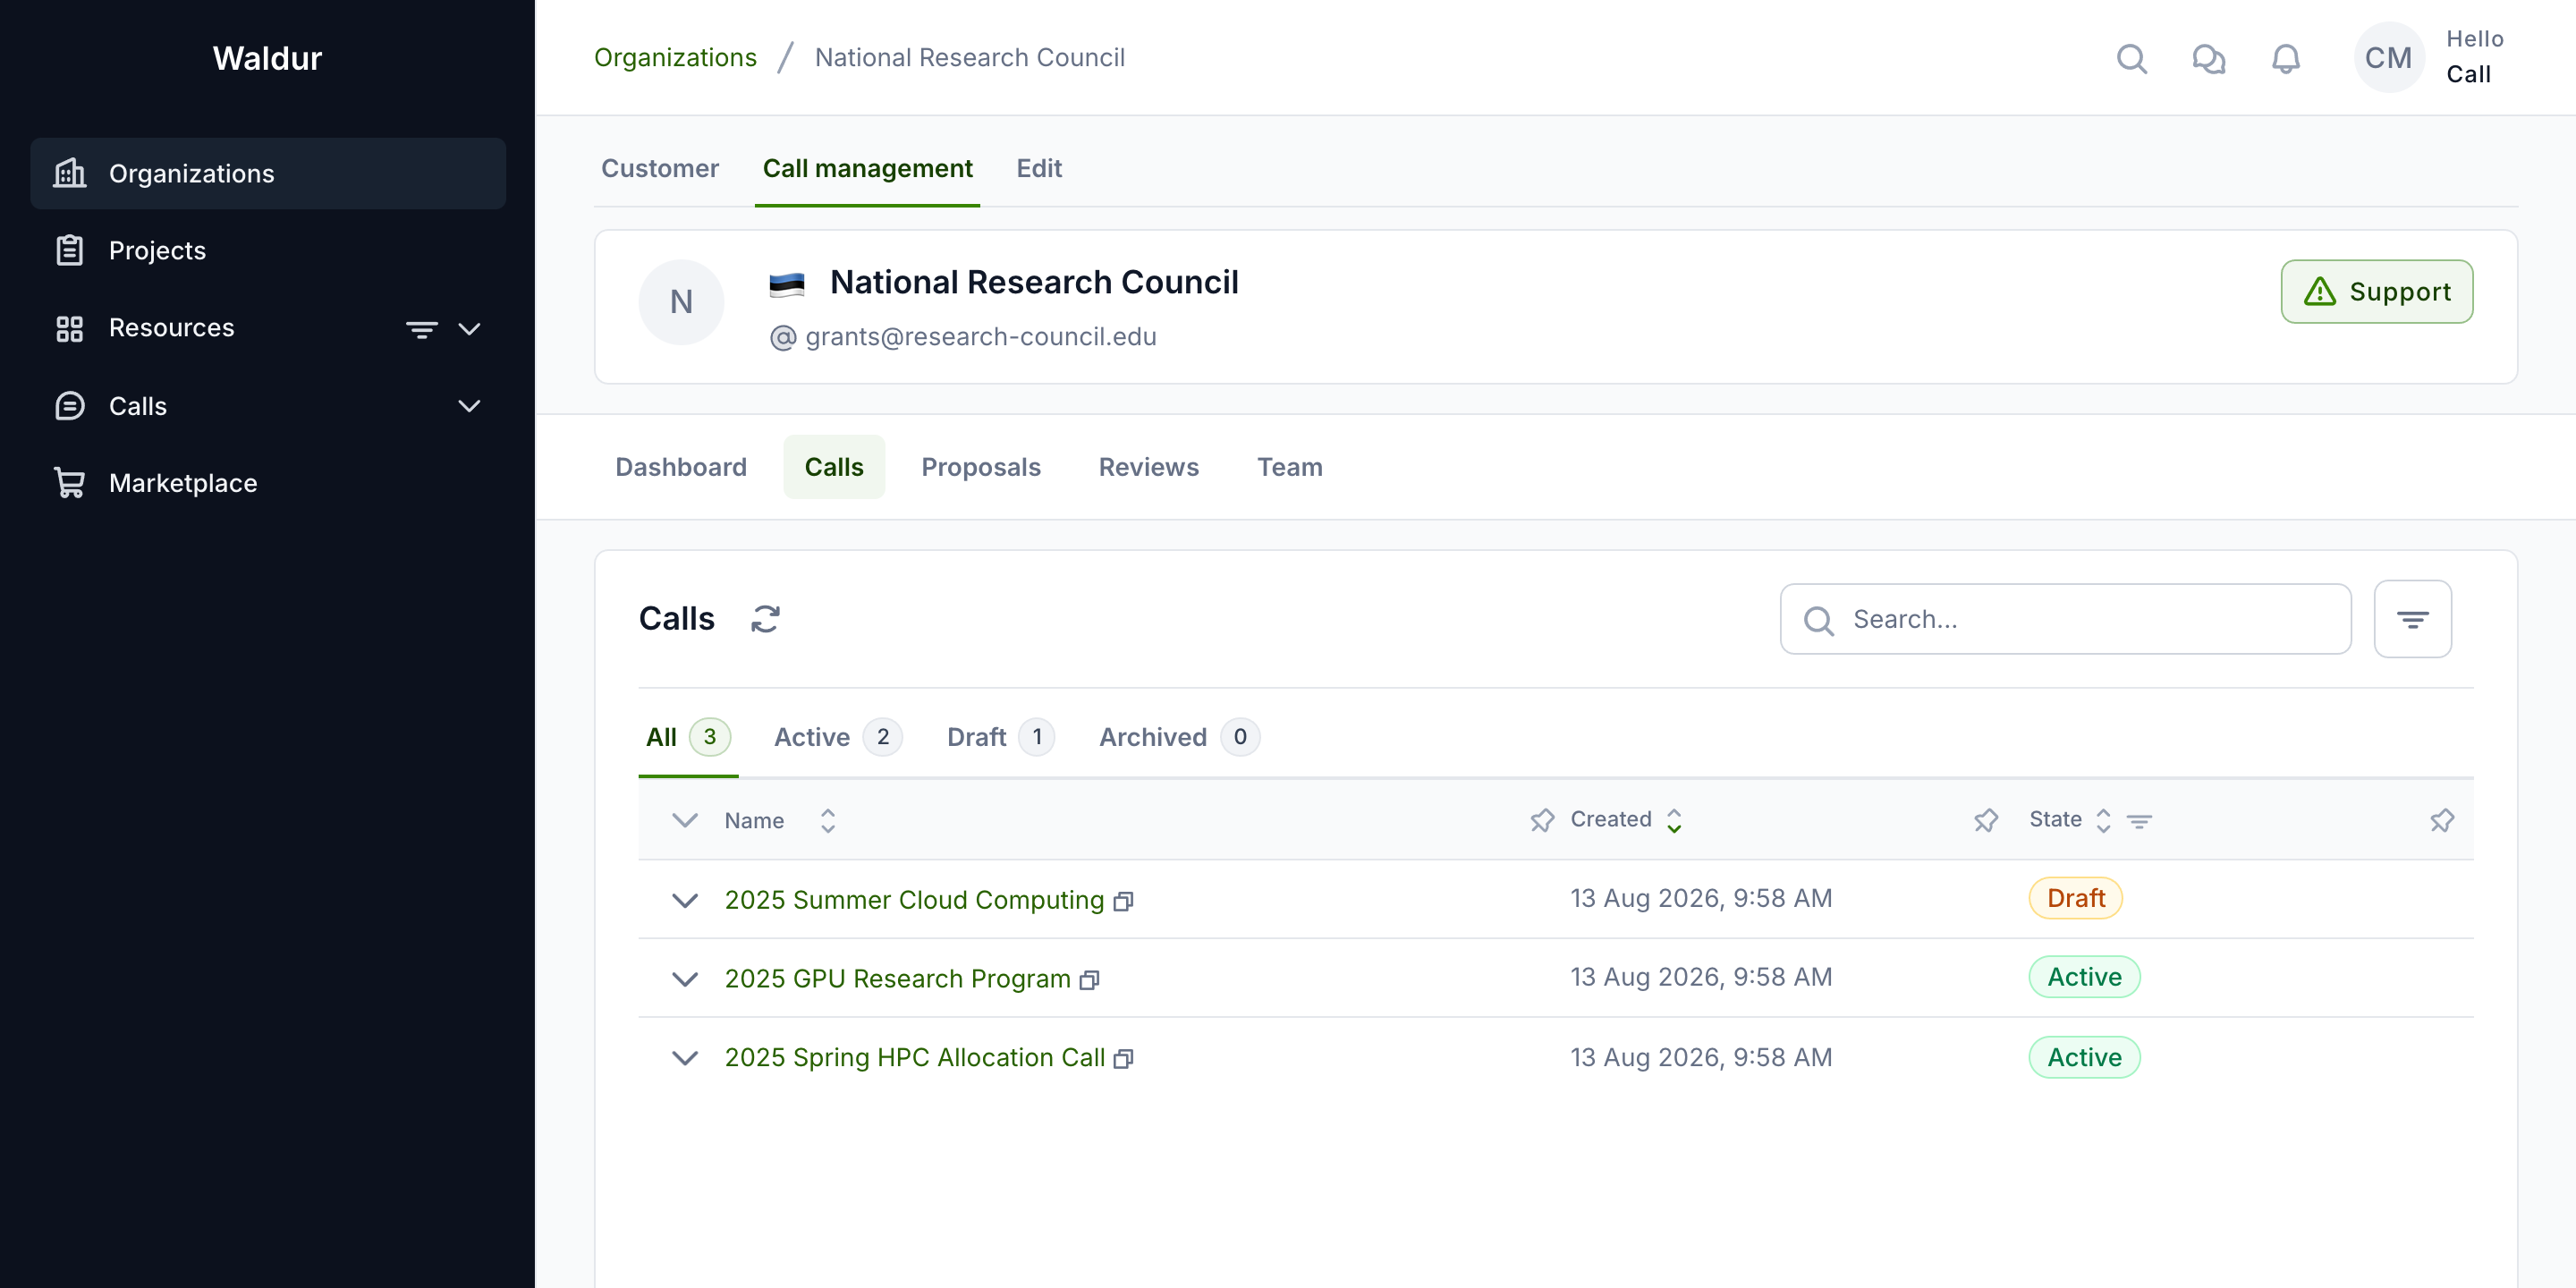
The Calls section lists every call your organisation manages, grouped by state (All / Active / Draft / Archived). Click a call name to open its configuration.
Setting up a call
General settings
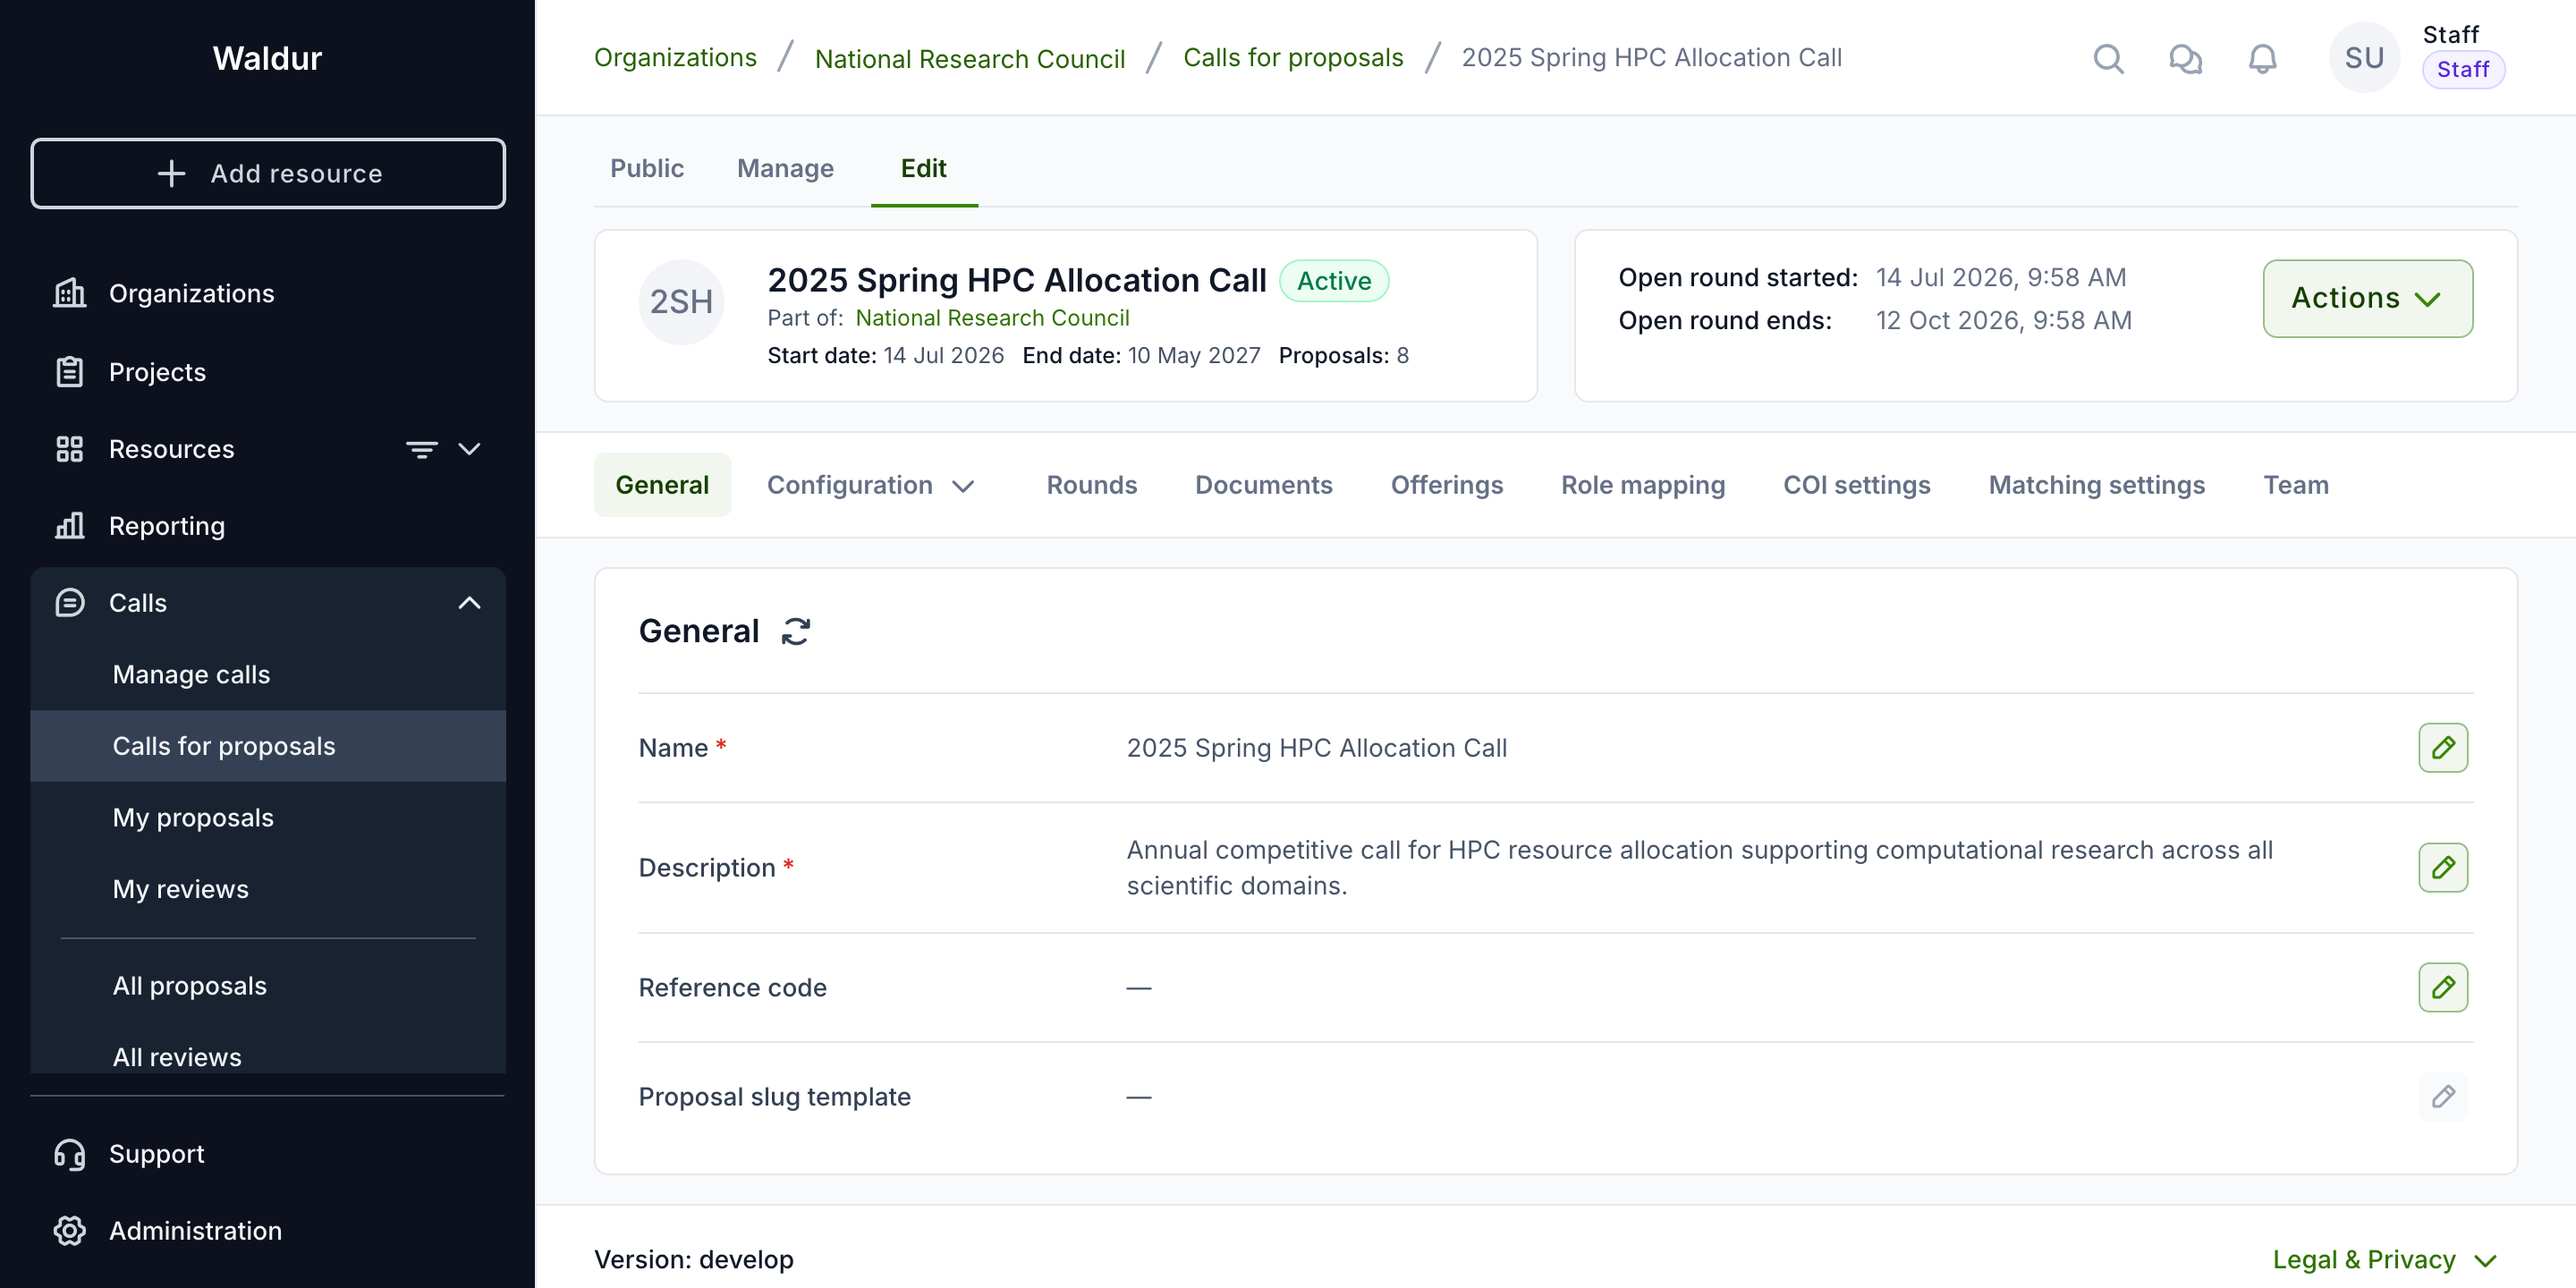
The General tab holds the call's identity: name, description, reference code, an optional external URL, and the proposal slug template used to generate human-readable proposal IDs. See Proposal ID configuration for slug placeholders.
Configuration and workflow steps
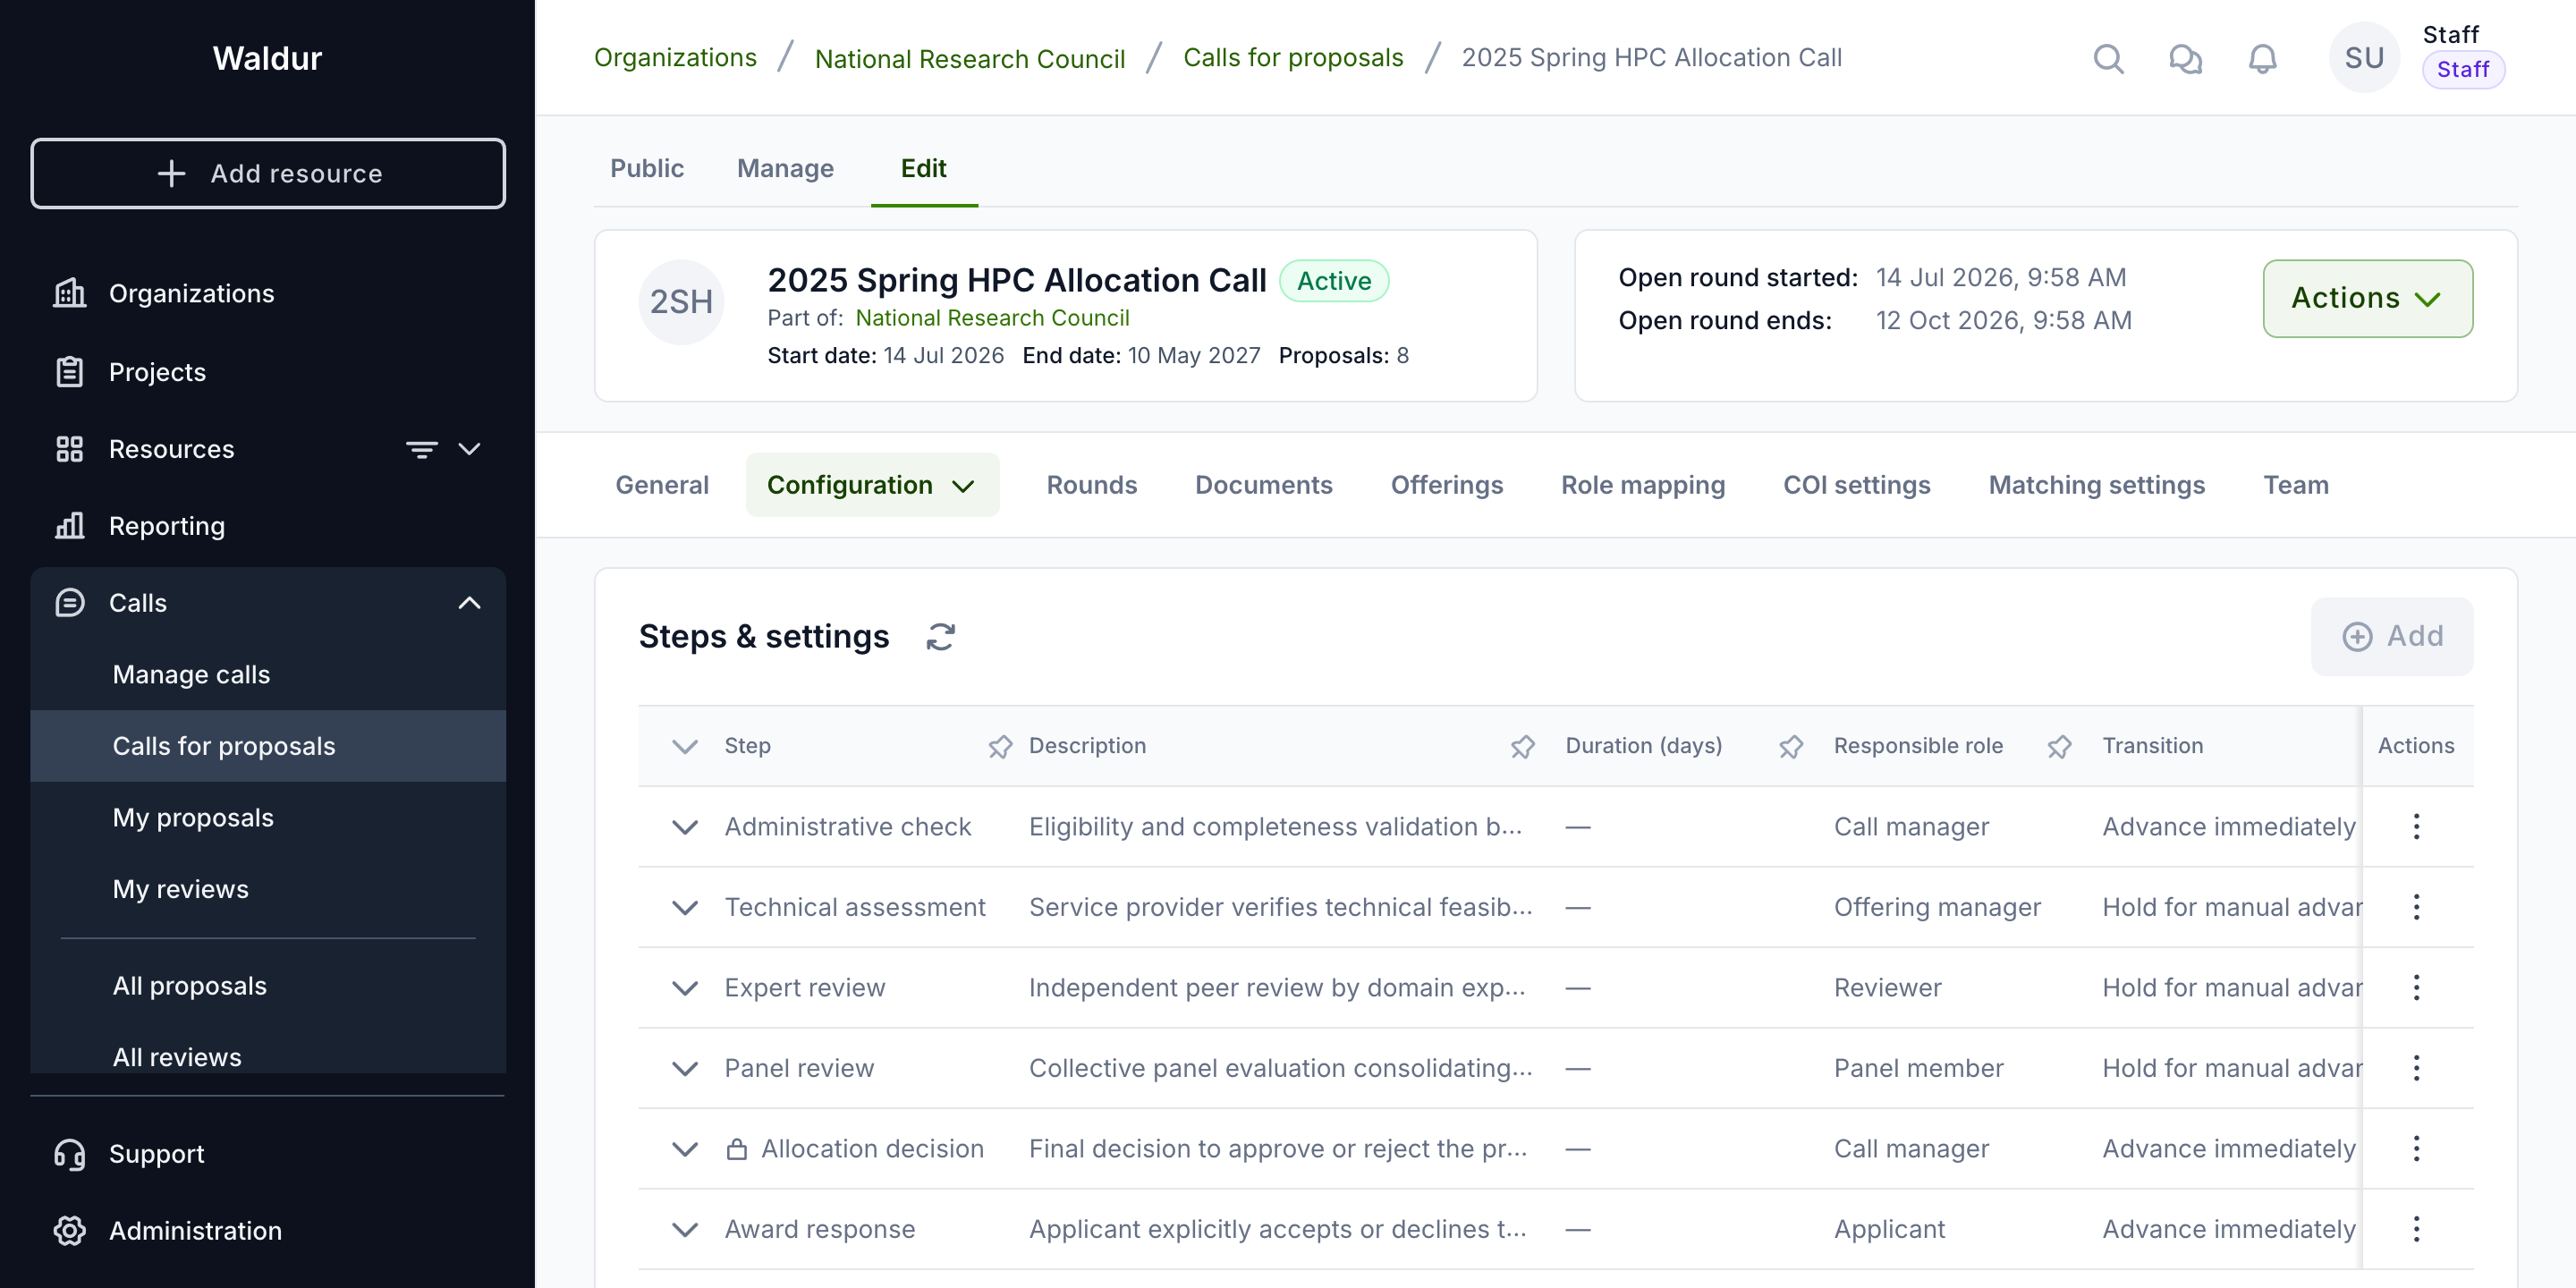
The Configuration tab is where the evaluation workflow lives. Below the general options, the project details fields, applicant data visibility, applicant eligibility and resource templates, the Steps & settings table lists every workflow step with its description, deadline, responsible role and transition mode. The Preview sequence below the table visualises the proposal journey exactly as configured.
Warning
Workflow steps stay editable while the call is in Draft or Active; the step table only becomes read-only once the call is Archived.
Enabling or disabling a step does not retroactively change proposals already in flight: each proposal's path is fixed when it is submitted, so reconfiguring an active call means new submissions follow the new sequence while existing proposals continue on the one they were submitted under. Make structural changes before activation wherever you can.
Per-step durations are the exception — a step reads its duration when it becomes active, so adjusting one still affects steps a proposal has not reached yet.
Configuring a workflow step
Use the row's actions menu — Configure, Enable/Disable, Remove — and choose Configure to open a step's settings. The dialog adapts to the step type.
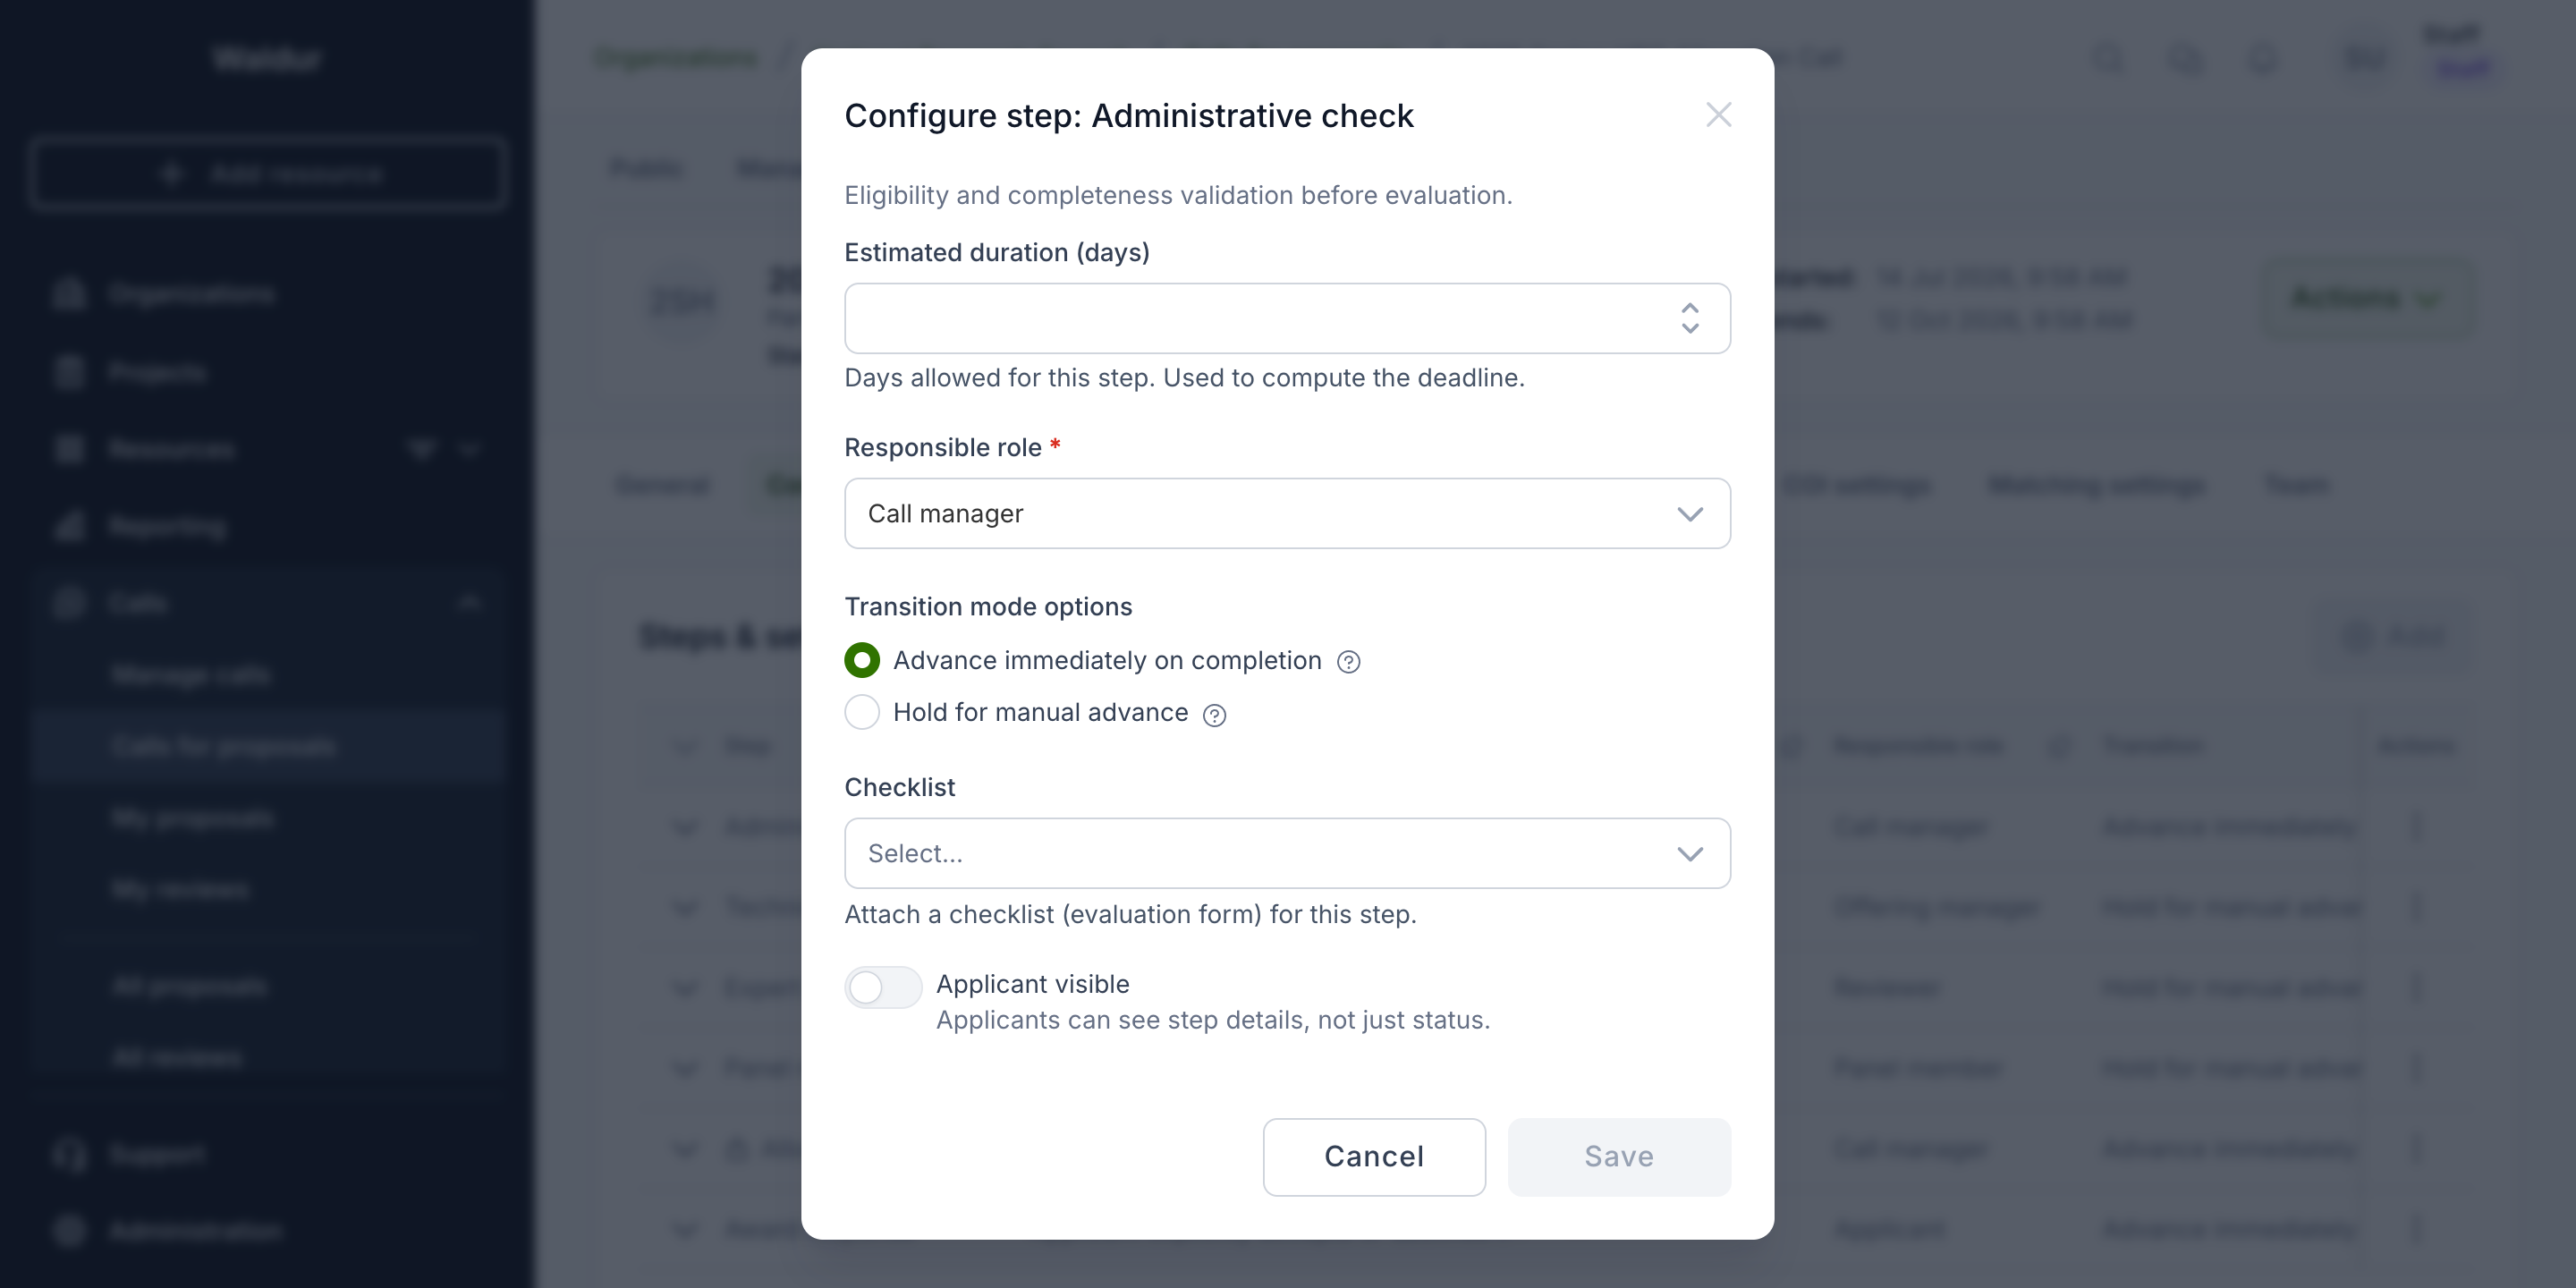
For a task step such as the administrative check, it opens as Configure step: … with the estimated duration, responsible role, transition mode and an optional checklist.
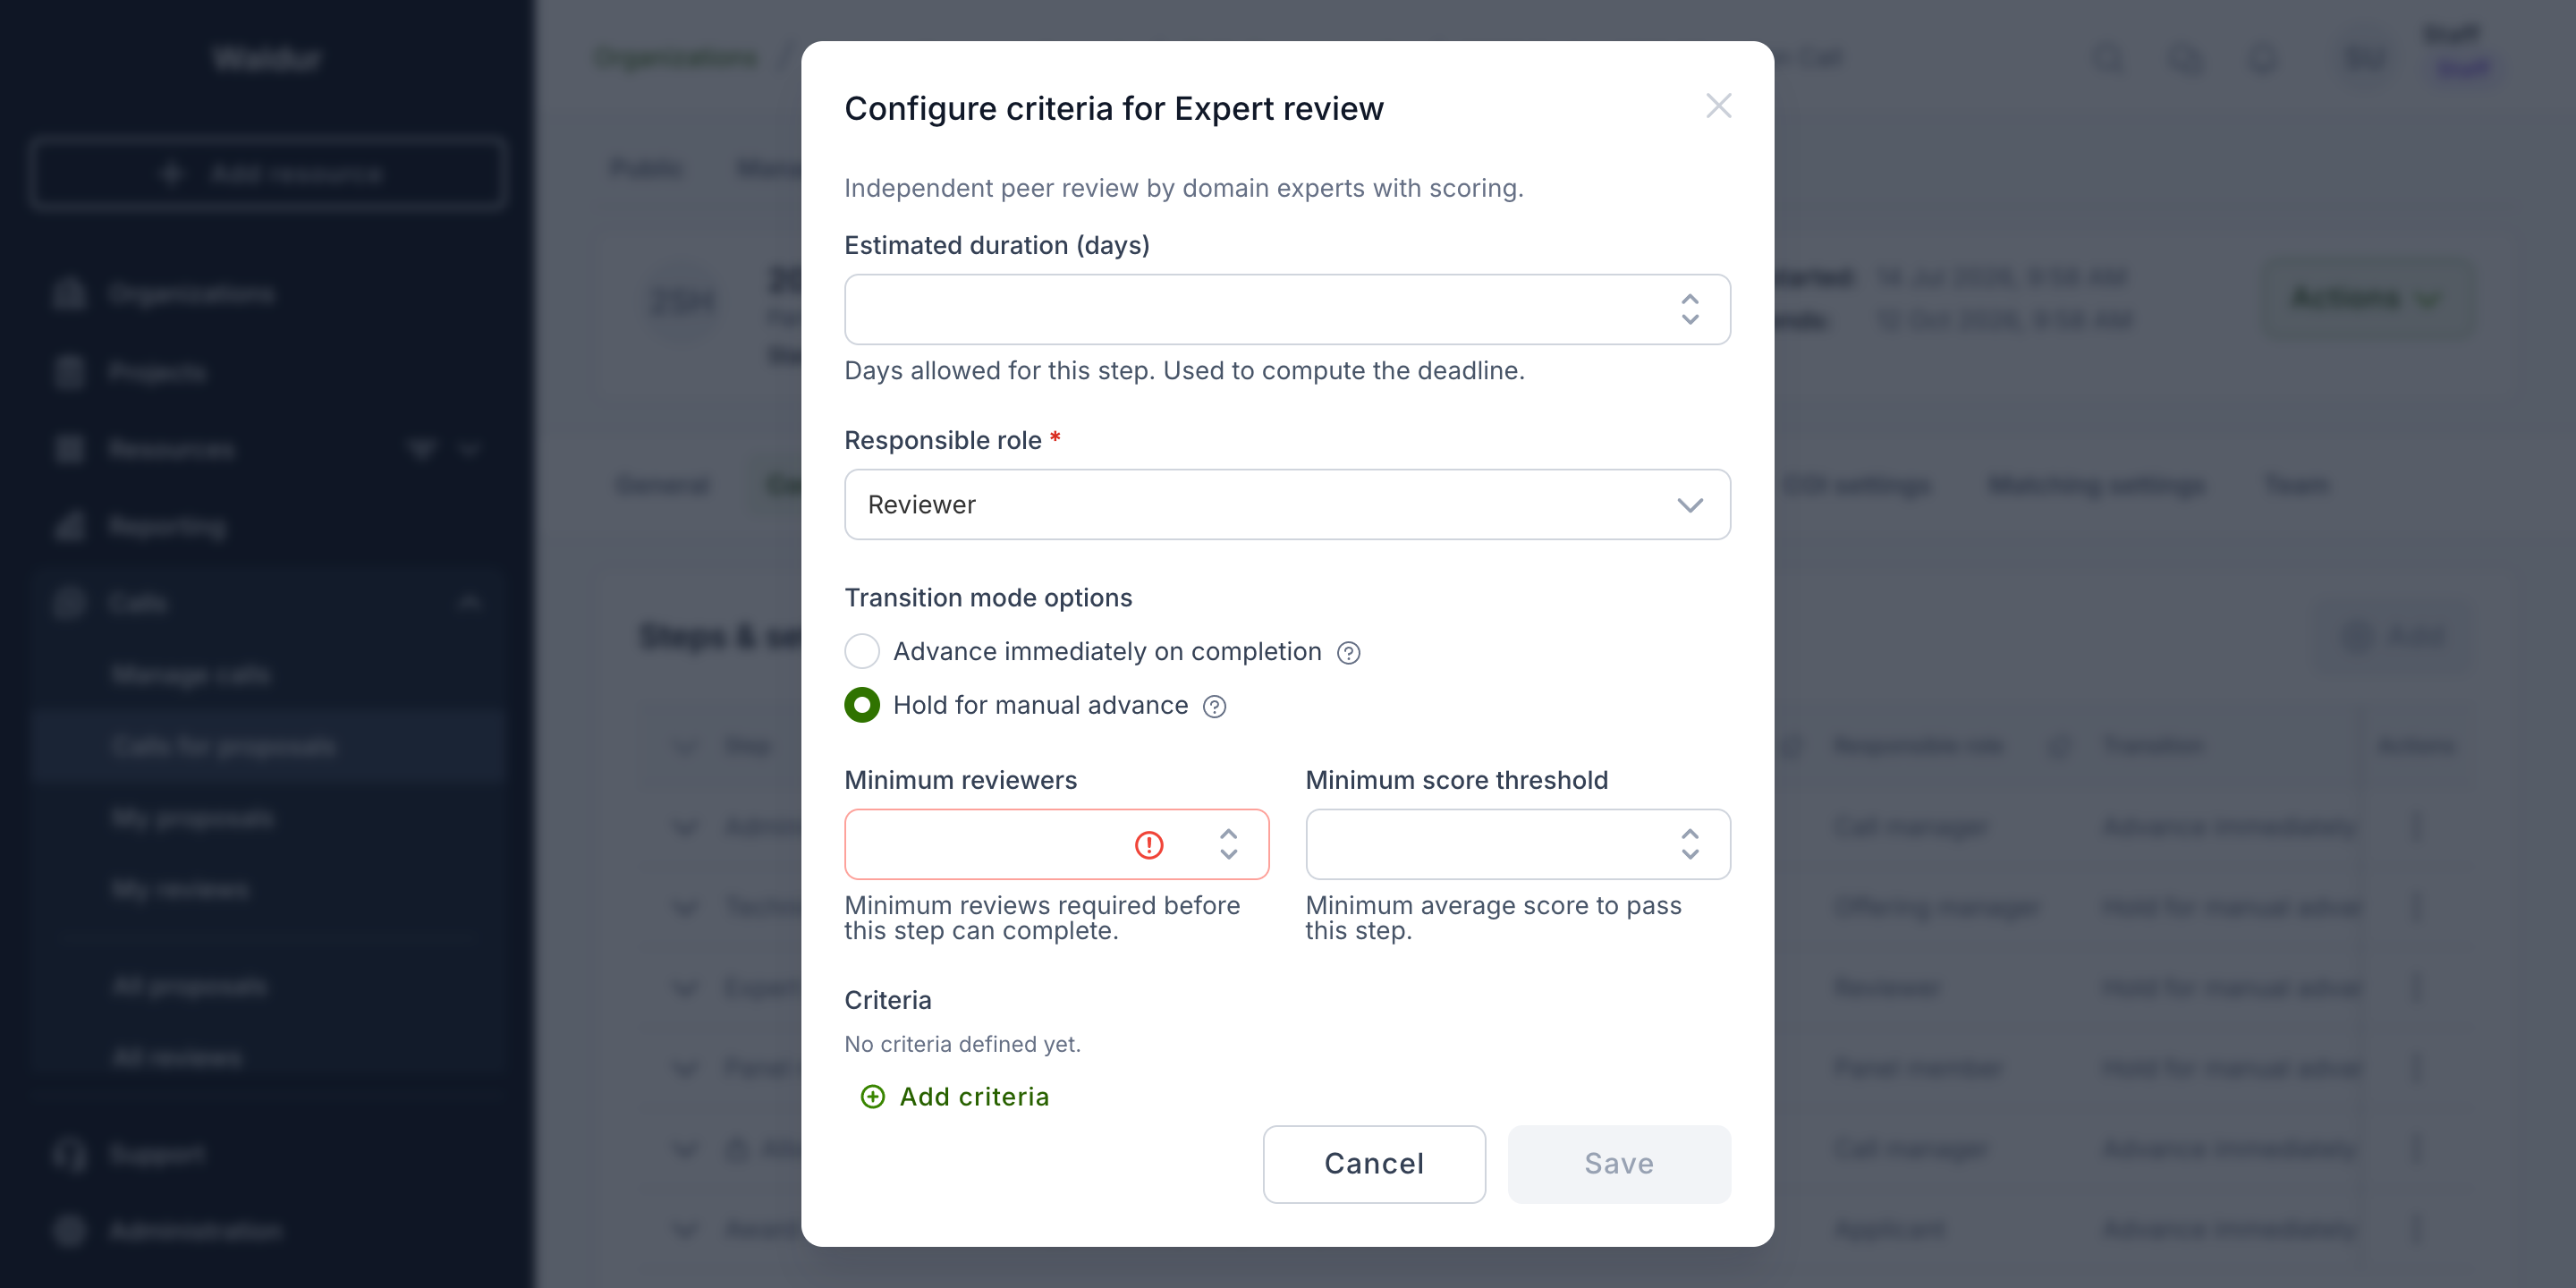
For a review step such as expert review, it opens as Configure criteria for … and adds review-specific settings — minimum reviewers, minimum score threshold, scoring criteria, blind review and conflict-of-interest confirmation.
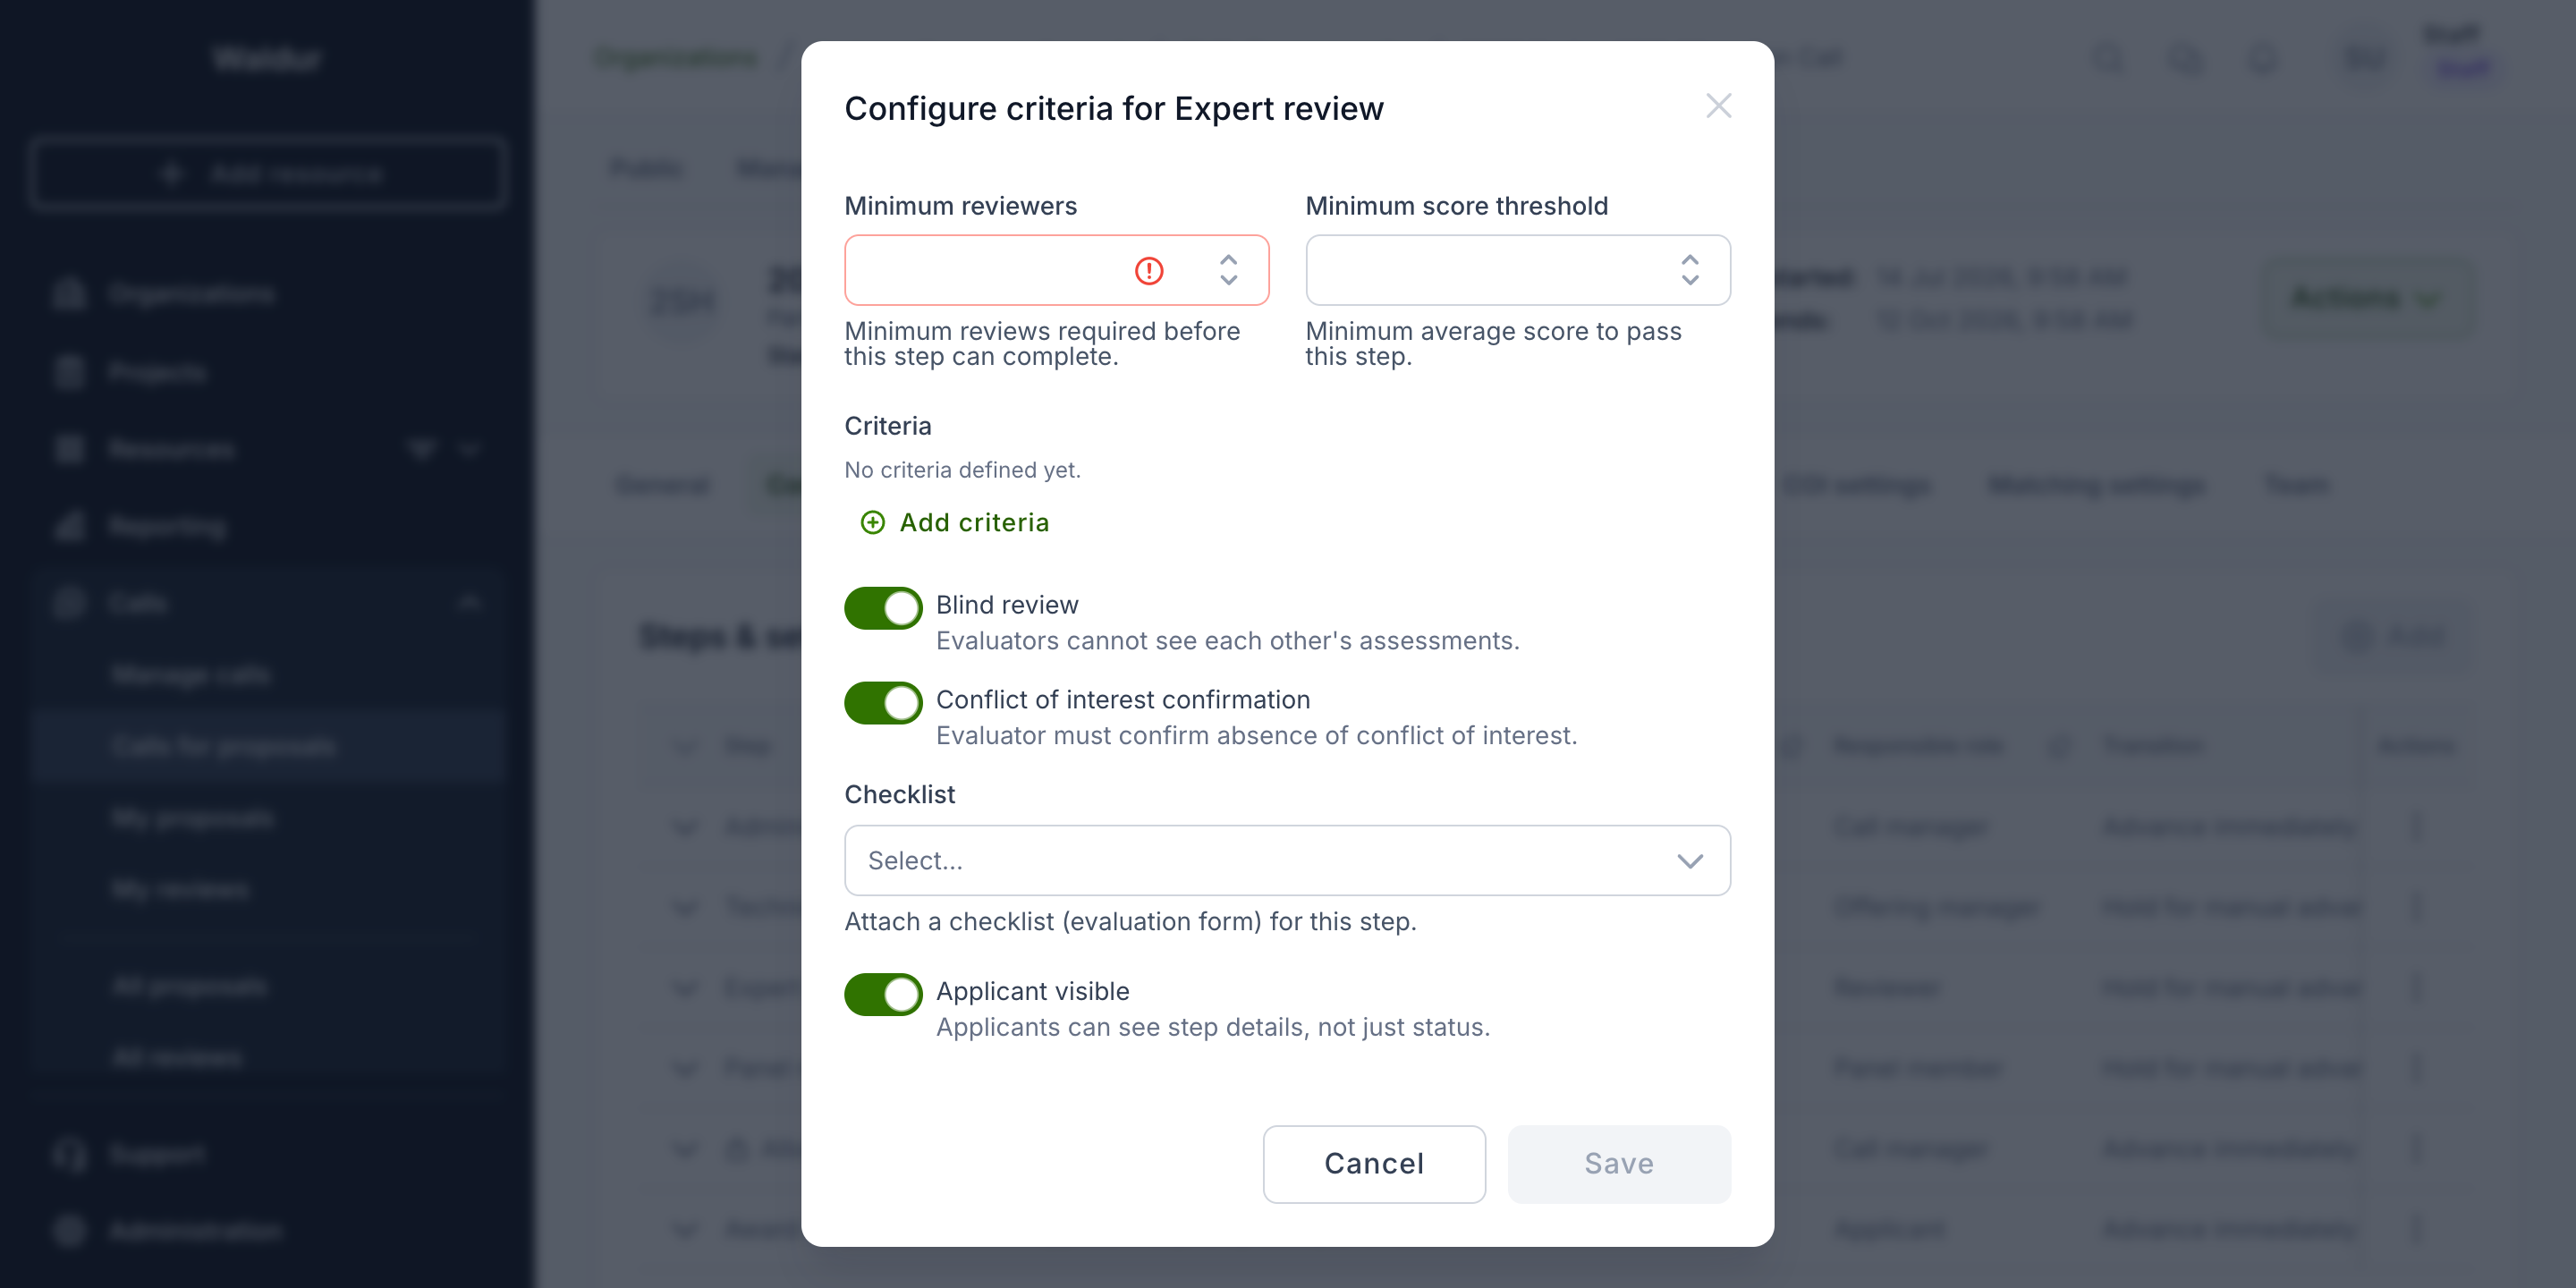
The remaining criteria appear lower in the same dialog:
Key settings:
- Estimated duration (days) — days allowed for the step, used to compute its deadline. Leave it empty for a step that should wait indefinitely.
- Responsible role — who owns the step and can complete it (call manager, offering manager, reviewer, panel member, or the applicant for award response).
- Transition mode options — Advance immediately on completion moves the proposal to the next step automatically; Hold for manual advance pauses so you can review before advancing.
- Checklist — attach an evaluation form (see below). The Checklist required toggle decides whether it blocks completion.
- Minimum reviewers / Minimum score threshold — gates for review steps; the step cannot complete until enough reviews are in and the average score clears the threshold.
- Criteria — named scoring criteria, available on the expert review step only.
- Blind review — evaluators cannot see each other's assessments.
- Conflict of interest confirmation — reviewers must confirm they have no conflict with the proposal before they can submit their review; it does not block them from opening or drafting it (see Conflict of interest).
- Applicant visible — applicants see this step by name on their progress tracker. Off by default; while an invisible step runs, it shows to them only under the name of its stage — Decision for the allocation decision, Awaiting your response for the award response, Evaluation for any other step.
Required vs advisory checklists
A step checklist turns the step into a structured evaluation form. The Checklist required toggle controls how strictly it is enforced:
- Required — the step cannot be completed until every required question is answered. This is the checklist gate (see Completing or rejecting a step).
- Advisory (toggle off) — the checklist is available to record structured input but never blocks completion.
Checklists are built from the same flexible question types described in Checklists and forms. A technical-assessment checklist, for example, pairs a single-select decision question with a free-text rationale — in the demo call, Technical feasibility decision (Feasible – sufficient resources / Feasible with conditions / Not feasible) and Assessment rationale.
Building the reviewer pool
Open the call's Manage tab and go to Reviewer pool to invite and track reviewers. The Pool table lists each reviewer with their acceptance status, review counts, invitation date and assignment load; an Expertise match column is available from the column settings, and expanding a row reveals the reviewer's expertise in full. The sub-tabs are Pool, Discovery, Assignment batches, Reviewer capacity and COI.
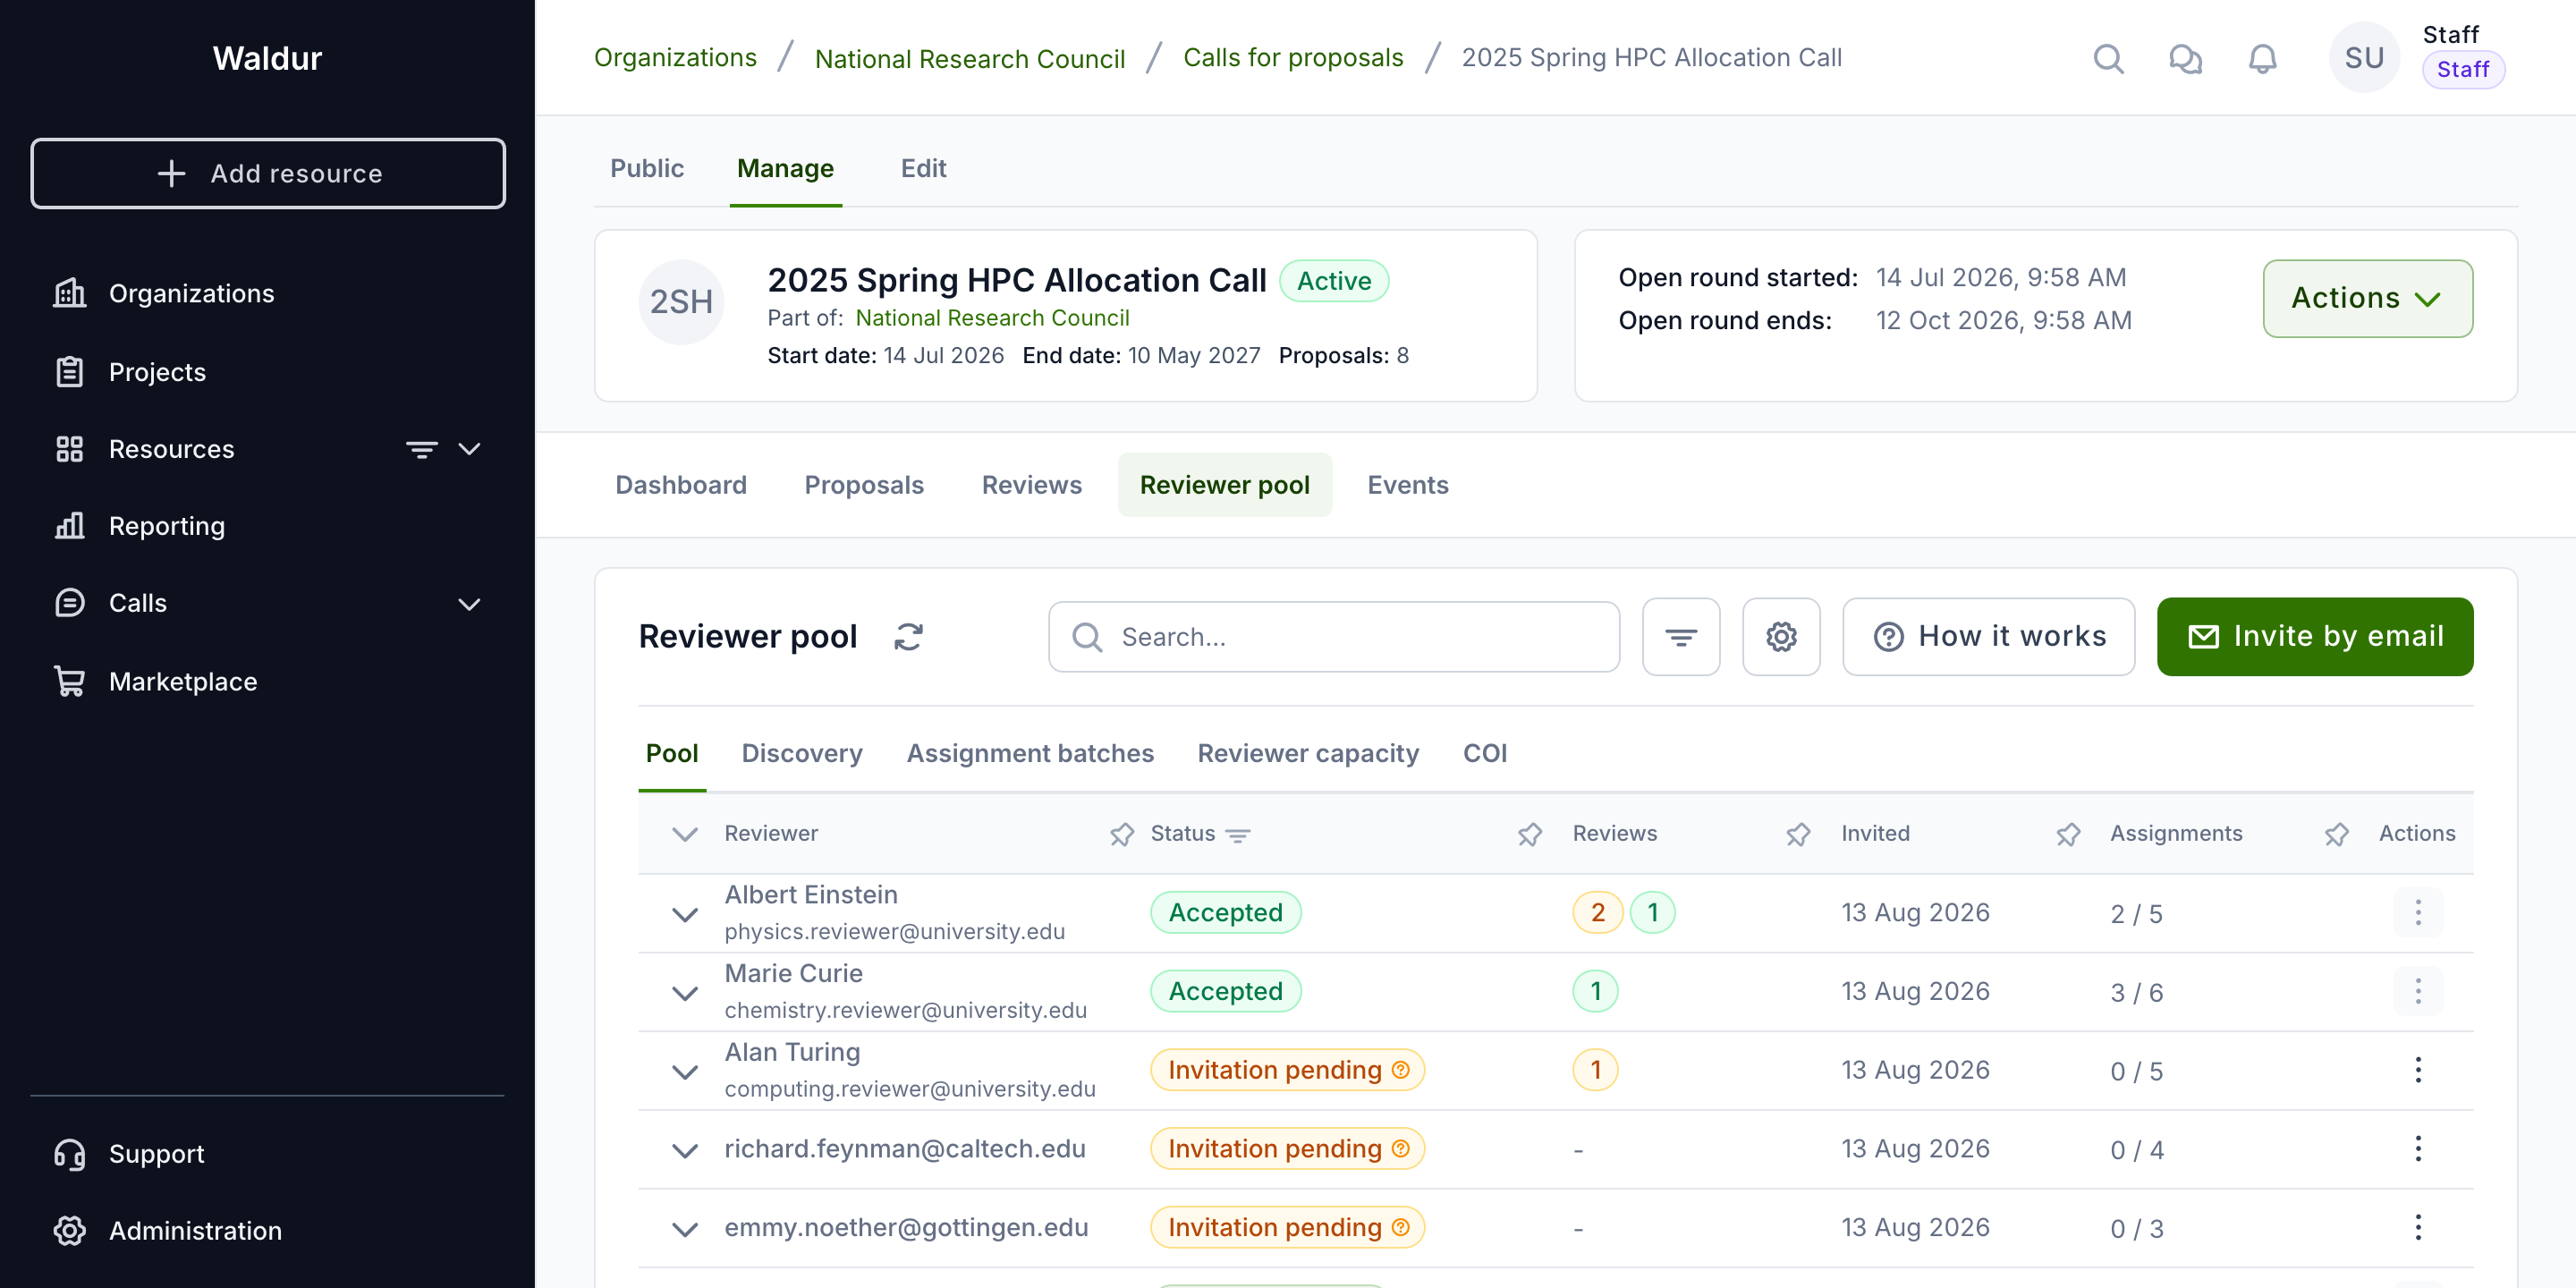
Building the pool, running matching suggestions and creating assignment batches are covered in depth in Reviewer management and the Reviewer guide.
Conflict of interest
COI settings
Configure automated conflict detection per call from the COI settings tab in the call configuration. You control co-authorship and institutional lookback windows, matching thresholds, and which relationships are flagged.
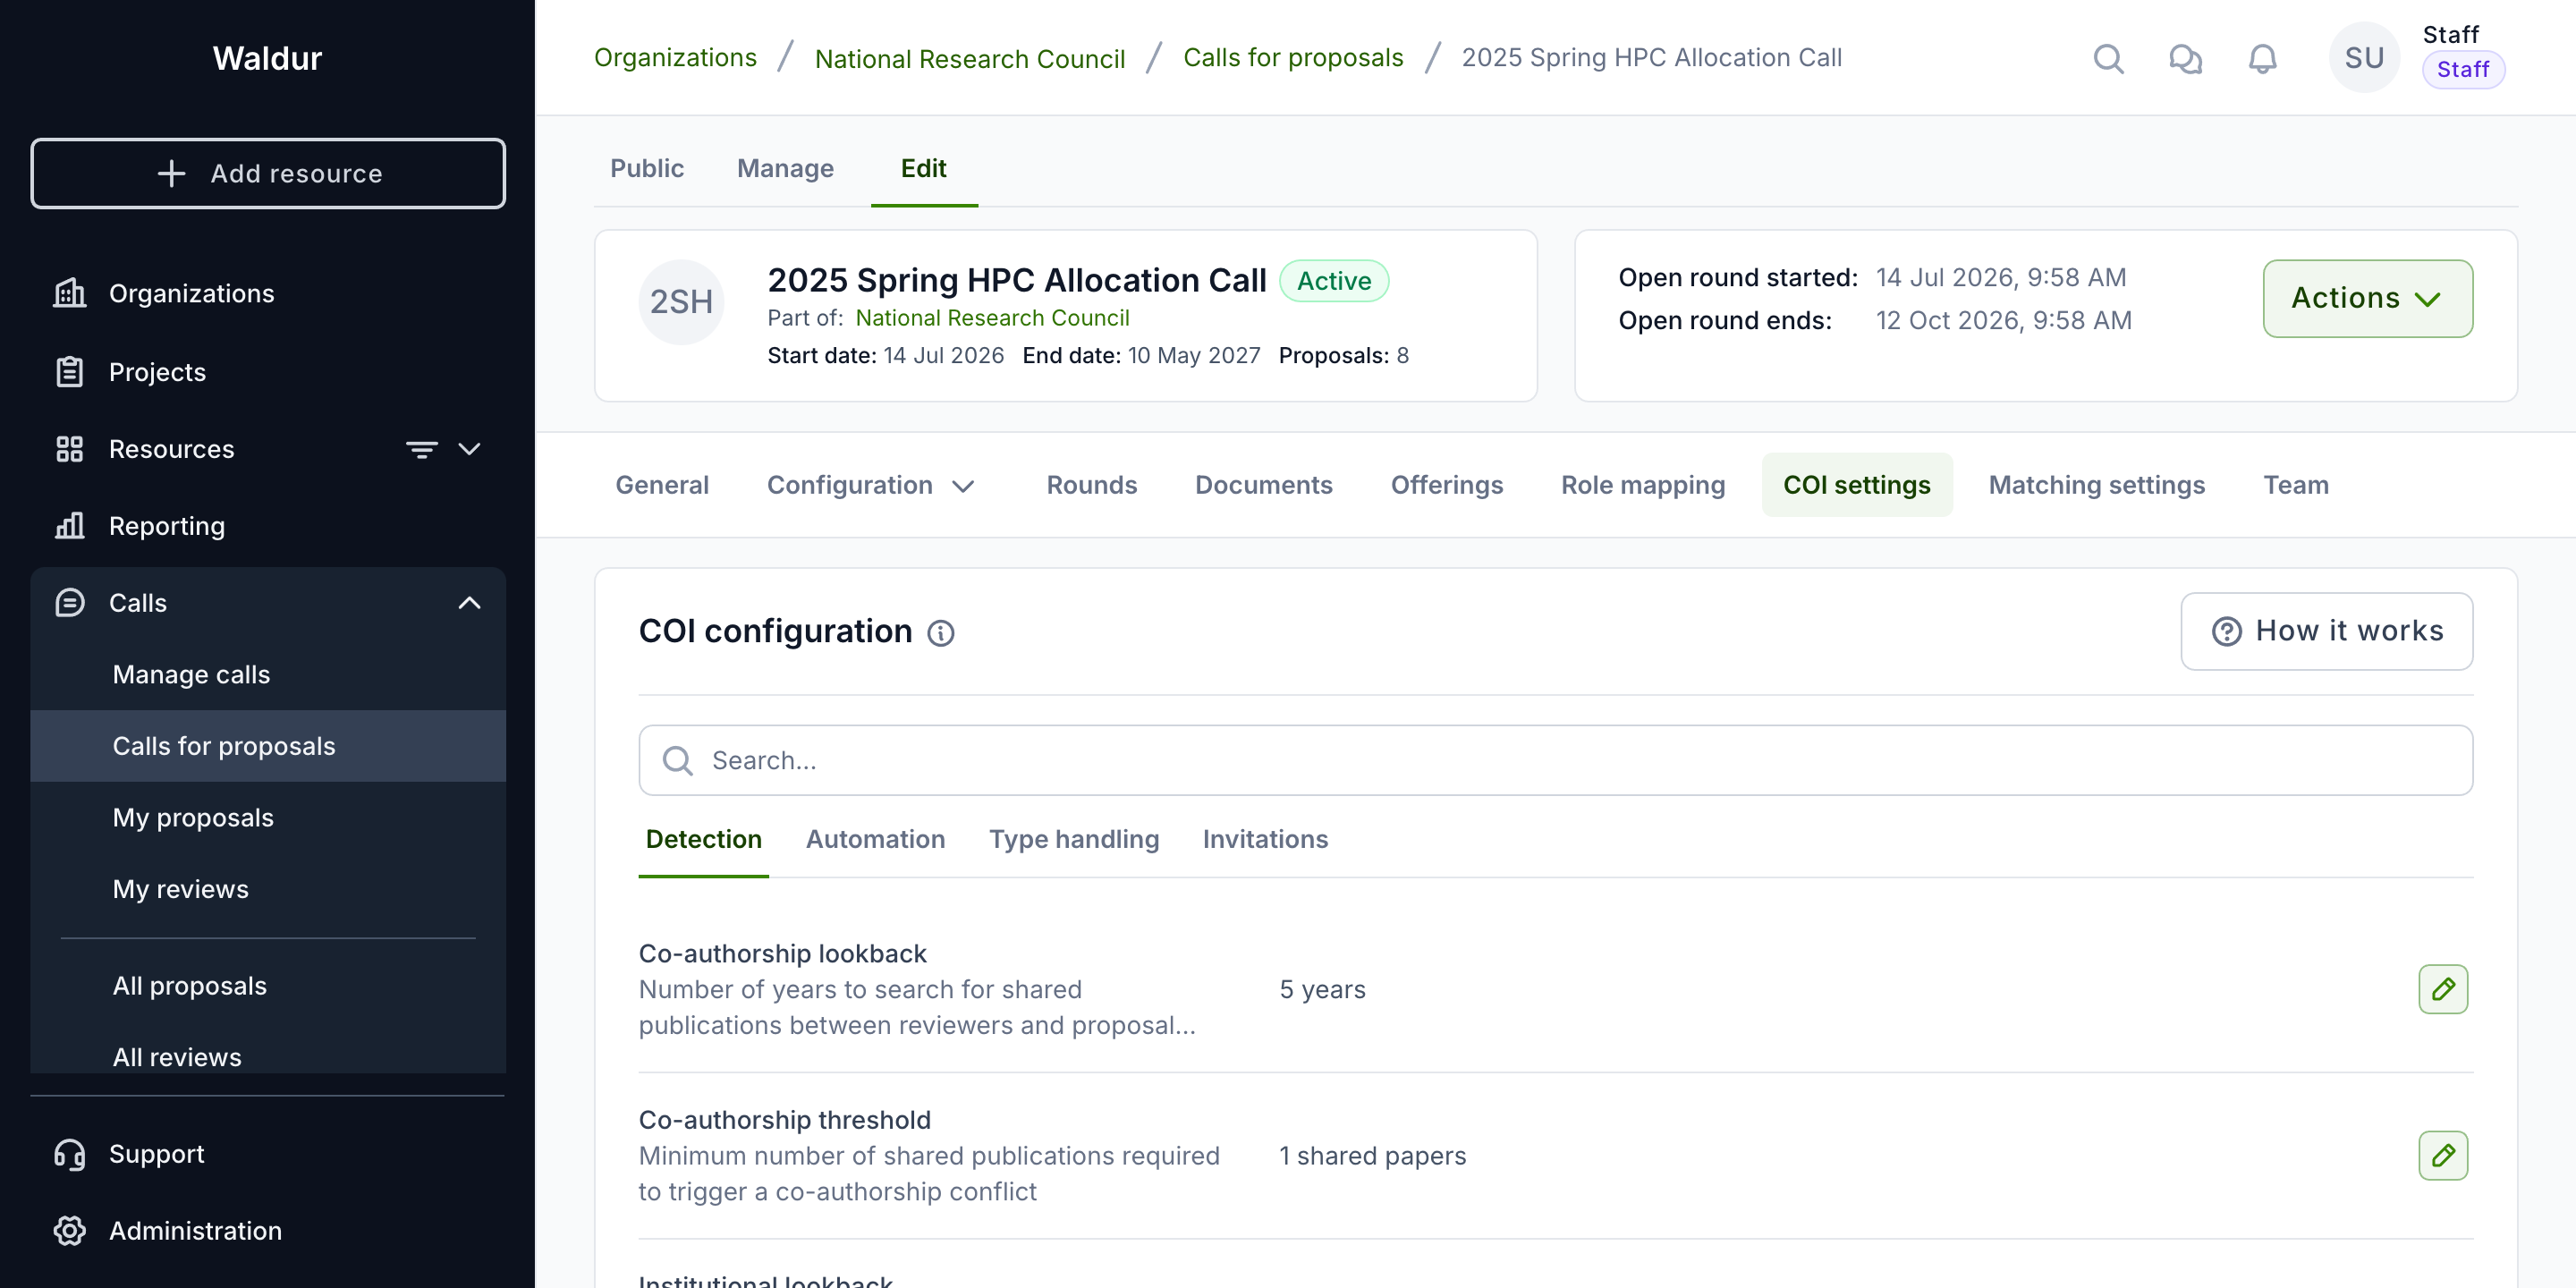
When a review step has Conflict of interest confirmation enabled, reviewers must additionally attest to being conflict-free before they can submit their review — the Submit review button stays disabled until they do.
Reviewing detected conflicts
The COI sub-tab of the reviewer pool lists conflicts detected between reviewers and proposal teams. From here you dismiss false positives, waive with a management plan, or recuse a reviewer.
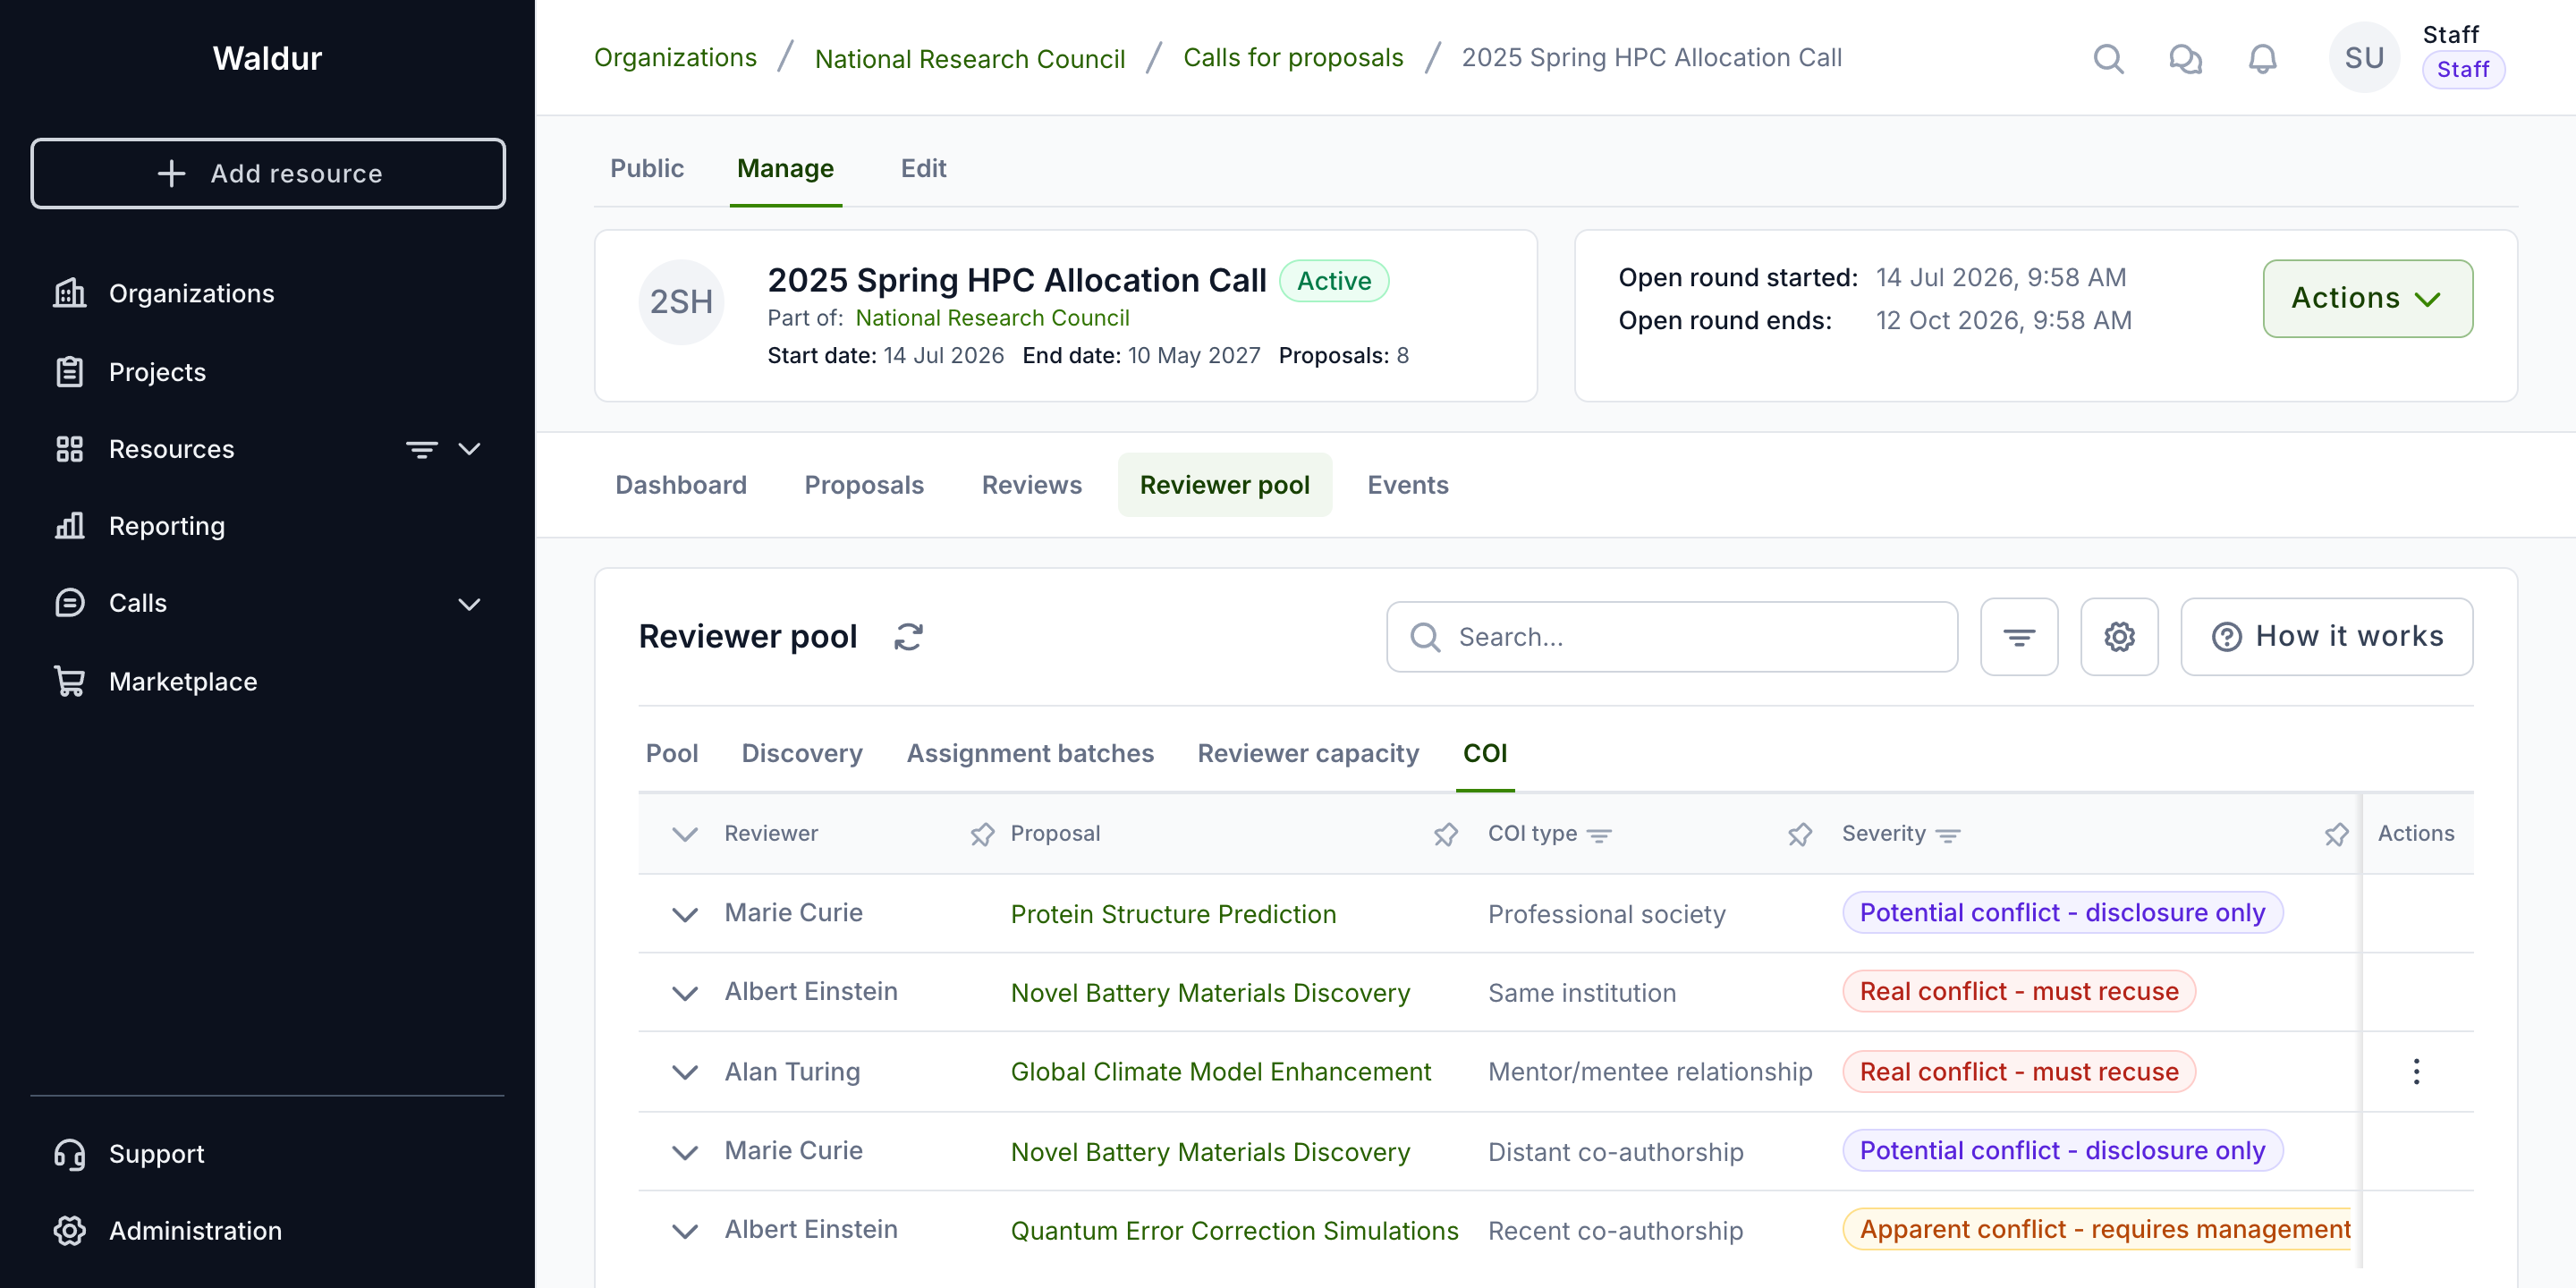
Conflict types, severities and handling rules are detailed in COI management.
Driving proposals through the workflow
The proposals list
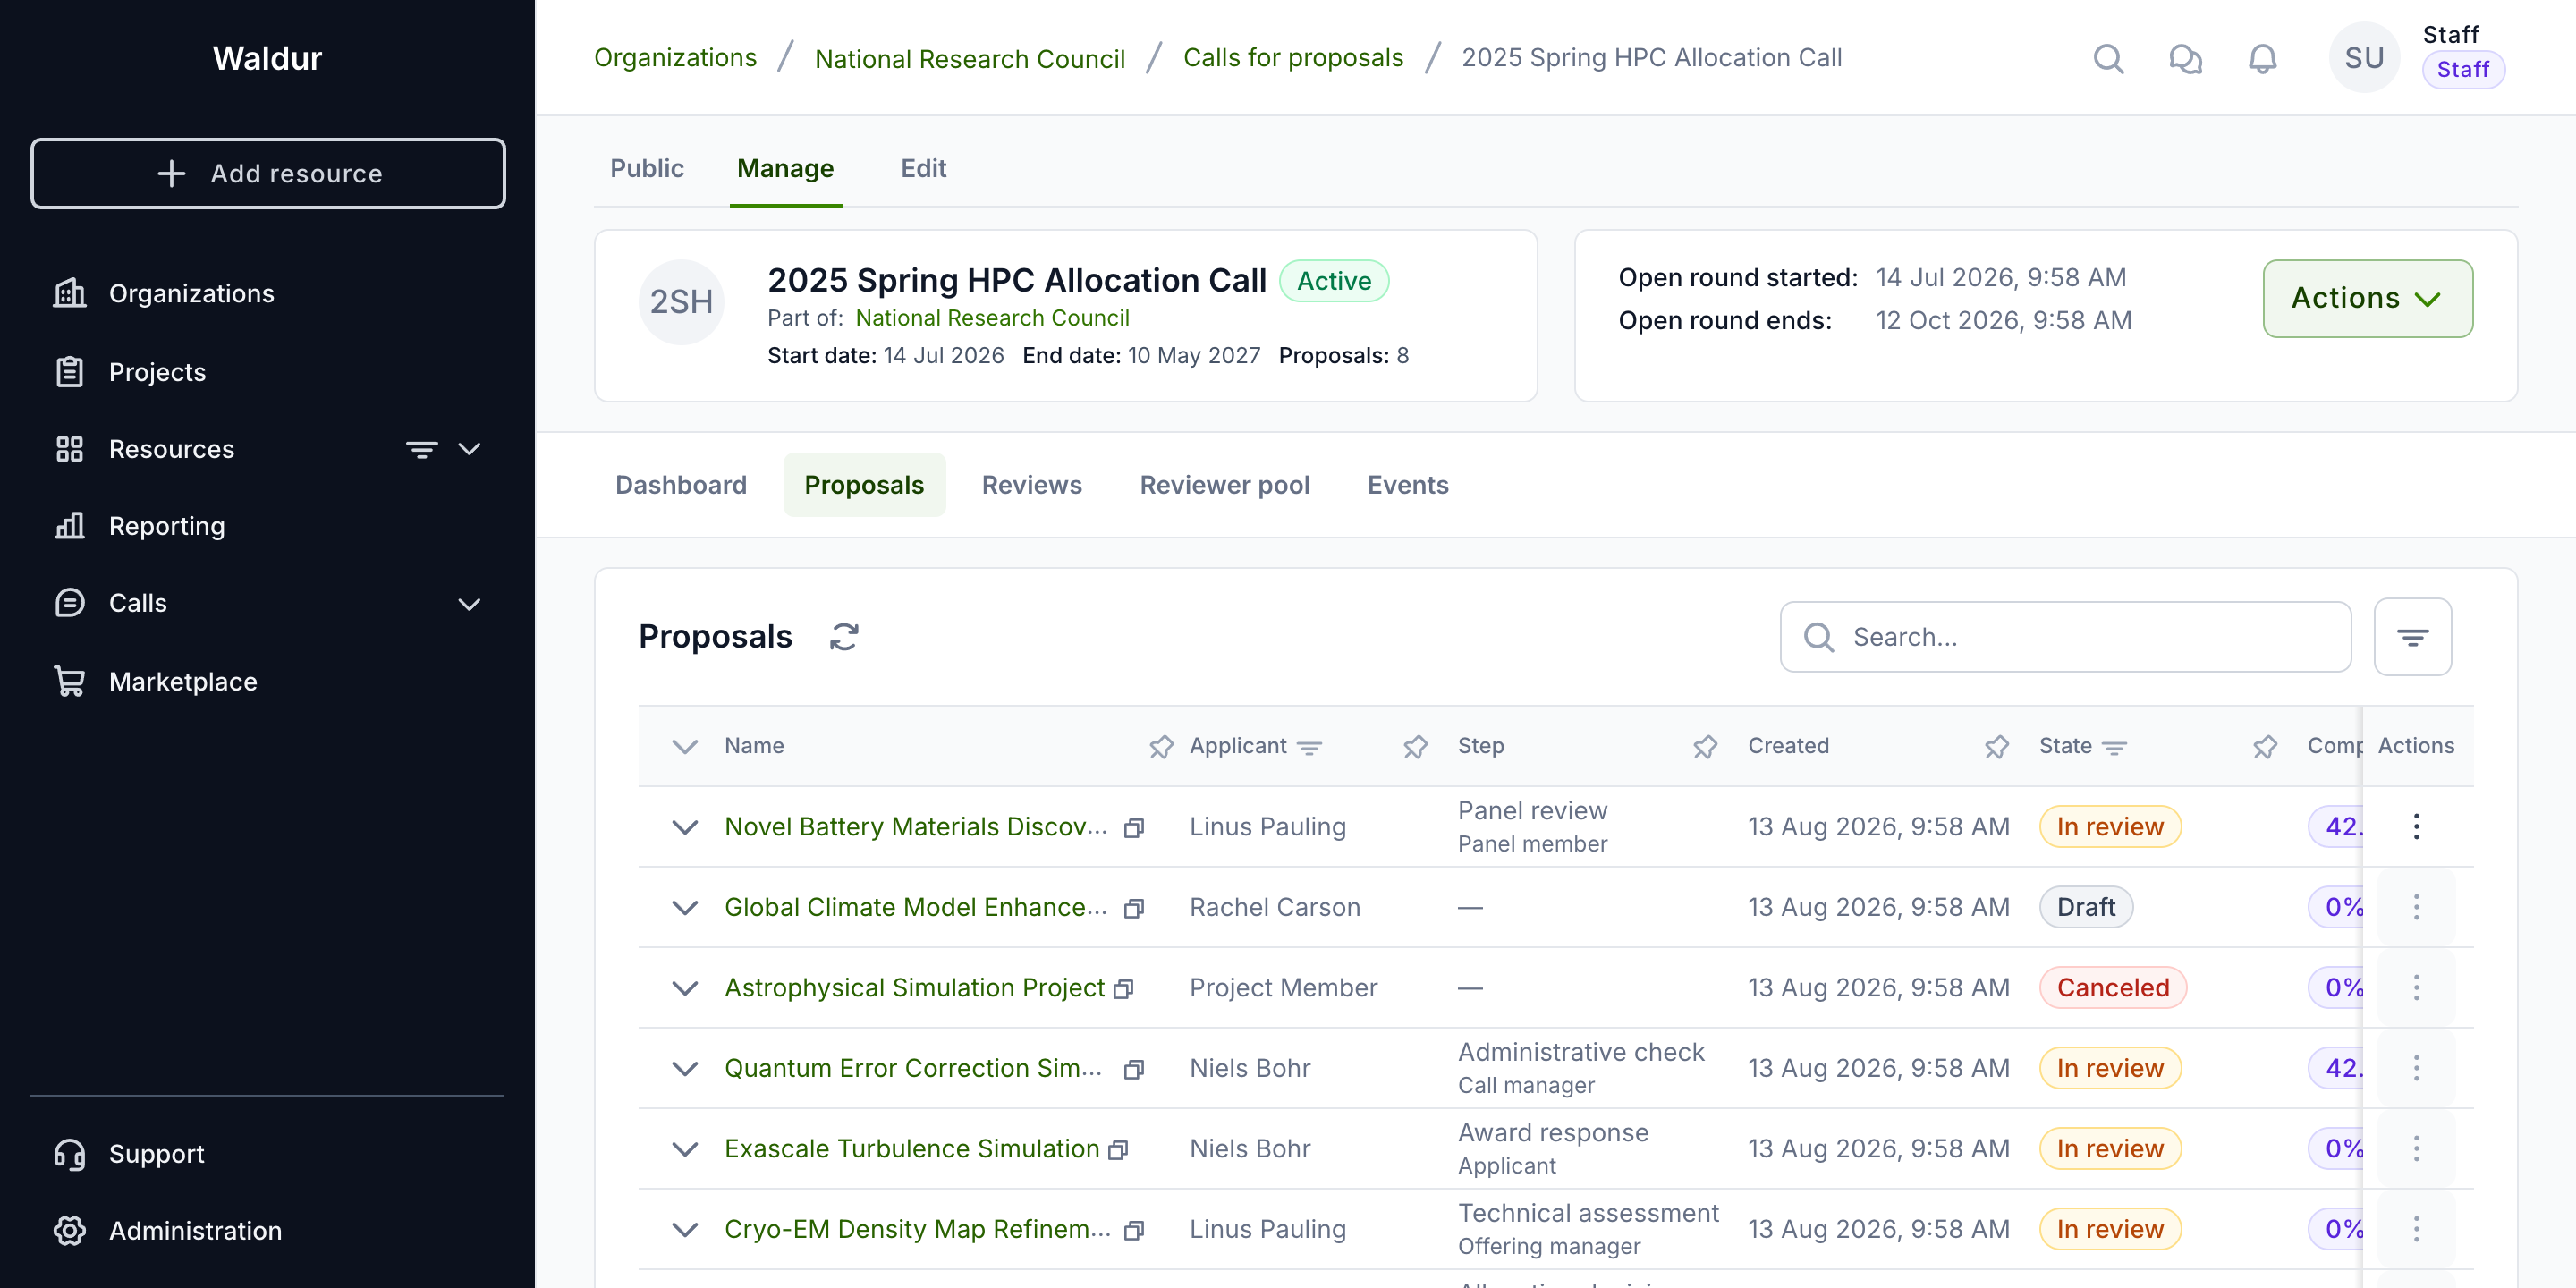
The Proposals tab (under either call management or the call's Manage view) lists every proposal for the call with its applicant, current Step and the step's responsible role, creation date, state and compliance status. Click a proposal to open it. A decision held for the round's publication shows its tentative outcome in place of the state (see Held decisions).
Opening a proposal
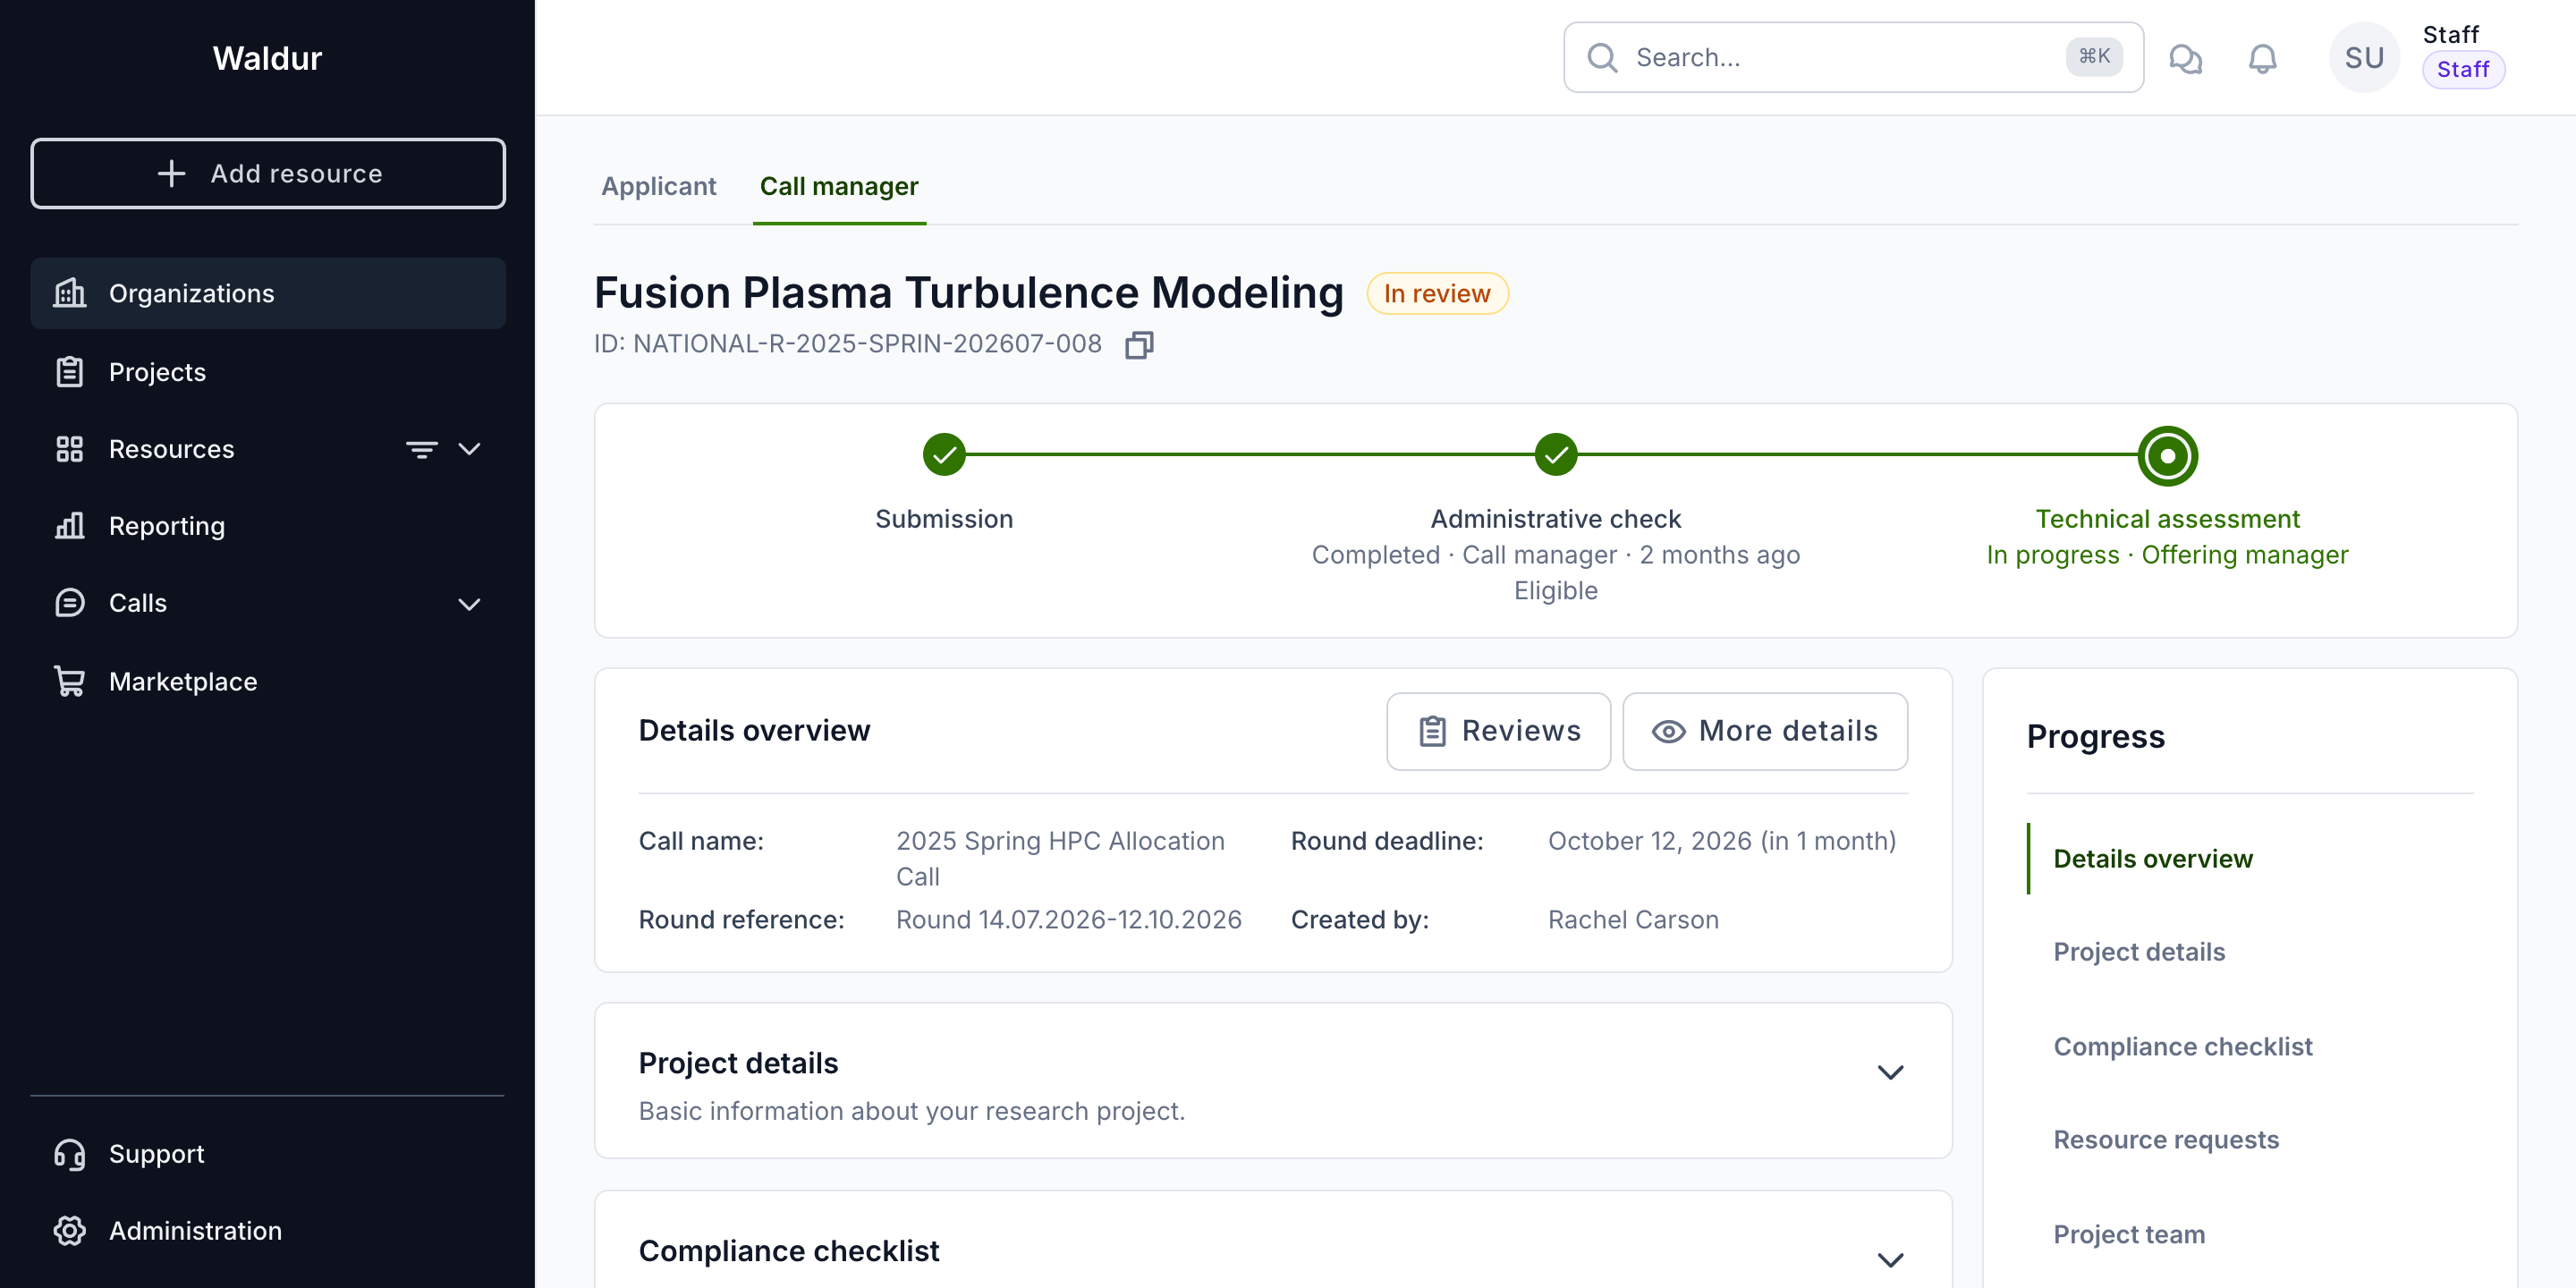
A proposal opens on the Call manager view. The workflow stepper at the top shows each step with its status and outcome; the Progress sidebar on the right offers the section tabs and the step action buttons — Create review, Complete step and Reject at step.
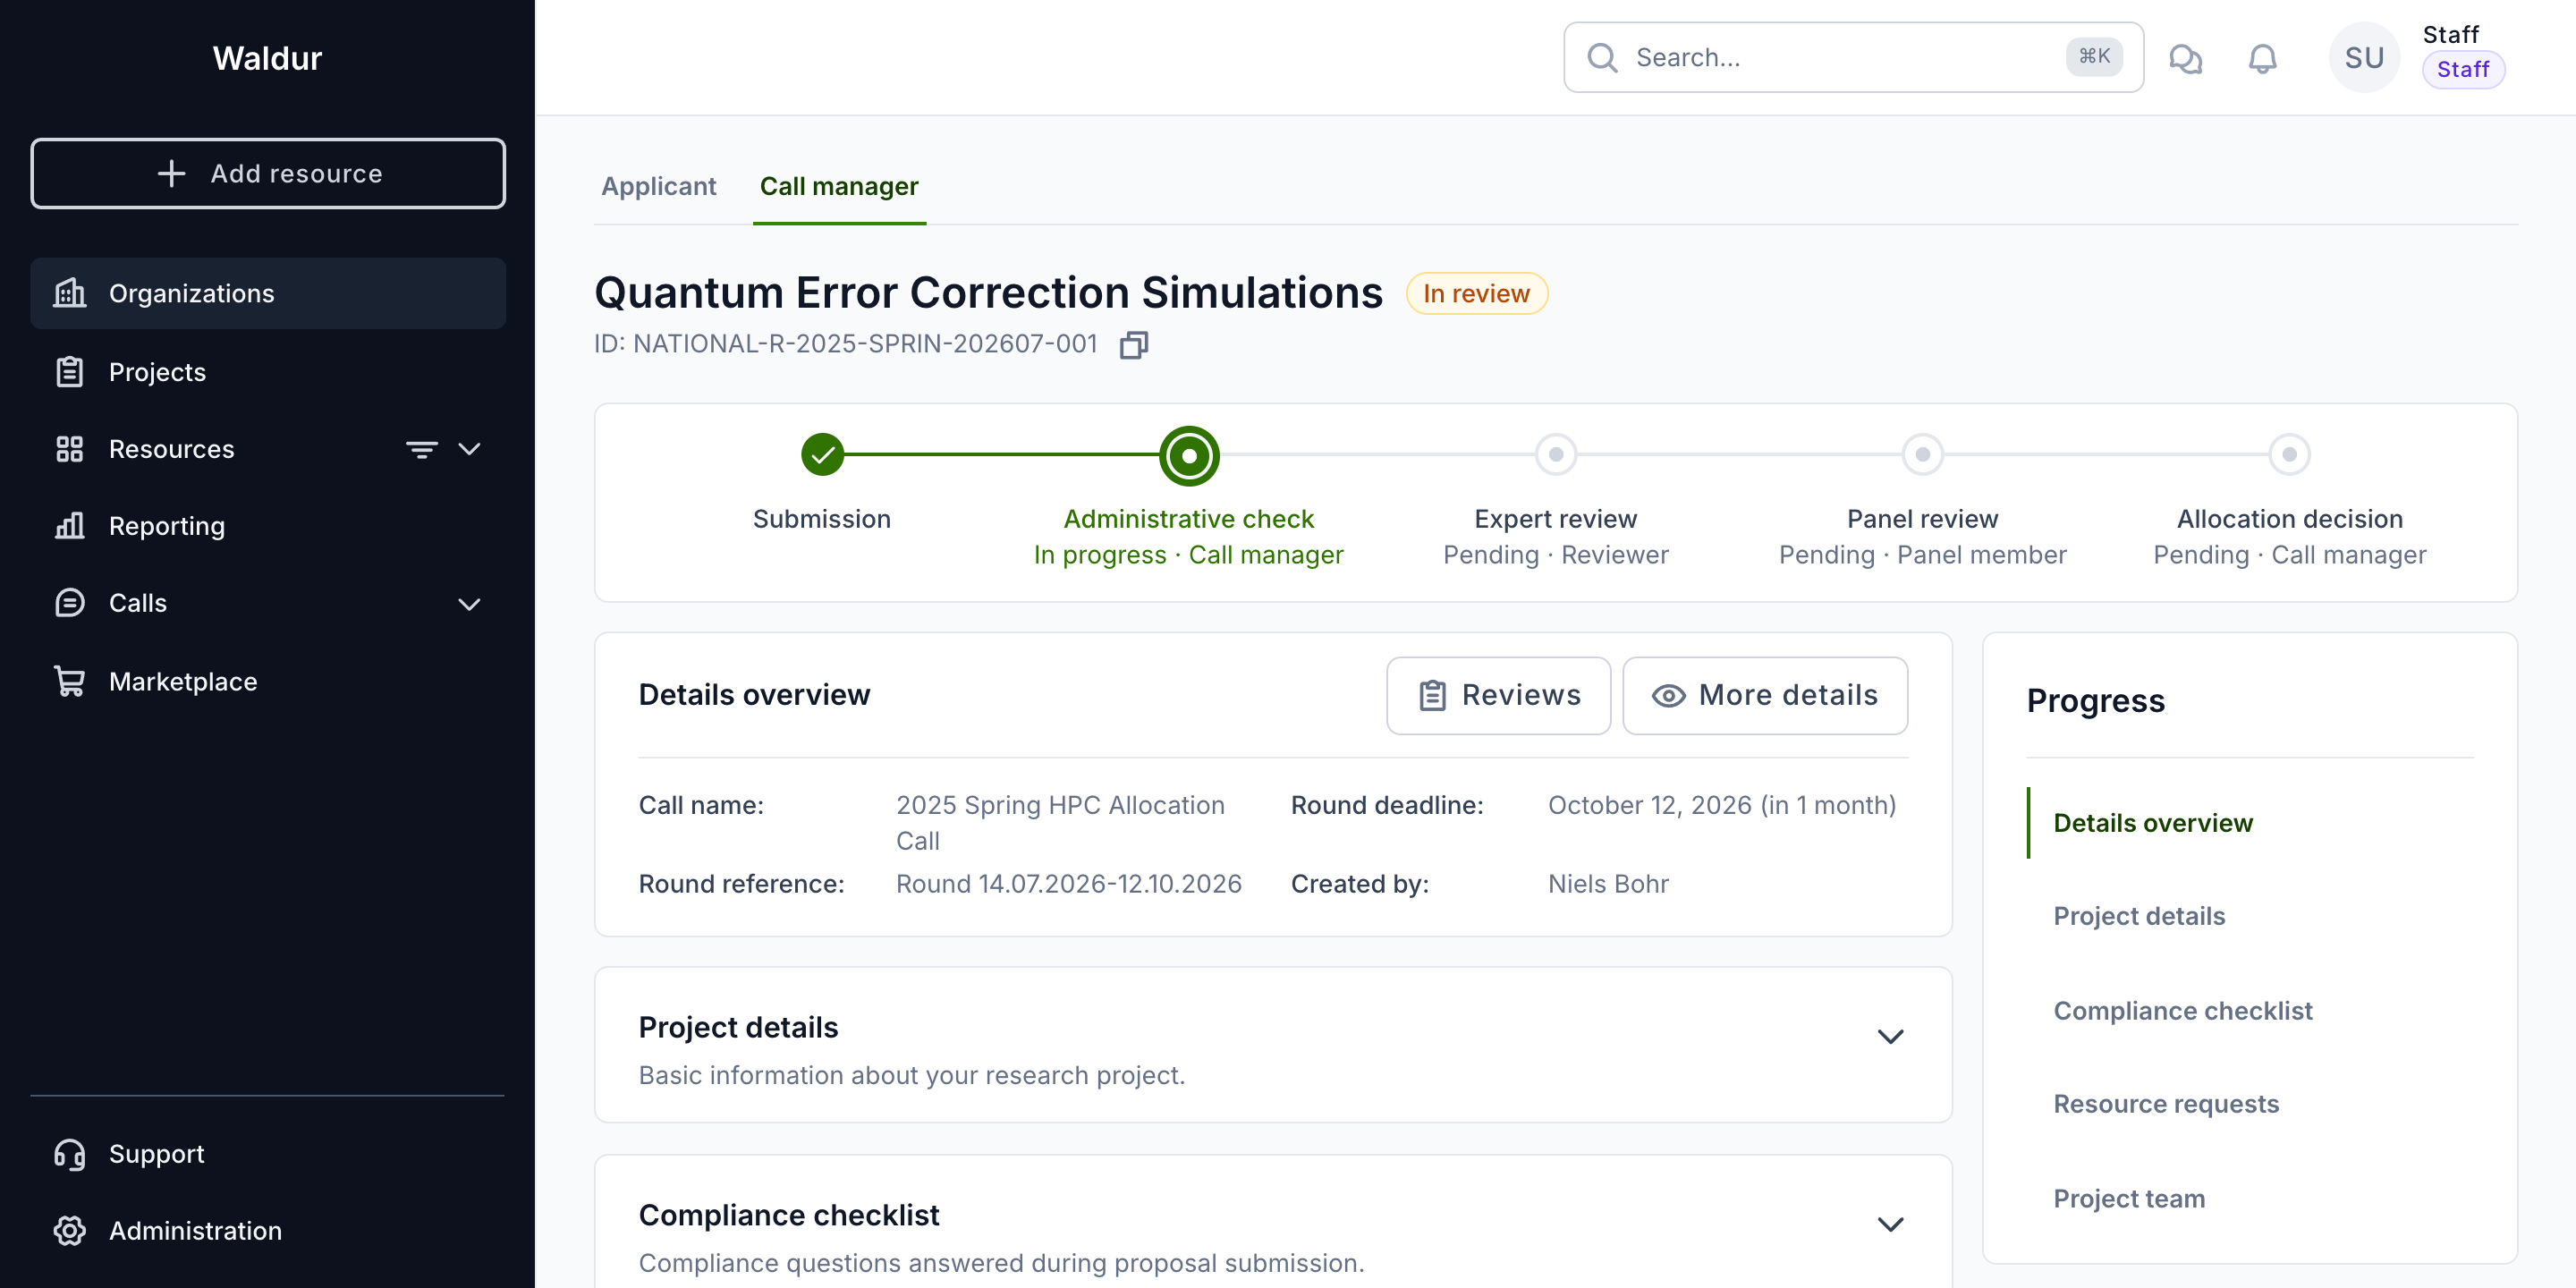
The stepper makes the proposal's position obvious at a glance: completed steps carry their outcome (for example Eligible, Accepted, Approved), the active step is marked In progress, and downstream steps are Pending.
Answering a step checklist
When the active step has a checklist and you are its responsible role, the checklist appears as a section on the proposal. Answer the questions and click Submit answers. Once every required question is answered, the section shows an OK completion badge.
Reading technical assessments
When technical reviewers (offering managers) have submitted their feasibility decisions, the Technical assessment decisions section presents them as a threaded, read-only view — one entry per reviewer, each with a colour-coded decision badge and comment.
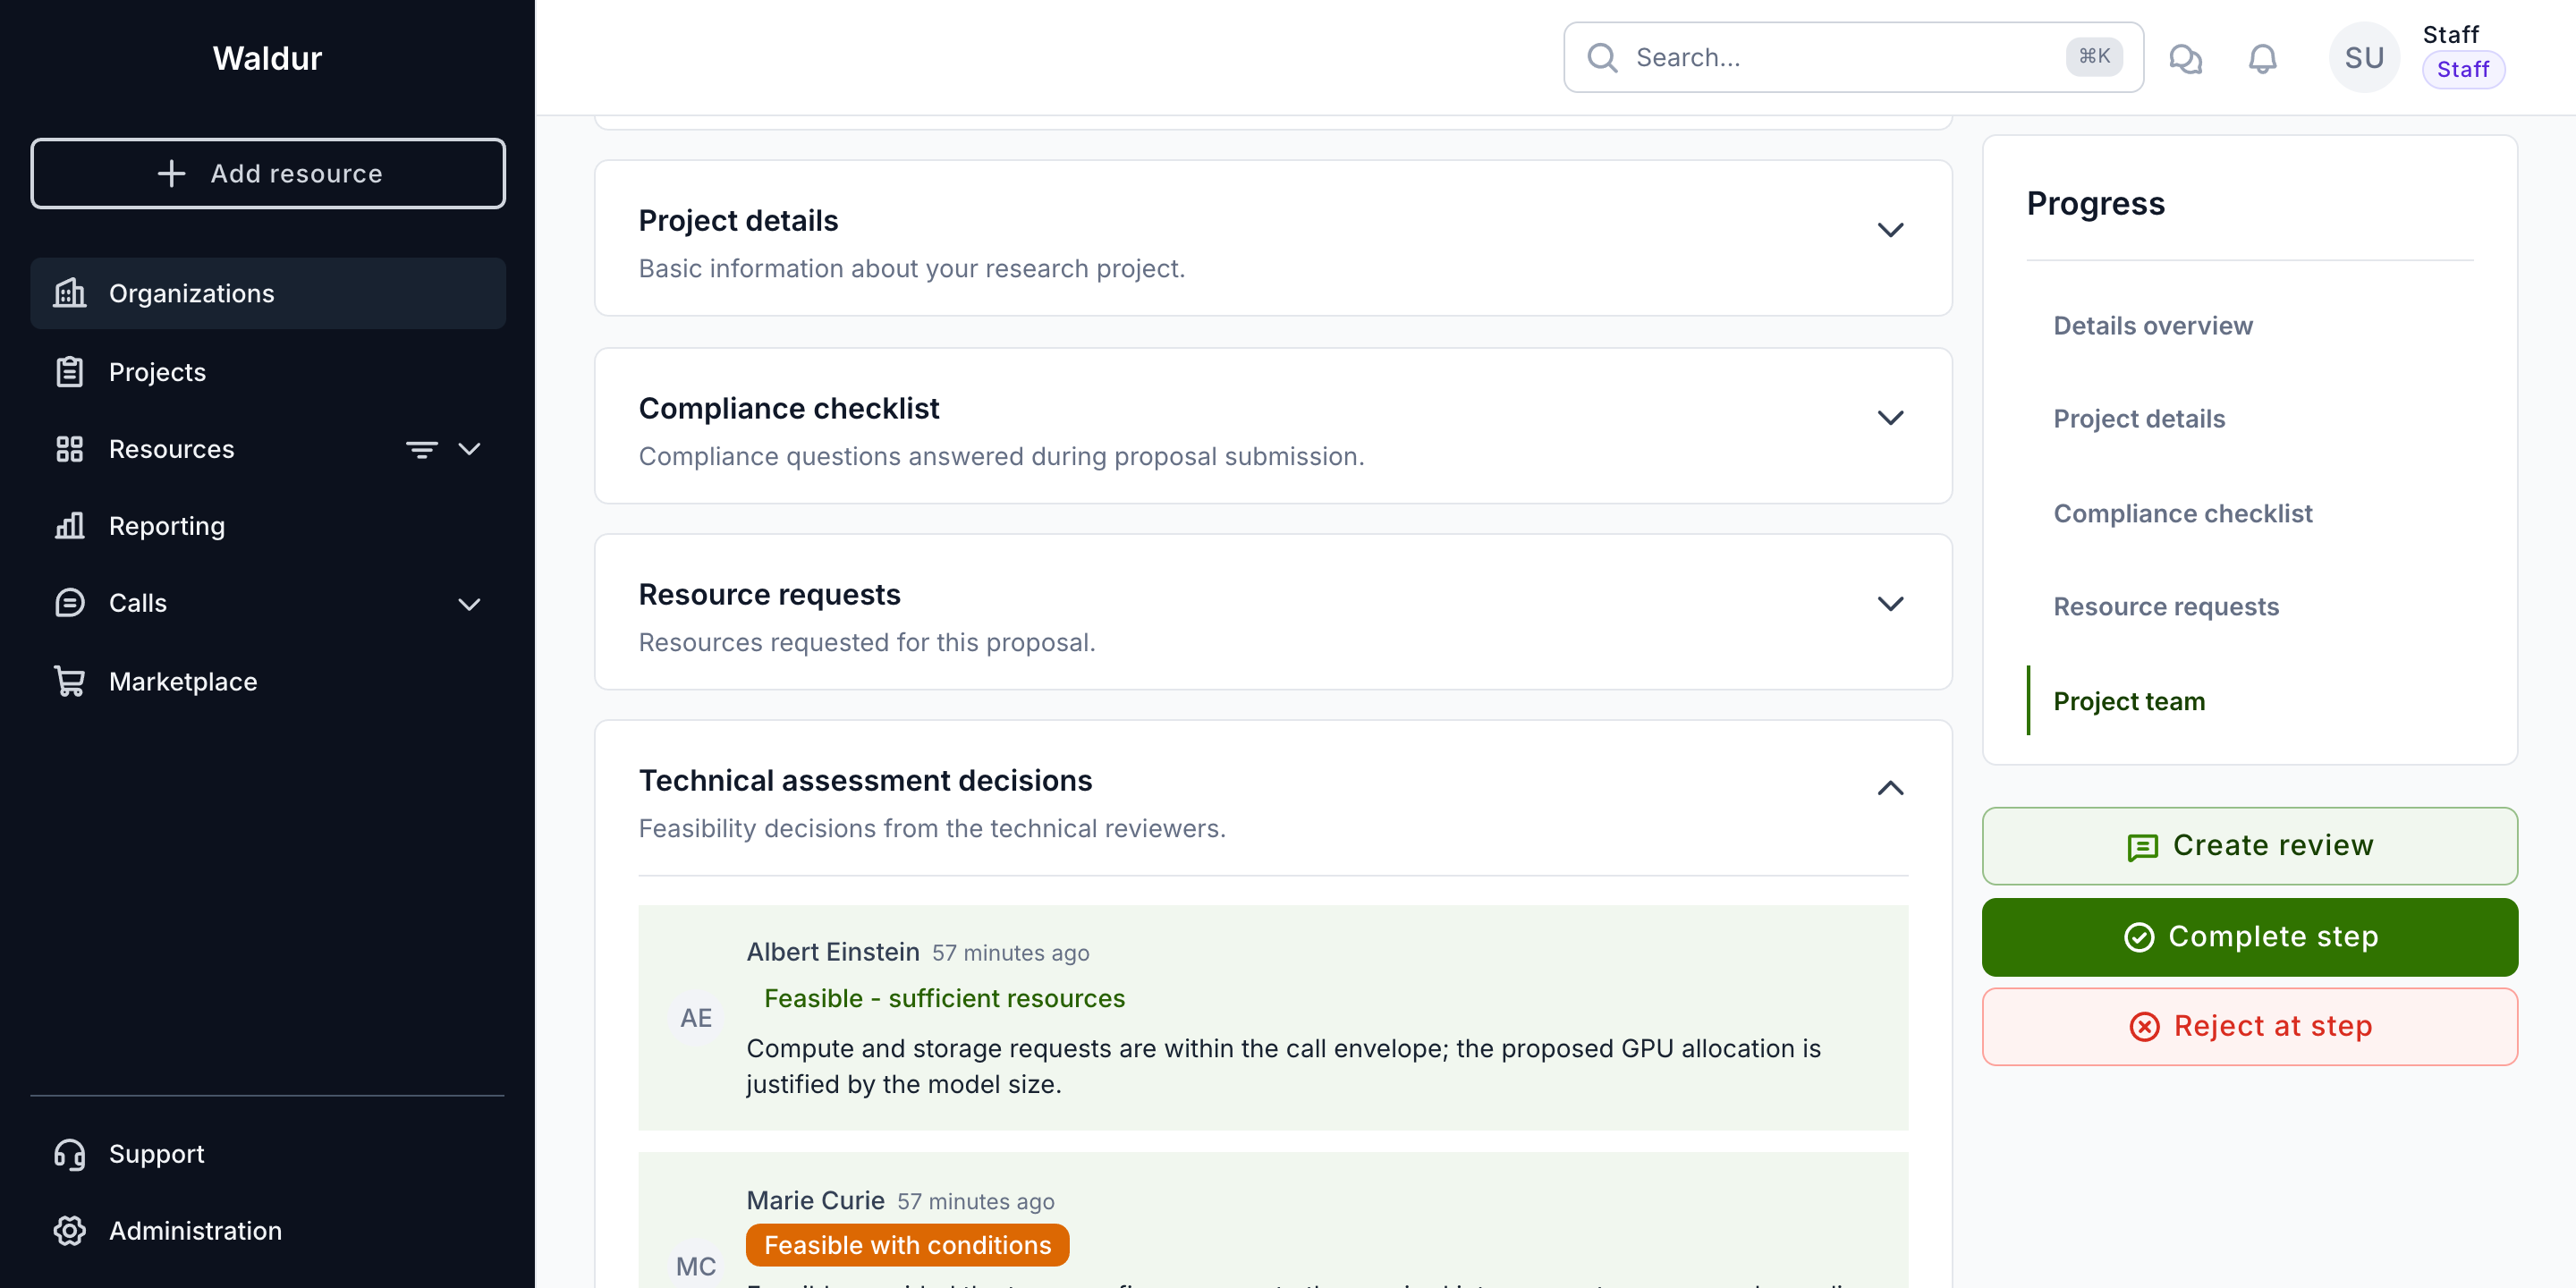
The decision values are whatever the step's checklist defines, so they differ between calls.
Tip
Badge colours are derived from the wording of the decision option, not from a fixed list: an option containing "condition" renders amber, "accept" green and "reject" red, and anything else falls back to a neutral style. Word your decision options with those terms if you want feasibility consensus to be readable at a glance.
Completing or rejecting a step
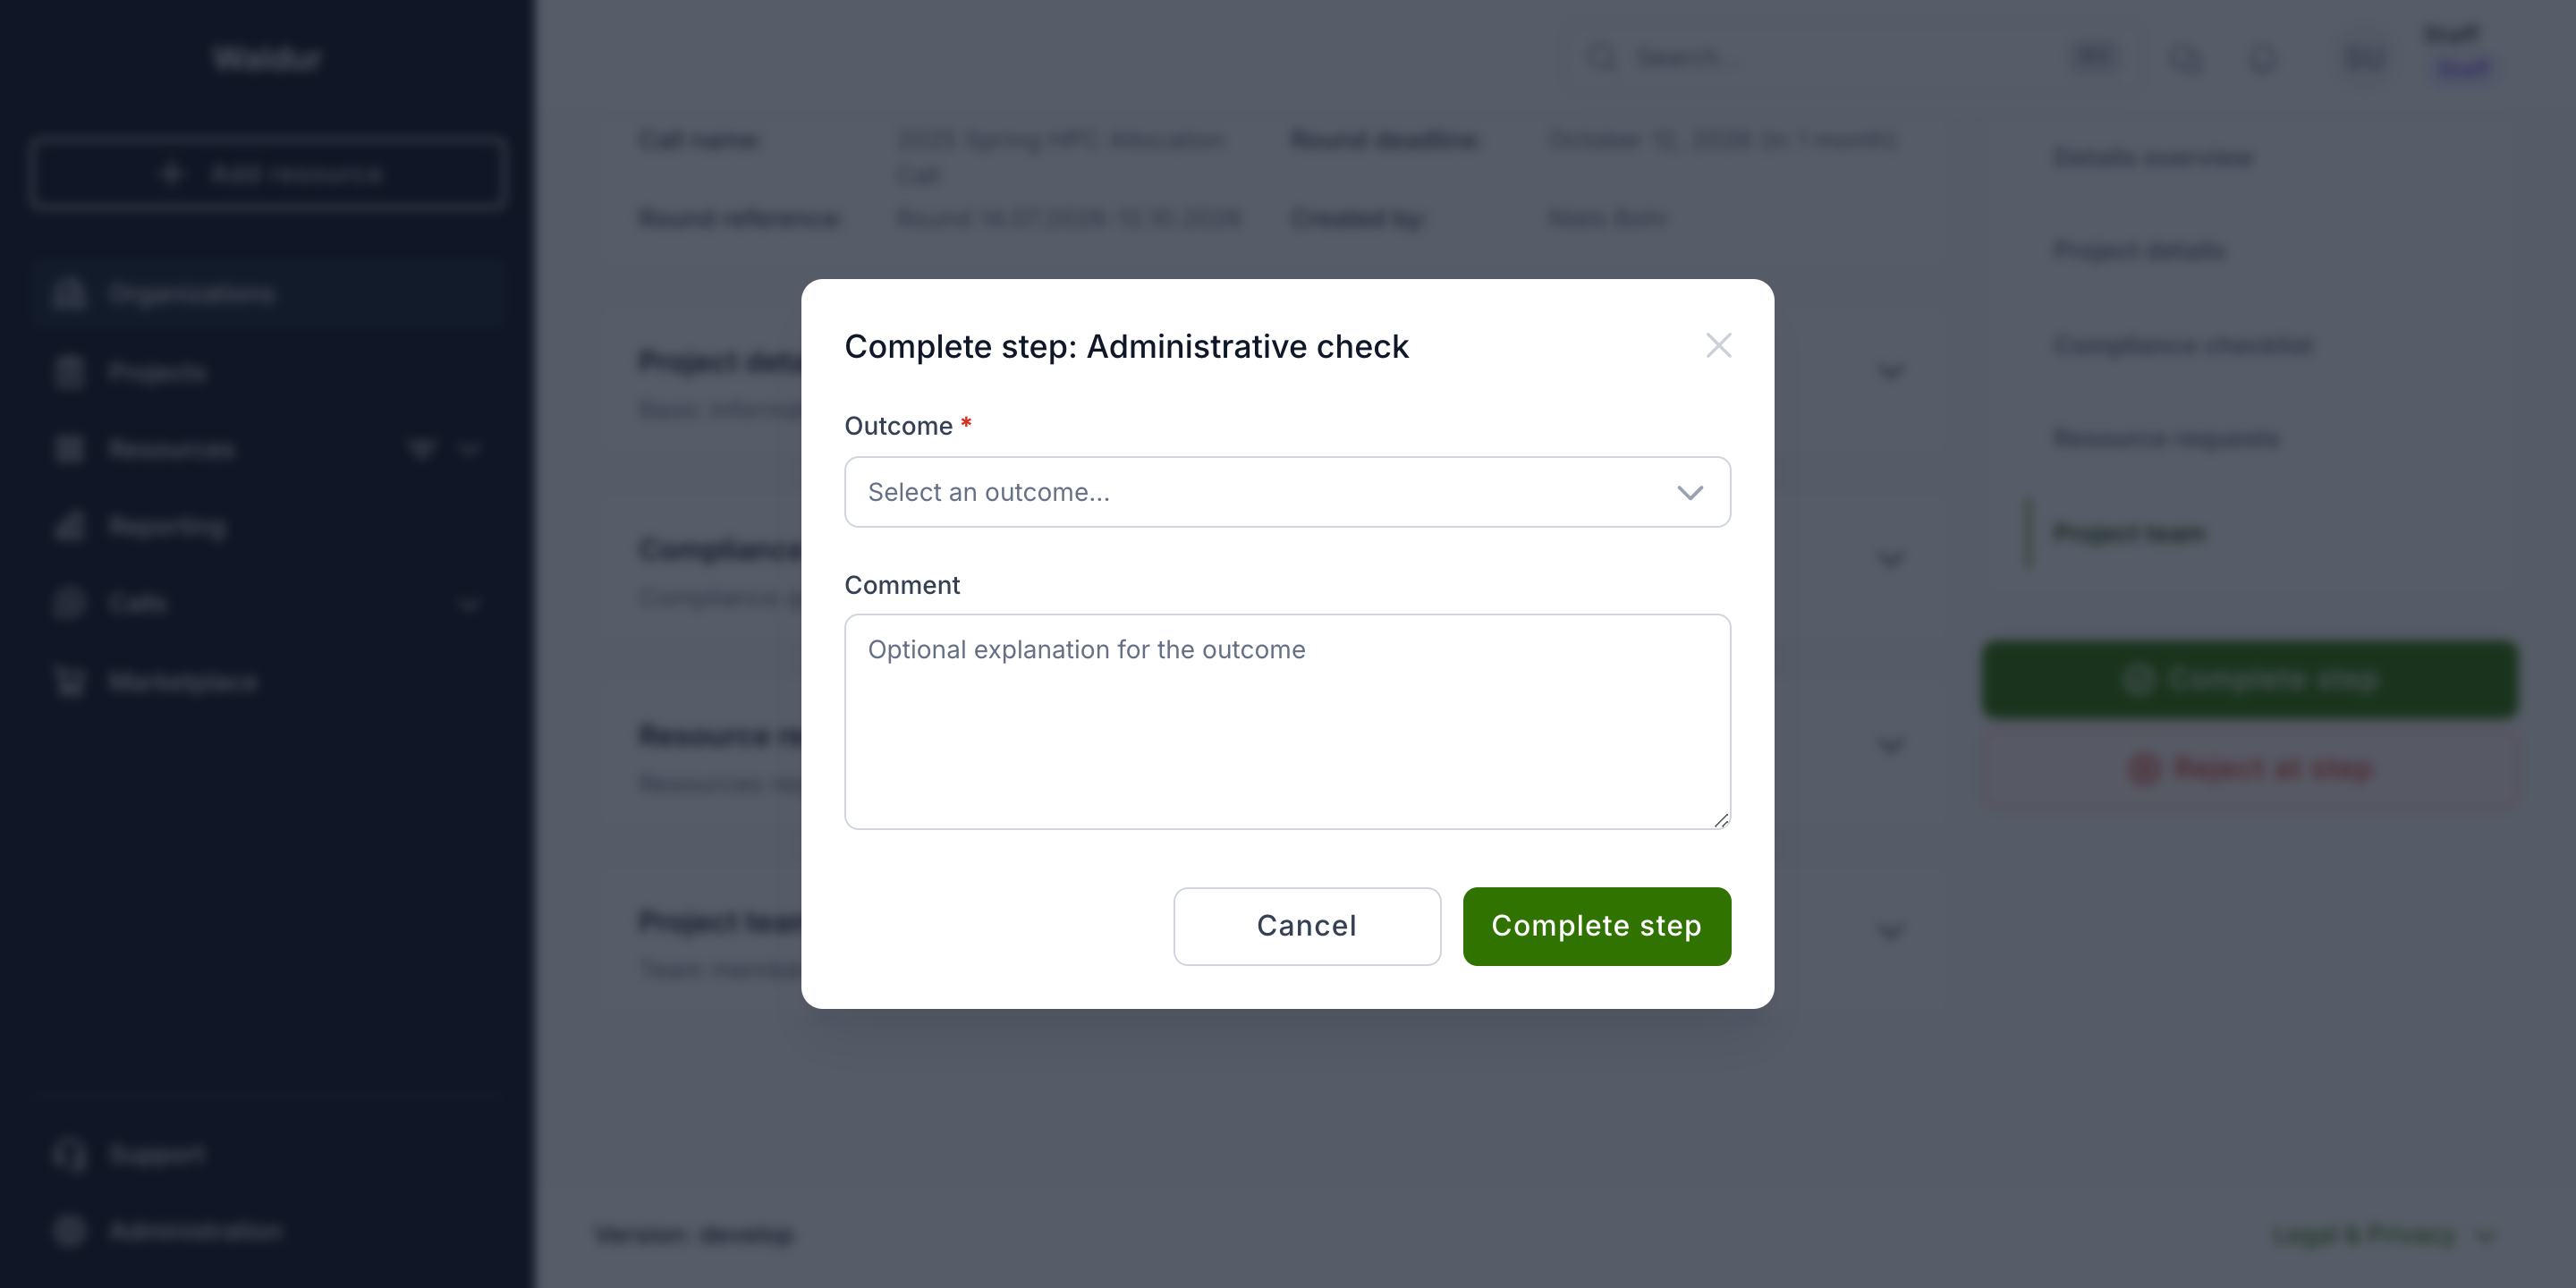
Click Complete step to record the step's outcome. Choose an outcome from the step's allow-list (for the administrative check, Eligible or Ineligible) and add an optional comment.
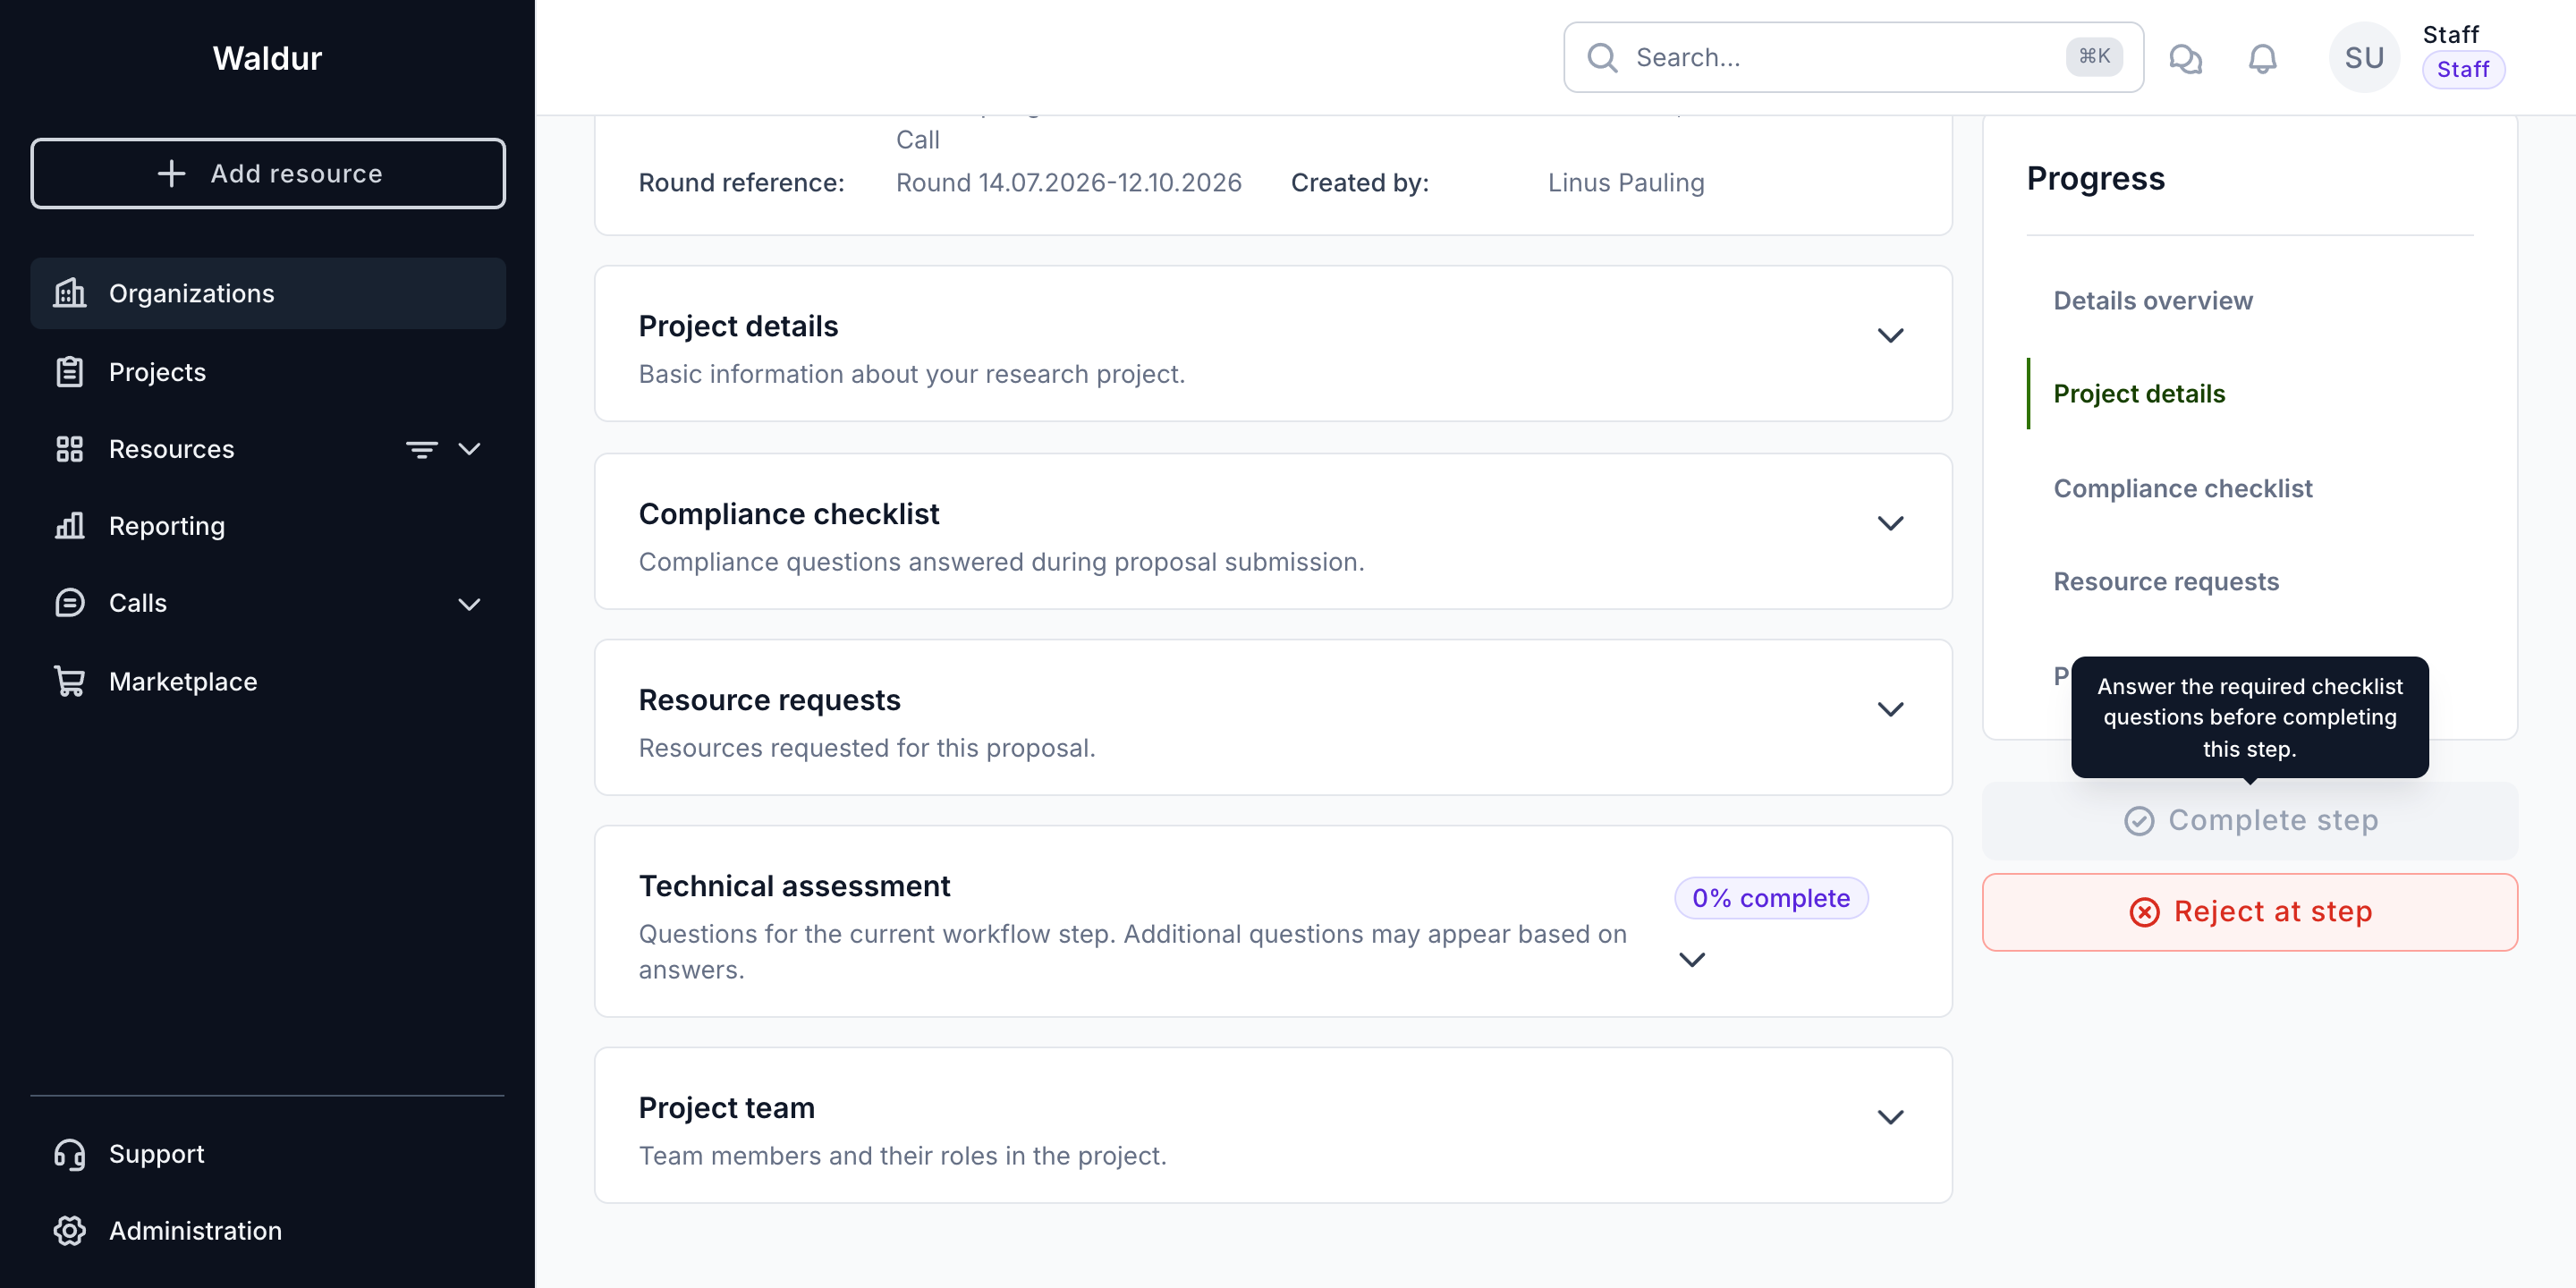
If the step's checklist is required and any required question is still unanswered, Complete step is disabled and explains why on hover — Answer the required checklist questions before completing this step. Answer the checklist first, then complete the step.
Warning
The required-checklist gate is enforced by the backend, not just the UI: a step with a required checklist cannot be completed — via any client — until all required questions are answered. Advisory checklists never block.
The same applies to the Minimum reviewers and Minimum score threshold gates, which are evaluated against the proposal's submitted reviews.
One exception cuts across all three: a Declined outcome is never blocked, so a weak proposal can always be turned down regardless of how much of the evaluation was completed.
To send a proposal back or knock it out at the current step, use Reject at step instead and record the reason.
The allocation decision
Allocation decision is owned by the call manager and is the one mandatory step in every workflow. Completing it with an Approved outcome advances the proposal to the next enabled step.
Provisioning happens when the last enabled step completes, not at the allocation decision as such:
- If Award response is disabled, the allocation decision is the last step, so approving it immediately marks the proposal Accepted, creates a project under the applicant's organisation, provisions the requested resources and grants the team access.
- If Award response is enabled, the proposal moves to that step instead and waits for the applicant to accept before anything is provisioned. See Responding to an award.
An accepted proposal shows the full workflow completed, each step stamped with its outcome and completion time.
Awarded resources
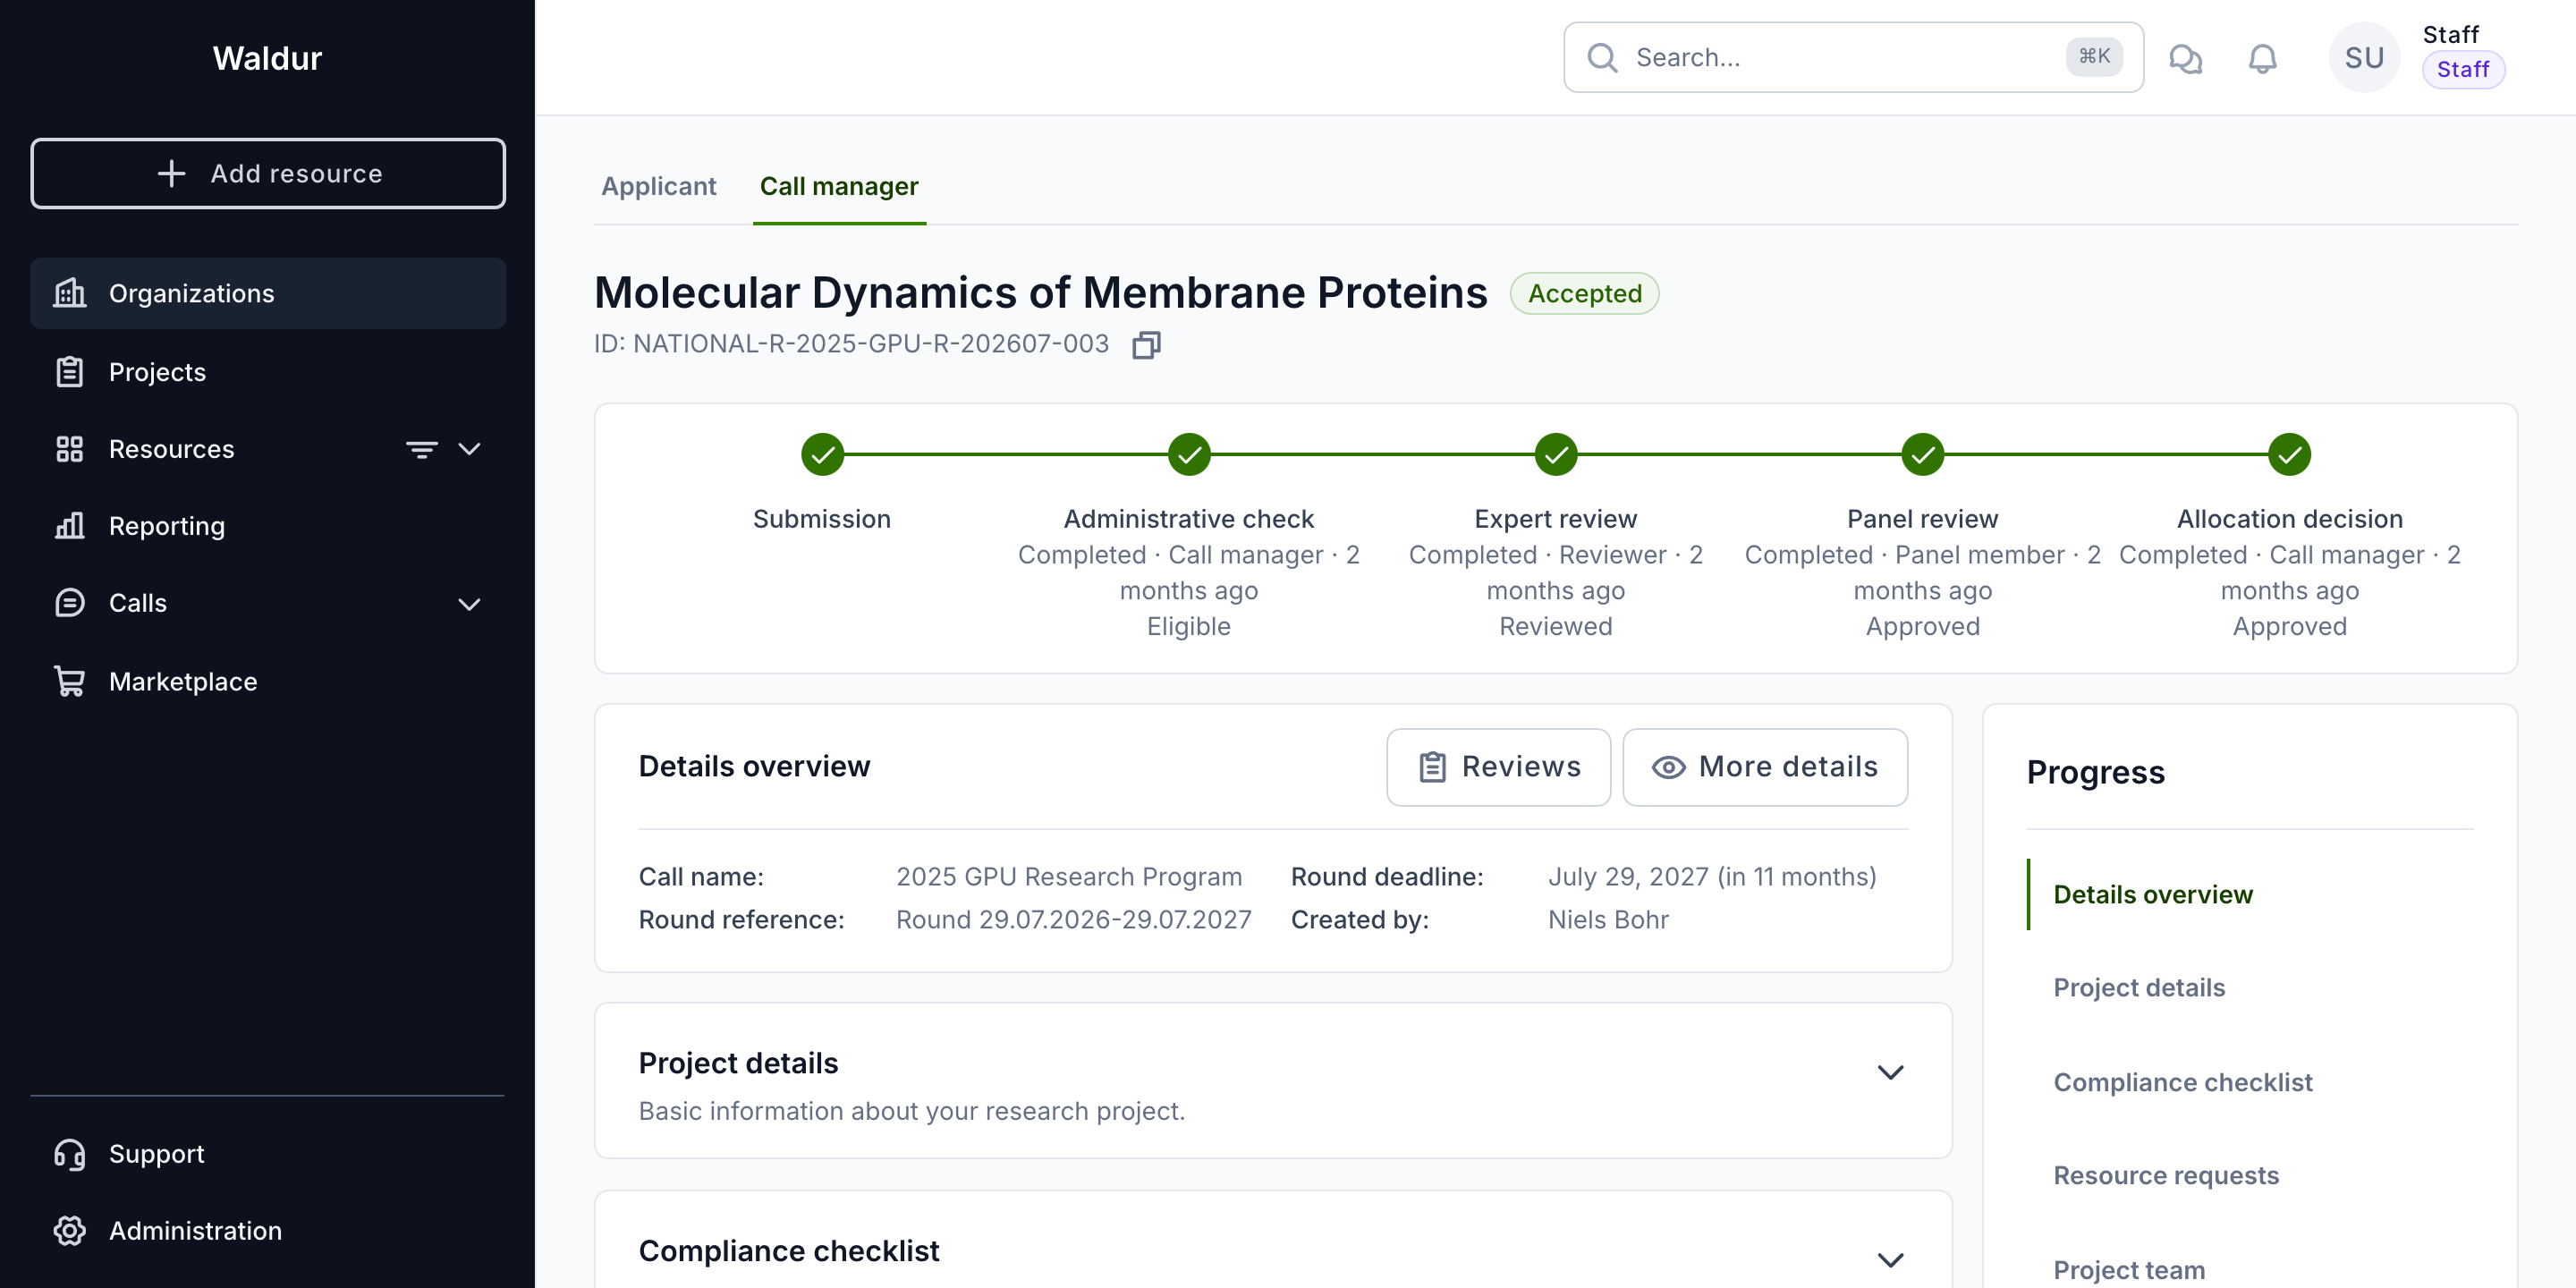
The allocation decision can grant something other than what was requested. When the Allocation decision step starts, the proposal gets an Awarded resources section — also listed in the page's section navigation — that starts as a copy of the resource requests. While the step is in progress, a call manager can:
- change the amounts of an item,
- move an item to another offering of the call that its provider has accepted, or pick another plan of that offering,
- add items and remove them.
Each row is marked As requested or Changed, and a changed amount shows the requested one beneath it. The Summary of the award in the side panel totals the estimated cost of what is awarded.
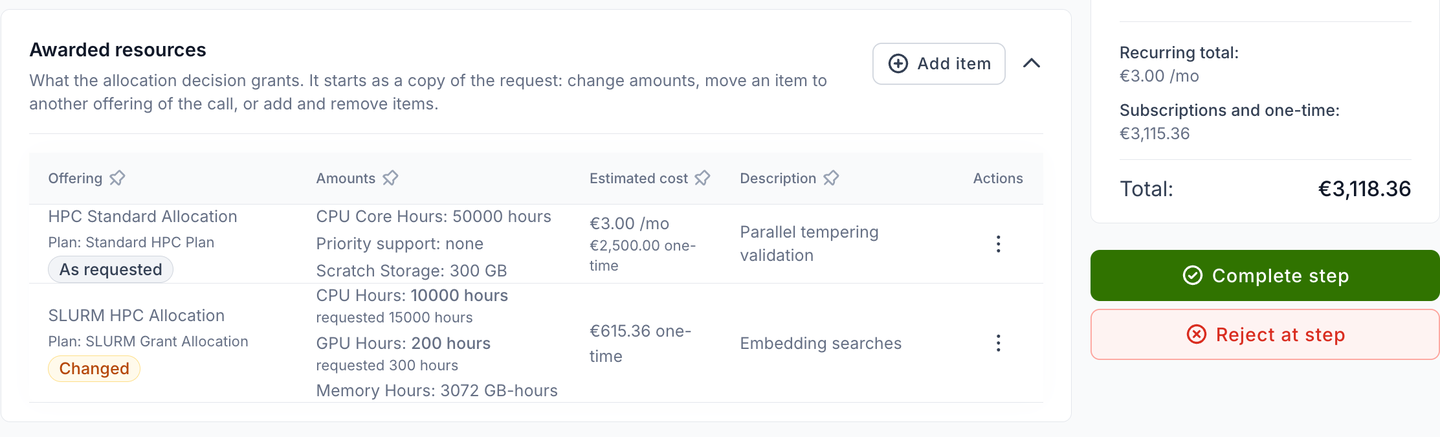
An item on an offering sold by amount must name an amount; approving the decision is refused while an awarded item has none. Declining is never blocked.
What is provisioned on acceptance is the award, not the request — the resource requests stay as the applicant submitted them. A purchase order attached to a request follows its item only while the item stays on the offering it was requested for.
The section is editable only while the allocation decision is in progress, and only by the call's managers and staff. Once the decision is completed, rejected or held for the round's publication, the rows lose their actions and the award is read-only.
Who sees the award:
- staff, support, the call's managers and the managing organisation's call organisers, and managers of the offerings requested or awarded — at any time;
- the applicant team — once the decision is released: when the proposal is accepted, when the applicant is asked to respond to the award, or when the call shows the allocation step to applicants; never while the decision is held for the round's publication;
- reviewers and panel members — never.
Held decisions
On a call whose applicants learn the decision Together for the whole round (see Publishing a round's results), completing or rejecting the Allocation decision step records the outcome but holds it. The proposal stays In review; the proposals list shows its tentative outcome — Awarded (tentative), Not awarded (tentative) or Decision lapsed (tentative) — and its step as Held until the round publishes results.
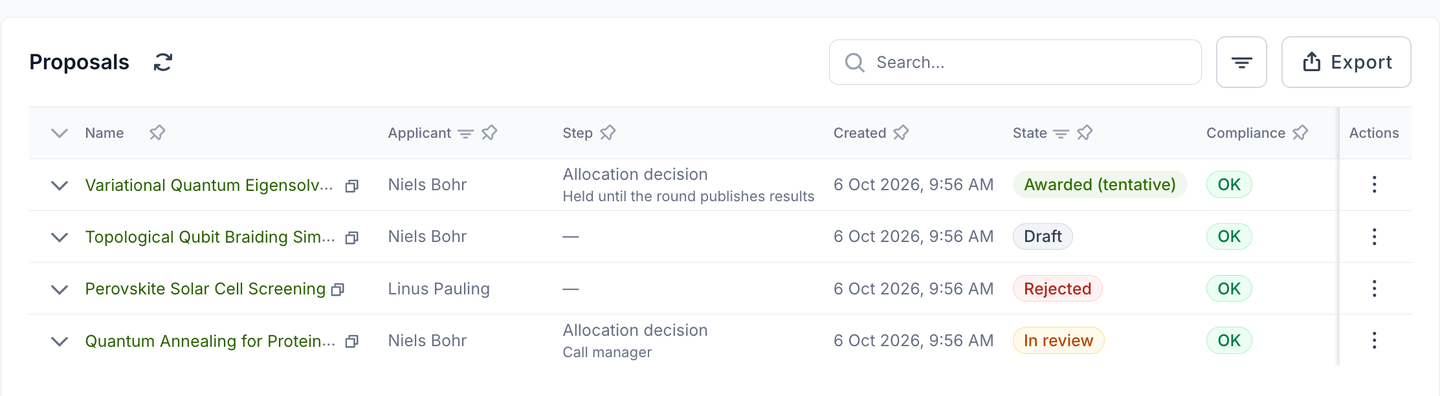
On the proposal's Call manager tab, the stepper shows the held outcome on the allocation decision, the awarded resources are read-only, and the Progress panel offers Reopen decision. The Applicant tab shows the proposal as the applicant sees it, with the decision still the current step.
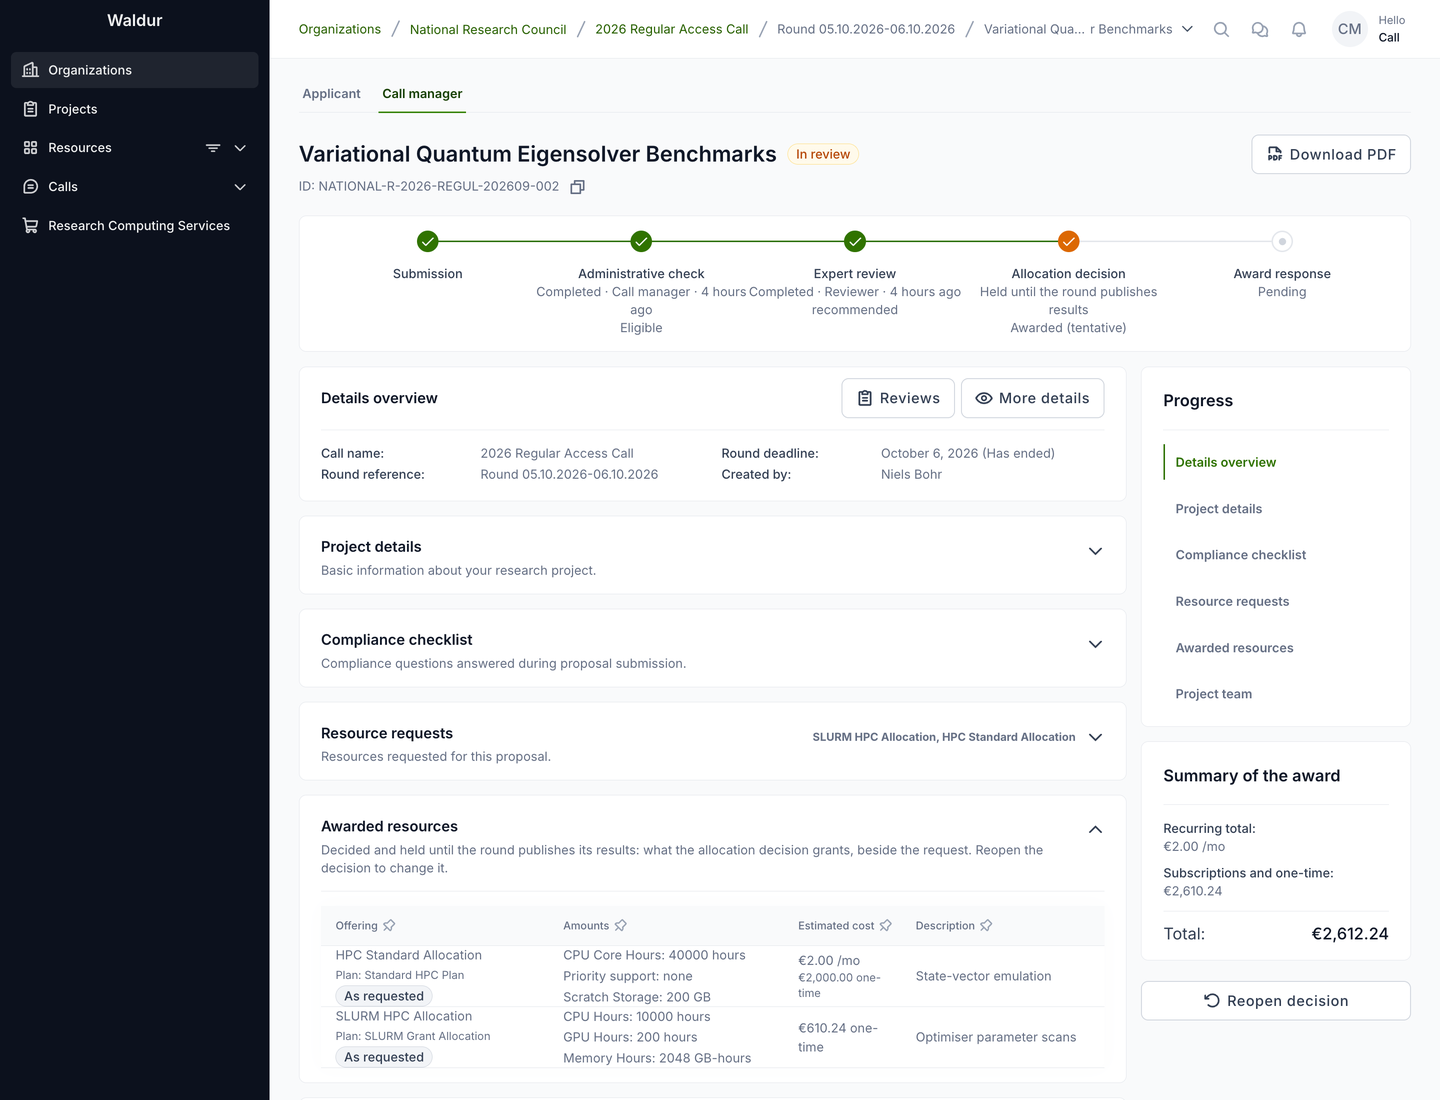
Reopen decision takes a held decision back, for example when the board changed the outcome while adopting the list. The allocation decision becomes active again with its outcome cleared, and the proposal counts as undecided when the round's results are published. A Reason is required; a New deadline is optional — without one, a deadline that has passed is cleared and one still ahead is kept.
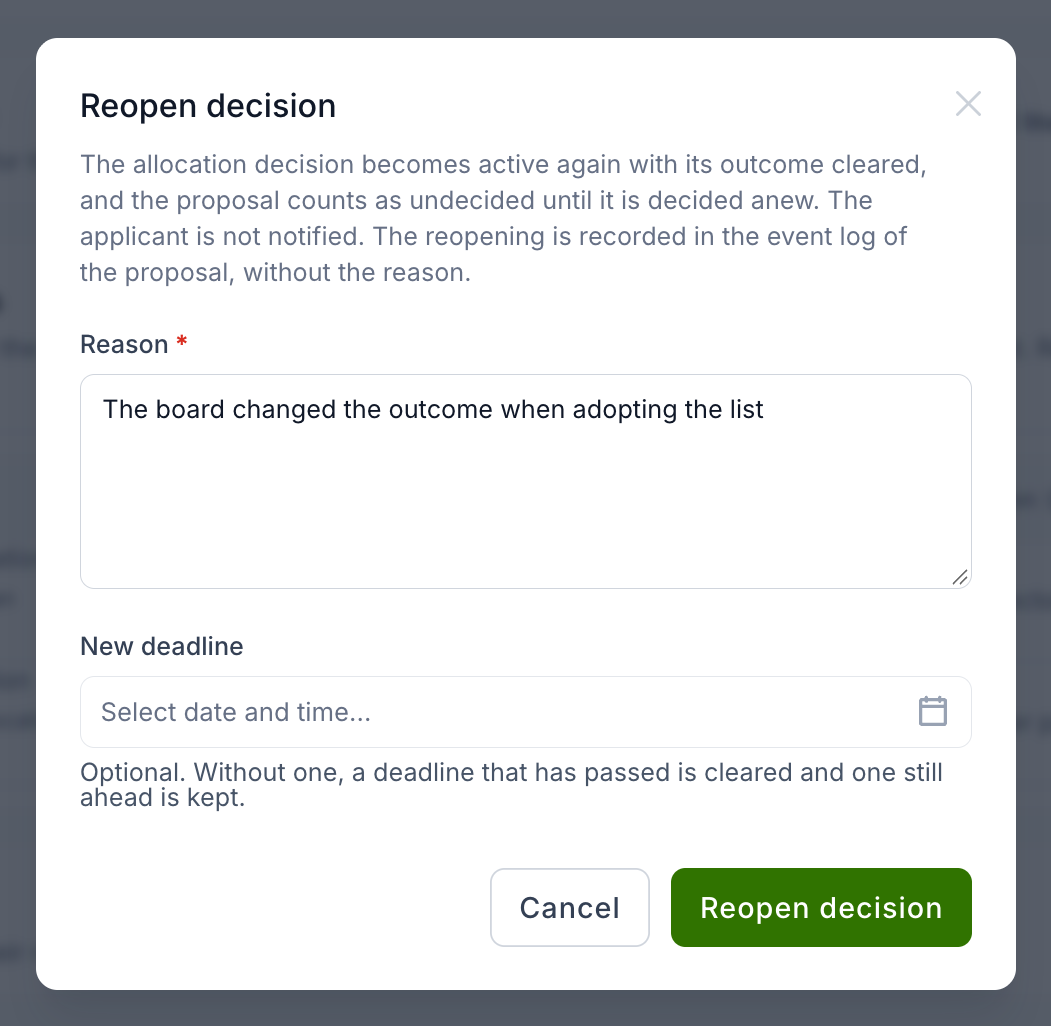
Reopening is possible only before the round's results are published, and only for staff and users who can update the call — not support, and not the applicant even if they also manage the call. Nothing is sent to the applicant. The proposal's event feed records that the decision was reopened and by whom, without the outcome or the reason; the reason goes to the server log only. Until the round's results are published that event is hidden from everyone who may not see held decisions, the applicant team included.
Related guides
- Call management — full call lifecycle and rounds
- Checklists and forms — question types and form building
- Reviewer management — pool, matching and assignments
- COI management — conflict types, severities and handling
- Reviewer guide — the reviewer's perspective